At this time of year there are two major challenges in the kitchen garden; how to use up the remaining winter vegetables in order to clear the beds for the sowing of new crops, and how to bridge the hungry gap, as we reach the end of our stores. Most of the remaining vegetables have been sitting in the ground or in storage for the best part of five months and as the days start to lengthen and warm, we crave the flavours of spring.
The trick to bridging the gap is to combine these winter vegetables with fresher, spring ingredients; roast beetroot with fresh horseradish and watercress, or a plate of sautéed carrots with blood oranges and the last cobnuts.
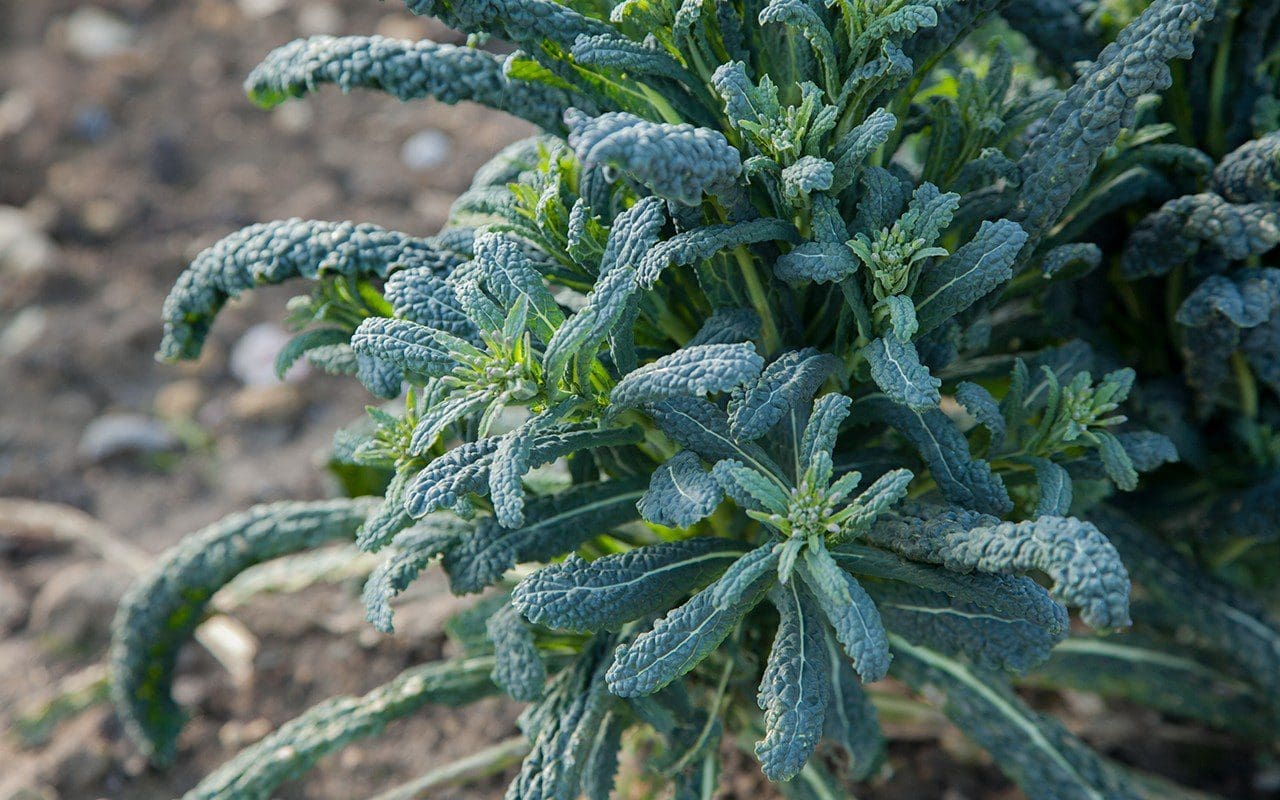
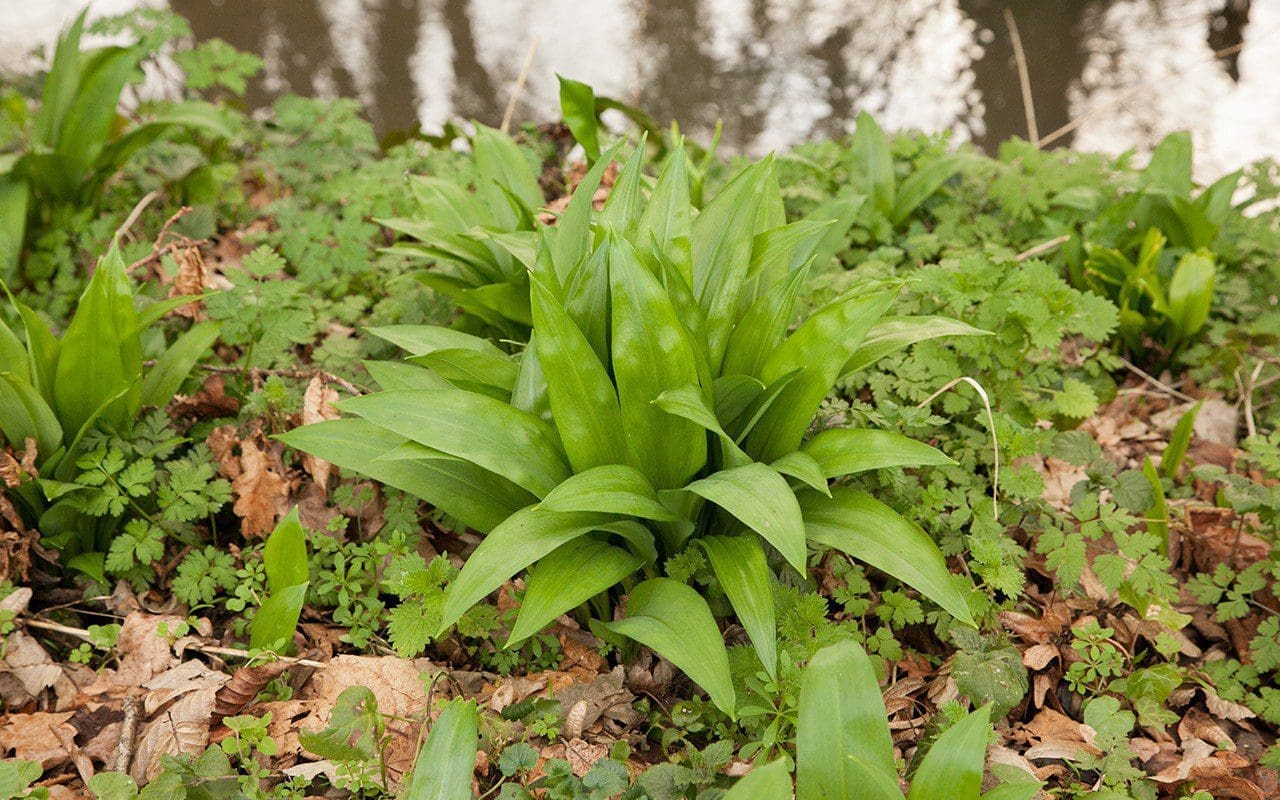
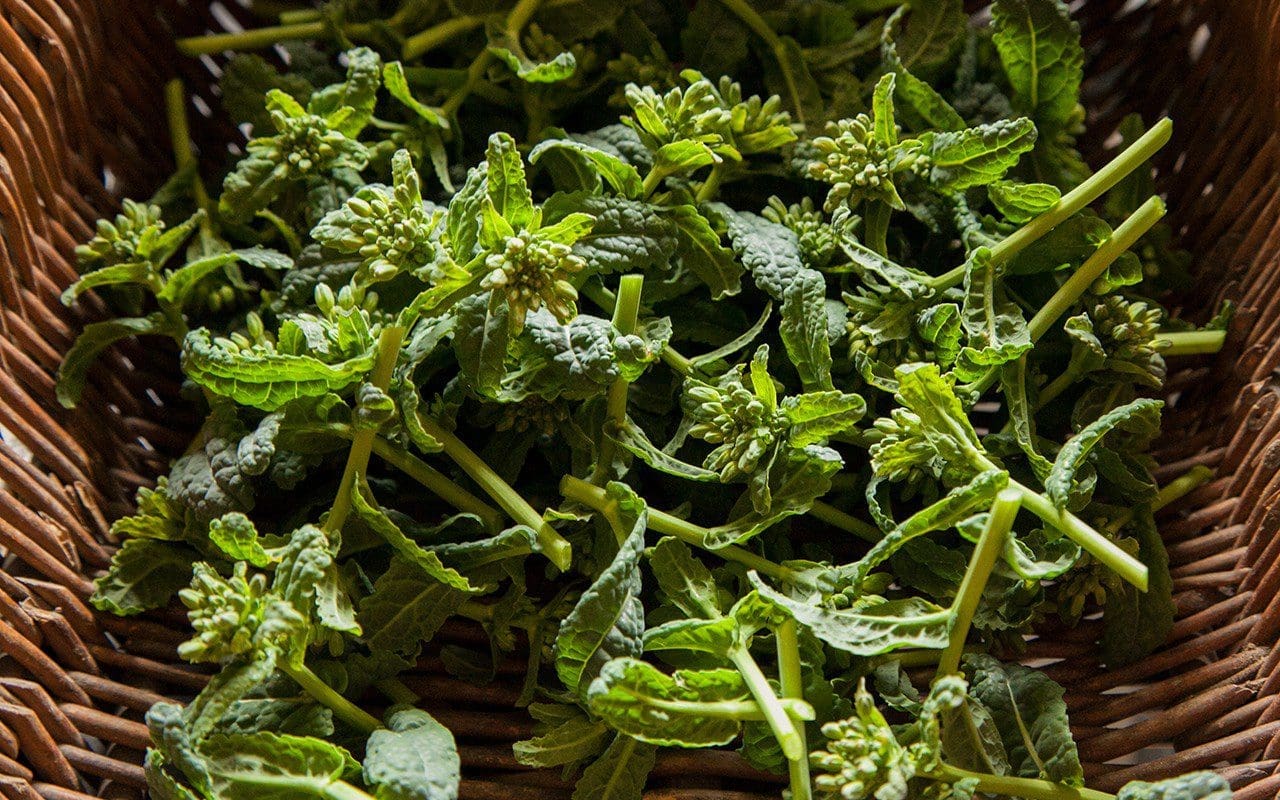
This recipe is an adaptation of one I usually make with purple sprouting broccoli. However, ours has been a disappointment this year as we sowed a couple of weeks too late and the plants failed to gain enough stature before the winter. The cavolo nero would also have done better with a fortnight more of summer. Although we’ve harvested a few good helpings of leaves we have learned not to uproot it too early, since we have found it has a second season and has been shooting furiously for the past few weeks as it readies itself to flower. The young cavolo shoots are best before all the energy goes into the flower so pick when you see the first buds to retain the velvety texture of the young growth. At the end of winter it has has a mineral richness, which is a good partner to the wild garlic that is now showing itself down by the stream.
Gnocchi are quick and easy to make yourself and a great way to use up the last of the potatoes. It is best to use a floury variety or the gnocchi will be gluey, but I made do with ‘Roseval’, the last of our stored potatoes, which is somewhat waxy. As long as you rice the potatoes while piping hot they still lose a lot of their moisture.
Served with a sharply dressed salad of bitter leaves this makes a perfect spring lunch.
INGREDIENTS
GNOCCHI
500g potatoes, preferably a floury variety like Desirée
1 large or 2 small organic egg yolks
75g Tipo 00 pasta flour
50g semolina
35g (a small handful) wild garlic leaves, finely chopped
Salt
TO SERVE
250g ricotta
100g cavolo nero shoots or purple sprouting broccoli
Olive oil
Pecorino cheese, finely grated
Serves 4 or 6 as a starter
METHOD
To make the gnocchi cook the potatoes in their skins in a large pan of boiling water. Drain and peel them while still hot. Protect your hand with a tea towel or oven glove. Immediately put them through a potato ricer or mouli into a large mixing bowl. Add the egg yolk, flour, semolina, wild garlic and salt and fold through with a metal spoon until well combined. Using very light movements use your hands to quickly bring the dough together into a ball. Do not knead it or the gnocchi will be heavy.

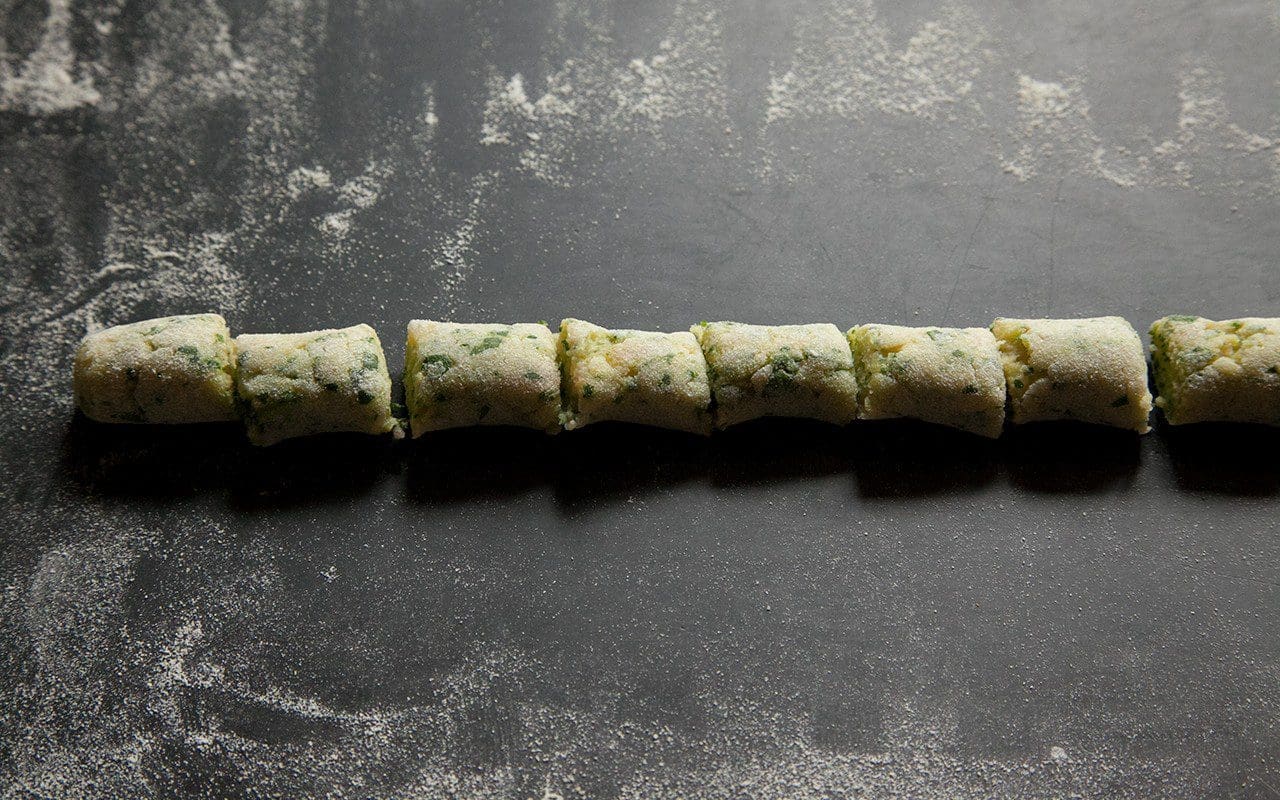
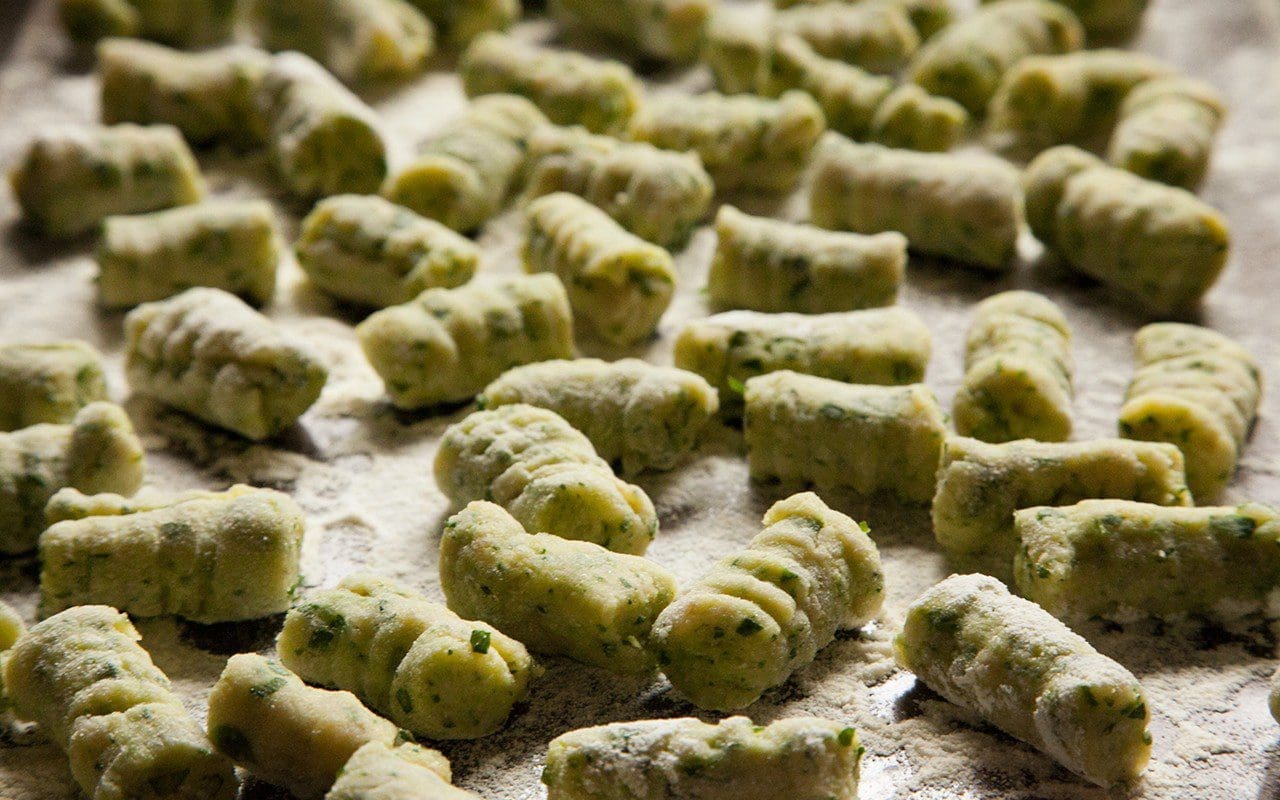
Divide the dough into four. On a floured worktop roll the first quarter into a sausage a little thicker than your index finger, then cut into 2cm pieces with a sharp knife. Take each piece and, pushing away from you, roll them on the back of a fork to create ridges which will hold some of the sauce. Place them on a floured tray. Repeat with all of the dough.
Bring two large pans of generously salted water to the boil. In the first one cook the gnocchi in batches. They are done when they float to the surface. Remove with a slotted spoon and drain them on a clean tea towel while you cook the rest.
As you cook the last batch of gnocchi put the cavolo nero shoots in the other pan of boiling water for two minutes. They should retain some bite. Drain, refresh in cold water and drain again. If using purple sprouting broccoli remove the small florets from the larger stems and cut any larger florets in half or quarters.
Put the gnocchi and cavolo nero shoots into a bowl. Add the ricotta in spoonfuls. Season with salt, ground pepper and a little olive oil. Stir gently to coat adding a little reserved cooking water to loosen if necessary.
Divide the gnocchi between hot plates. Drizzle with olive oil and finish with grated pecorino.
Recipe & Photography: Huw Morgan
At the height of summer, when all you want to be eating are salad, peas, broad beans and cucumbers, it is easy to resent the space taken up by the winter vegetables. But the time spent sowing, weeding, hoeing and watering them through the hot months is amply repaid come this time of year. We have been eating beetroot, parsnips, turnips, swedes, celeriac and carrots for several months now and, together with our stored potatoes and onions and a wide assortment of brassicas, we have been almost self-sufficient for vegetables. The greengrocer only sees me if I need lemons, oranges or some of the more exotic fruits available at this time of year like pomegranates, persimmons or Seville oranges.
The brassicas and roots are our winter bounty but, although we have enjoyed the hearty roast vegetables and mash, there comes a point when we pine for a crunch and for fresh, clean flavours. Without a polytunnel or greenhouse winter salad hasn’t been possible here yet, and I refuse to buy tasteless bags of salad so we rely upon the radicchio and chicory that were sown last spring, eaten in the summer and then left in the ground. We always miss the chance to sow them for a winter harvest, but these rogues from the summer are hearting up now, and add to this salad of raw winter roots.
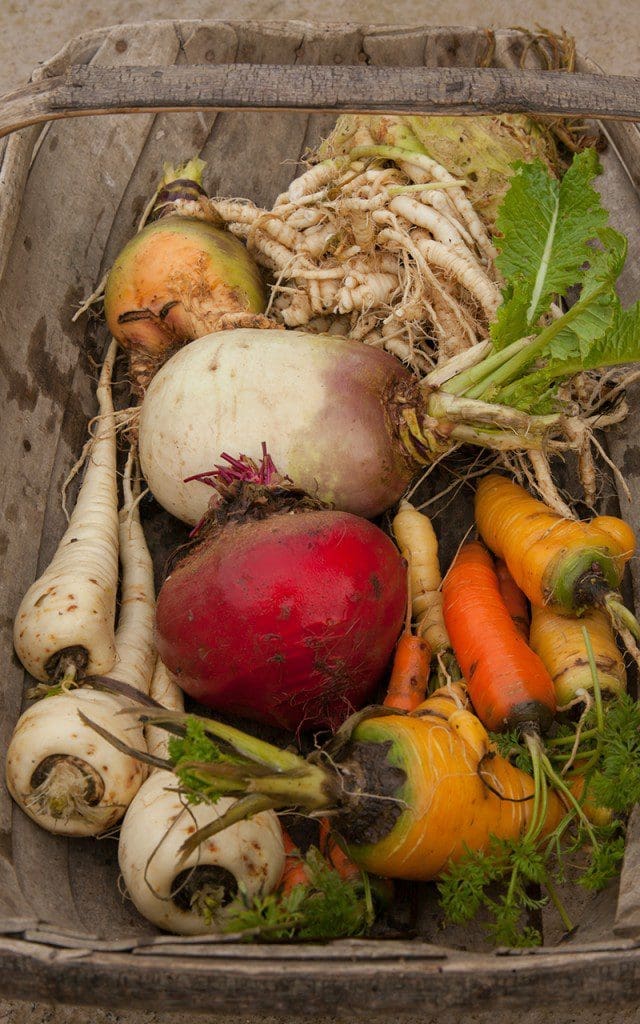
The freckled leaves of ‘Castelfranco’ make a pretty addition to the plate, but any of the more common dark red forms would provide a dramatic contrast. The wider a variety of shape and colour you can get in your selection of vegetables the more attractive the salad will look. Here I have used the striped beetroot ‘Chioggia’ and orange ‘Burpee’s Golden’. The varied colours of heritage carrots also add to an appealing mix.
The balance of sweet, savoury, earthy, bitter and peppery flavours provided by the vegetables selected here makes for a varied eating experience, but the salad could be made with any combination of three of the roots if you do not have access to them all. Thinly sliced fennel would also be a good addition and, although the frost has ravaged our winter crop of bulbs, the remaining foliage is still delicious for its aniseed flavour and addition of green. Radish, mooli or kohlrabi could also be substituted.
Seville oranges are just coming to the end of their season. When unavailable replace with a 50/50 mix of lemon and orange.
This salad is particularly good with roast chicken, roast pork, sliced ham or a cold chicken and ham pie.
Ingredients
SALAD
Juice of 1 lemon
2 medium carrots – different colours if possible
1 small parsnip
2 small beetroot – different colours if possible
½ small turnip
½ small swede
1 Cox’s apple
¼ medium celeriac
1 small head radicchio
2 tbsp finely chopped parsley
2 tbsp fresh fennel or dill herb fronds
DRESSING
50ml soured cream
1 egg yolk
2 tsp honey
1 tsp finely grated horseradish or English mustard
25ml rapeseed or other light oil
Juice of 1 Seville orange
Very finely grated zest ½ Seville orange
Salt
Some reserved fennel fronds
3 tbsp tablespoons pomegranate seeds
3 tbsp broken walnuts
Serves 6
Method
First prepare two bowls of iced water. Add the lemon juice to one of them.
Trim and peel the carrots and parsnip, then shave thin ribbons off the length of each with a vegetable peeler. Put them all into the bowl of plain iced water. If you are using dark red or purple carrots put them in a separate bowl of iced water.
Trim and peel the beetroot. Using a mandolin or very sharp knife slice as thinly as possible into rounds. Striped or pale coloured beetroot (orange, yellow or white) can be added to the water bowl containing the carrots and parsnip. Purple beetroot will need a separate bowl of iced water or can be added to that containing the purple or red carrots.
Peel the turnip and swede and grate coarsely.
Slice the apple as thinly as possible and put into the bowl of acidulated water.
Peel the celeriac. Cut into slices about a centimetre thick. Using a mandolin or very sharp knife slice as thinly as possible. Add to the bowl of acidulated water.
Remove the leaves from the radicchio and tear the soft part of the leaves away from the coarse ribs, which aren’t used. Tear the leaves into pieces roughly 4cm square.
To make the dressing put the egg yolk in a bowl, whisk with a fork, then add all of the other ingredients and whisk again until well combined. Taste for seasoning. You may need to add more honey, salt or horseradish to taste. The dressing needs to be fairly strongly seasoned as the flavour is diluted once mixed with the salad. Finally stir in the finely chopped parsley.
Heat a small heavy frying pan. Add the walnuts and allow to scorch on one side. Remove from the pan and allow to cool.
Drain the vegetables and apple and pat dry on a clean tea towel. Put in a large bowl. Keep the dark roots to one side. Add the radicchio and fennel fronds to the bowl. Using your hands toss the salad very gently to distribute the different vegetables evenly. Pour over two thirds of the dressing and use your hands again to gently mix the salad ensuring everything is well coated. Add more dressing if required, however the vegetables should just be lightly coated, not swimming. Now add the dark beetroot and carrots and toss the salad again very quickly to avoid turning the whole salad pink.
Transfer the salad to a serving plate or divide between individual plates. Spoon on a little more dressing then scatter over the pomegranate seeds, scorched walnuts and reserved fennel fronds.
Recipe & Photographs: Huw Morgan
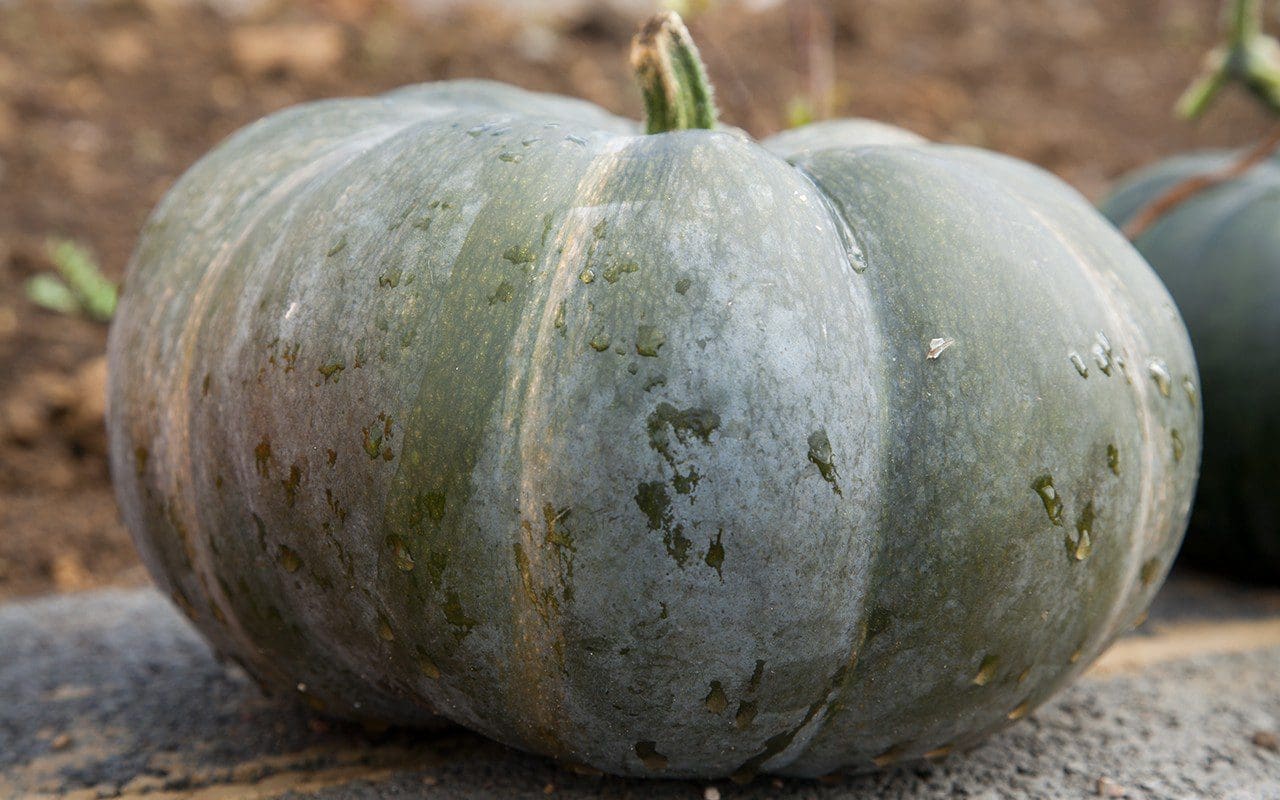
As Dan wrote recently, at this time of year we often find that some of our pumpkins have started to deteriorate in storage. These are usually the varieties that contain more water. Unless damaged or frosted, those higher in dry matter generally have a longer storage life.
Last year, and due to a lack of storage space while our building works were taking place, we were faced with a depressingly large number which were fast heading in only one direction. The compost heap. Determined not to lose such a good harvest I resolved to find a way of preserving them. However, there is only so much soup and puree that the freezer can take. Or that you want to eat.
I had had success the previous year developing a recipe for brown sauce, which had been initiated by a similar desire to make the most of the windfall apples from the old orchard in our top fields. Traditional brown sauce recipes are based on tomato, but I thought that both the sweetness and texture of apples could stand in for them, particularly when brown sauce is primarily a vehicle for full-flavoured spices. And so came the idea of a making a spiced ketchup where the sweetness and texture of tomato are replaced with those of pumpkin.
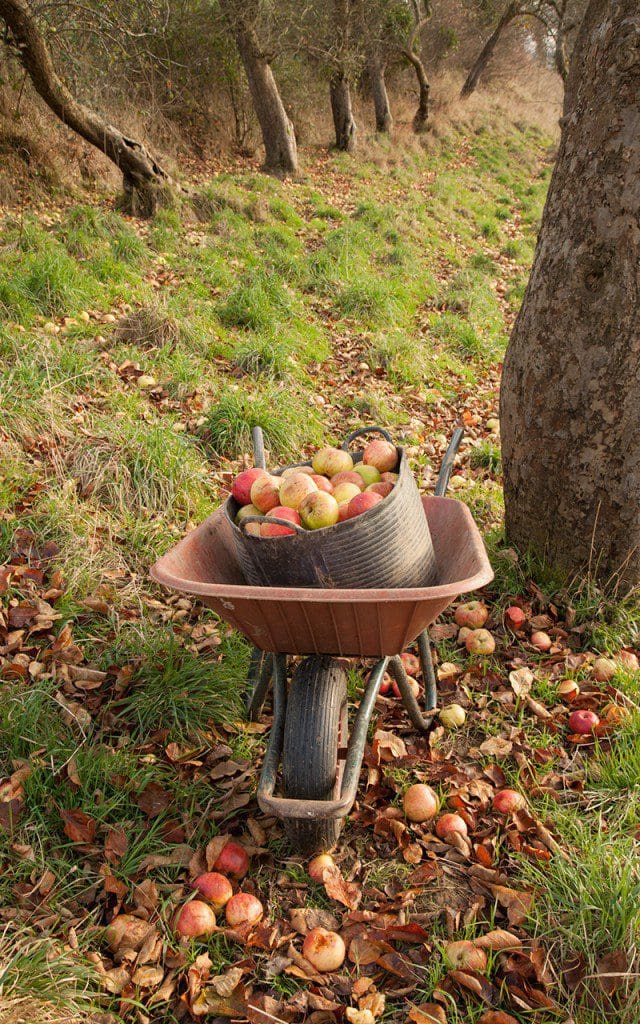 Windfall apples in the old orchard
Historically ketchups were developed from fermented fish-based sauces from the Far East which were brought to the west by the British. In 18th century England they started as dark, savoury table sauces made with mushrooms, anchovies and even walnuts. The development of tomato ketchup took place in America in the early 19th century and this is when recipes for the sauce that we recognise as ketchup today first appeared. Traditional flavourings for tomato ketchup included allspice, mace, ginger, nutmeg and coriander seed. Since all of these, and more, feature in the Moroccan spice mix Ras el Hanout, I decided to use this as the basis of the spicing for this ketchup.
I enjoy the process of making my own spice mixes with a mortar and pestle. The gradual change of texture as the whole seeds and ground spices combine into a fragrant powder is a gratifying experience. You can also balance the proportions of the spices to suit your own tastes rather than relying on a pre-made spice mix which may be a little stale, too heavy on the cloves or cinnamon or lacking the pricier components like mace.
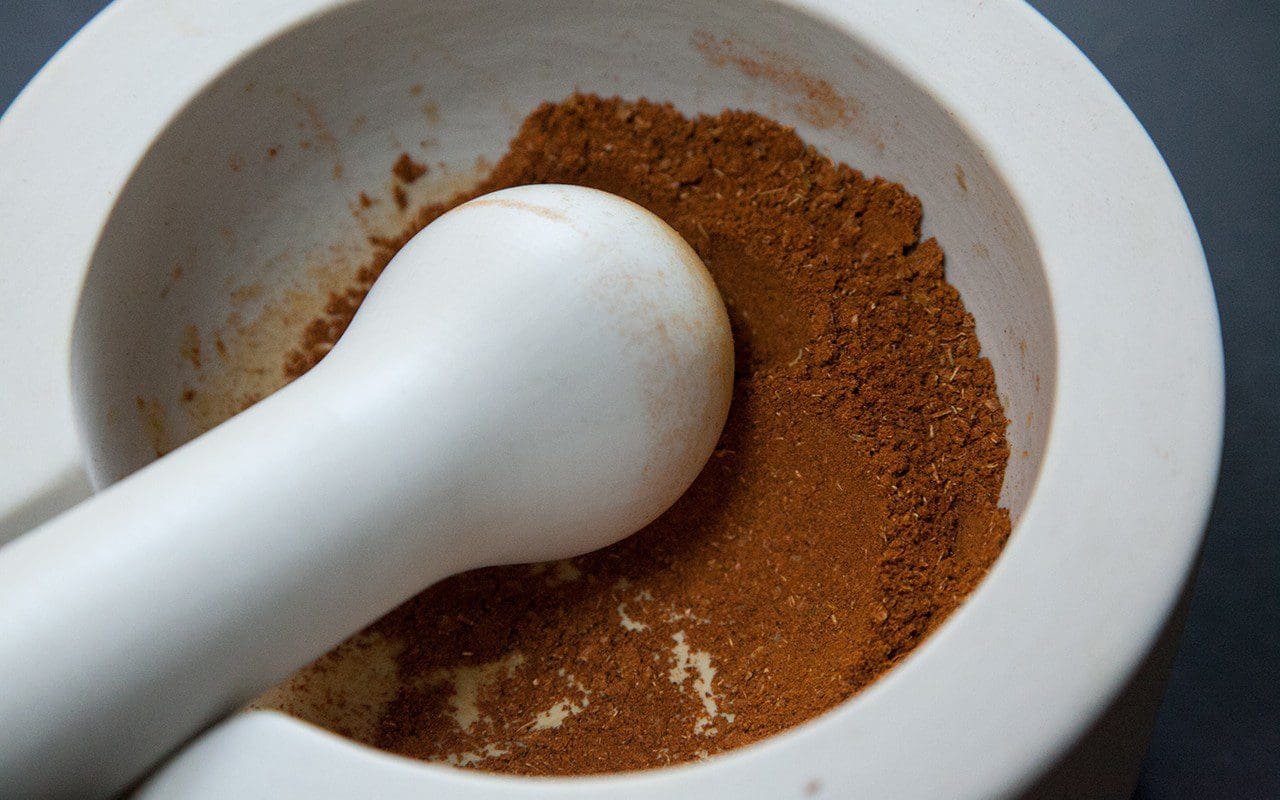 Ras el Hanout
To counteract the sweetness this ketchup needs a good kick of heat. Last year, in keeping with the Moroccan flavourings, I used a combination of harissa and smoked paprika, adding the harissa separately from the spice mix. Earlier this year I was given a large bag of fresh chipotle chilli powder by a friend who had been to Mexico and, since both pumpkin and chilli are native to this part of North America, they seemed a natural pairing. If using ready made Ras el Hanout check that it contains chilli, as some varieties don’t. If so you will need to add the chilli separately.
As with all preserves containing vinegar this ketchup needs to mature before use. However, since the amount used is relatively low in proportion to the other ingredients, it can be used within 2-3 weeks, so there is still time to make a batch for Christmas presents. The flavour improves and develops the longer it is kept.
Use as you would tomato ketchup or brown sauce with fry ups, burgers and sausages, as a marinade for chicken, lamb and pork, or as a seasoning for soups and stews.
Ingredients
1.5kg pumpkin
500g cooking or eating apples
500g onion
1 head of garlic or 7 large cloves
Zest of 1 lemon
3 teaspoons salt
250ml apple cider vinegar
250 g soft brown sugar
Water
RAS EL HANOUT
1/2 teaspoon fennel seed
1/2 teaspoon cumin seed
1/2 teaspoon ground ginger
1/2 teaspoon coriander seed
1/2 teaspoon ground allspice
1/2 teaspoon ground turmeric
1/2 teaspoon ground cinnamon
1/2 teaspoon freshly grated nutmeg
1/2 teaspoon ground mace – 3 blades
1/4 teaspoon ground cloves – about 10 cloves
1/4 teaspoon cardamon seed – contents of about 5 pods
2 teaspoons chilli flakes, smoked paprika, chipotle chilli or harissa
OR
6 teaspoons of ready made Ras el Hanout
Method
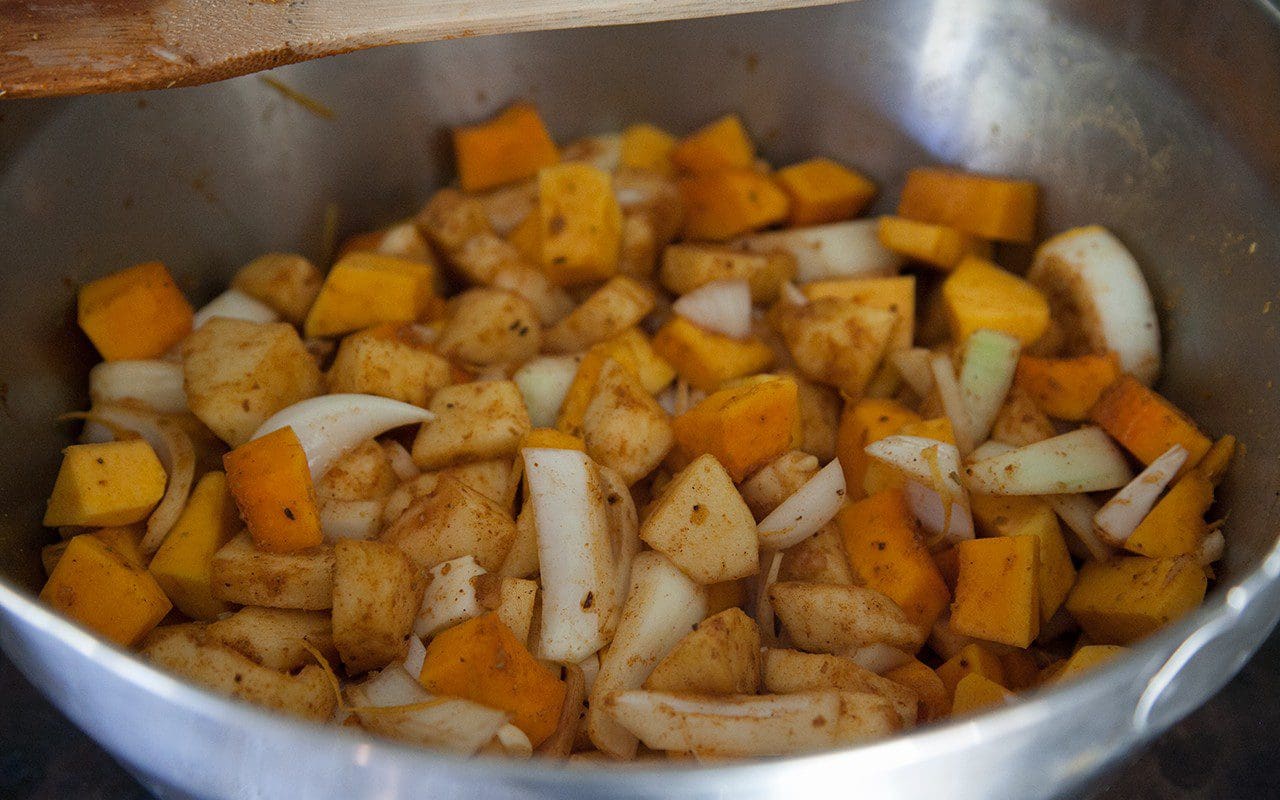
Cut the pumpkins in half. Scoop out the seeds and peel, removing any parts that are soft. Chop into pieces and put into a large preserving pan with the peeled, cored and chopped apples, coarsely chopped onion and peeled, trimmed garlic cloves.
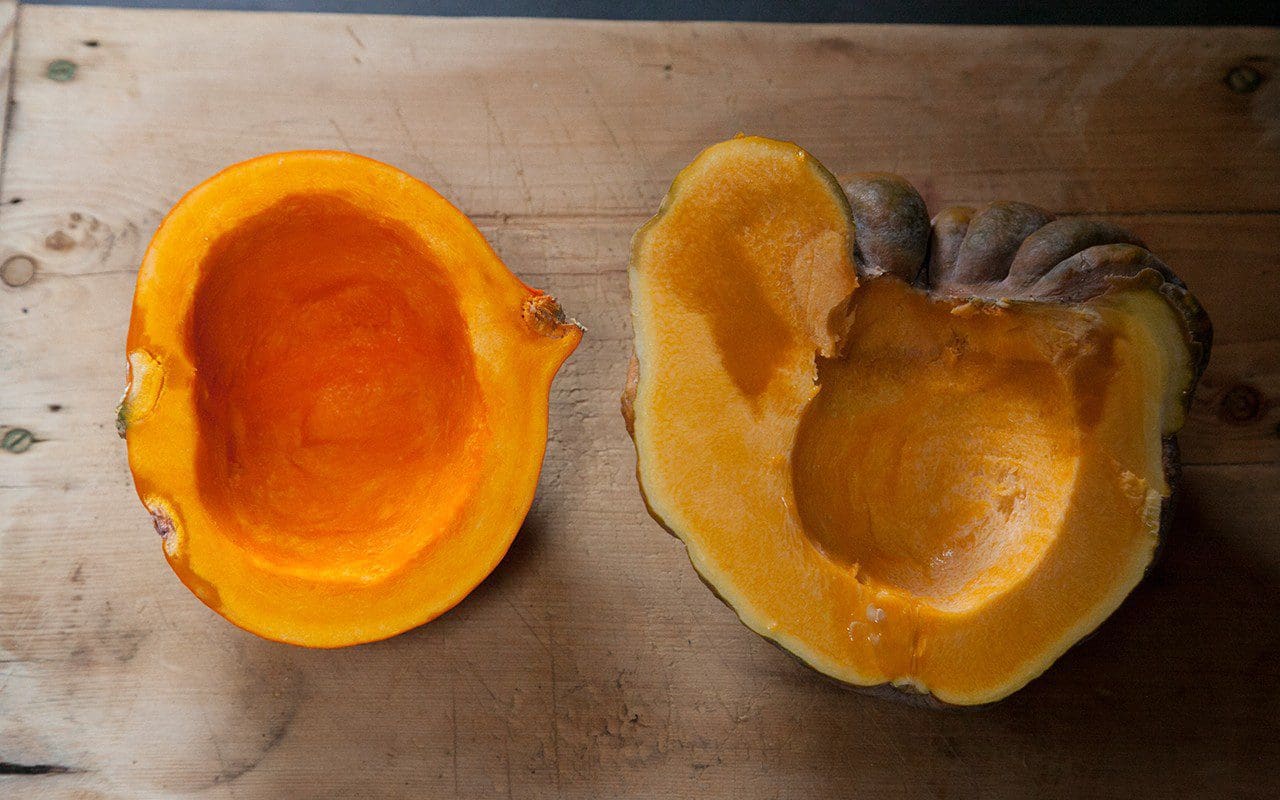 Any parts of the pumpkin that are soft or starting to rot are removed
Lightly toast the fennel, cumin, coriander and cardamom seeds in a small frying pan. Put with the remaining spices into a mortar and pestle or spice mill and grind to a fine powder. Add to the pan with all of the remaining ingredients, apart from the vinegar and sugar. Pour in just enough water to initially prevent the vegetables from catching. They will produce plenty of liquid as they start to cook.
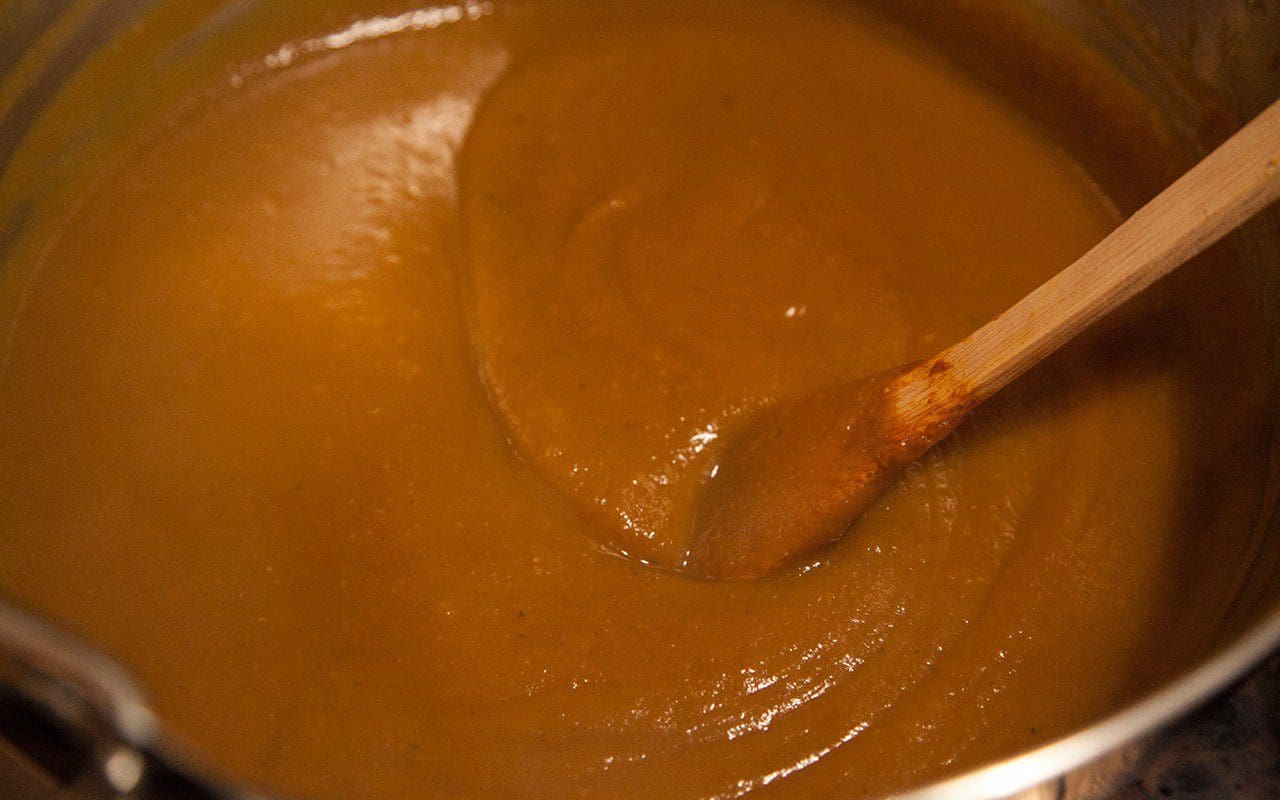
Put the pan over a moderate heat. Cover and cook gently, stirring from time to time, until the vegetables are soft and broken up. Pass the cooked vegetables through a food mill, or process to a smooth puree with a stick blender.
Add the sugar and vinegar and return the pan to a high heat. Cook, stirring continuously, until the mixture thickens. The sauce has a tendency to splutter, so it is advisable to use an oven glove or wrap your hand in a tea towel while stirring. The type of pumpkin you use will determine how much water is given up during cooking. You want to boil it until you have a homogenous sauce with no liquid separated from the solids. The consistency should be a little looser than you want it on the plate, as it continues to thicken as it cools after bottling.
Using a funnel pour into sterilised, heated glass bottles or jars with rubber seals and vinegar-proof lids. Close immediately.
Once cold label and store in a cool, dark place. It will keep for a year or longer.
Makes about four 500ml bottles.
Recipe & photographs: Huw Morgan
We always grow too many pumpkins. Such has been the luxury of having the space to do so. They have found themselves in a different position every year to give them the opportunity to reach. In the first summer they were in the virgin ground where we had turned field over to garden and the flush of weeds that had been disturbed by the change were kept in check by their coverage. The next year they were out in front of the house, each plant perched on a barrowload of muck on the banks. But it was too exposed there, we had a wet summer and learned their limits, for they made not much more than leaf. The disappointment of not having them in storage lasted the whole winter. Consequently, as the best way to learn is by your mistakes, I have taken their needs more seriously.
Six summers’ worth of trial, error and experimentation have taught us the good producers, the best keepers and those that under-produce in relation to their enormous appetite for space. A Californian friend and gardener, who grows the giant pumpkins you only find in the country where everything is bigger, was amazed that I was giving my plants so little room to grow. His pumpkin patch is the size of my whole garden, so he was not surprised that I hadn’t done better in terms of size and yield. A big plant with a rangy nature can easily take over a plot of nine or more square metres to provide the optimum ratio of leaf to fruit and, now that I have started planting up the garden, space for pumpkins is becoming more limited. So next year’s selection is due an edit. The giants will be separated from those that are happy with less space and the neater, more economical growers will have a bed to themselves in the kitchen garden with plenty of muck and sunshine. The big growers will be given the top of this year’s compost heap so that they can enjoy a romp and tumble over the edges unencumbered.
 ‘Musquée de Provence’
Of the big growers that produce more leaf than fruit, we will not be growing ‘Musquée de Provence’ again, after three years of trying. The deep-green, lobed fruit, though handsome, are supposed to ripen to a rich tan colour, but even on our south-facing slopes we just don’t have enough sun to do so. Consequently, the skin doesn’t cure fully and they have been poor keepers. Our average of one fruit per plant is also not worth the investment of space. Although a single pumpkin can easily feed twelve, there are only so many times you require a pumpkin that large.
 ‘Rouge Vif d’Étampes’
 ‘Crown Prince’
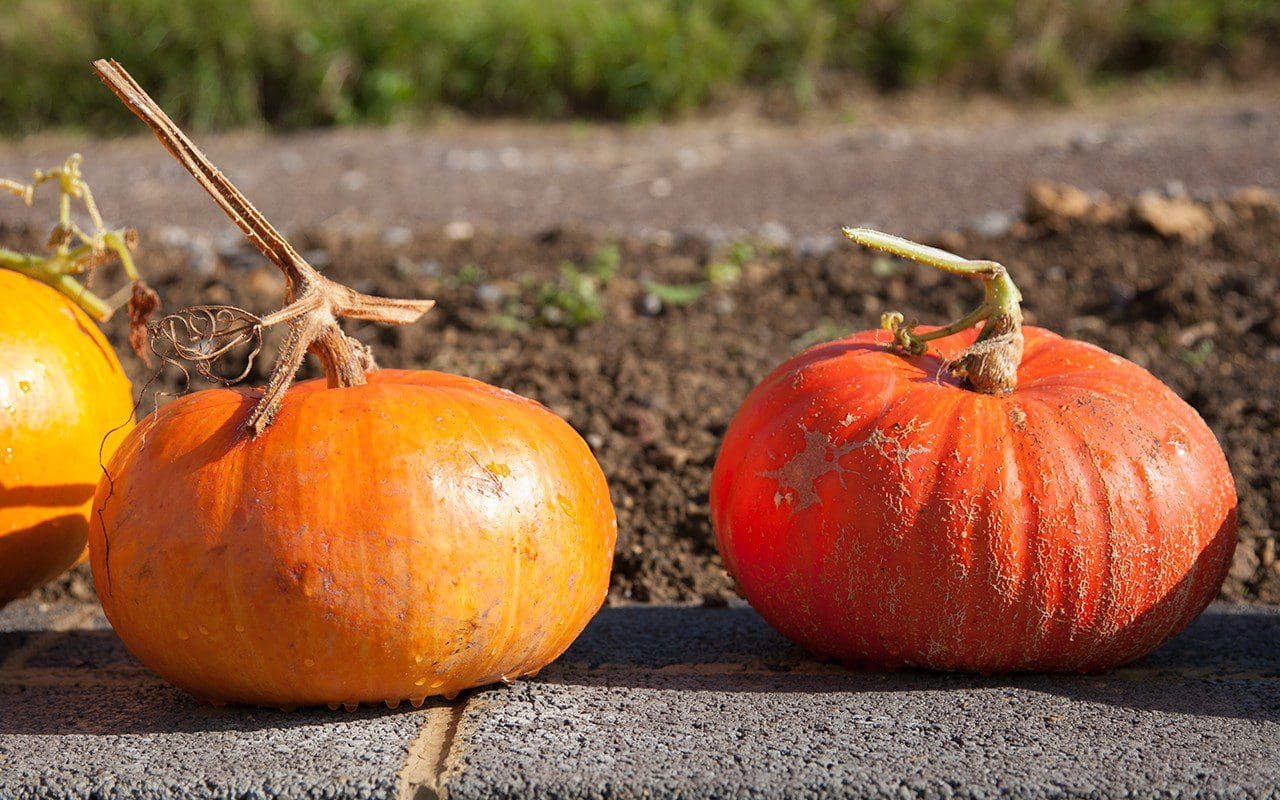
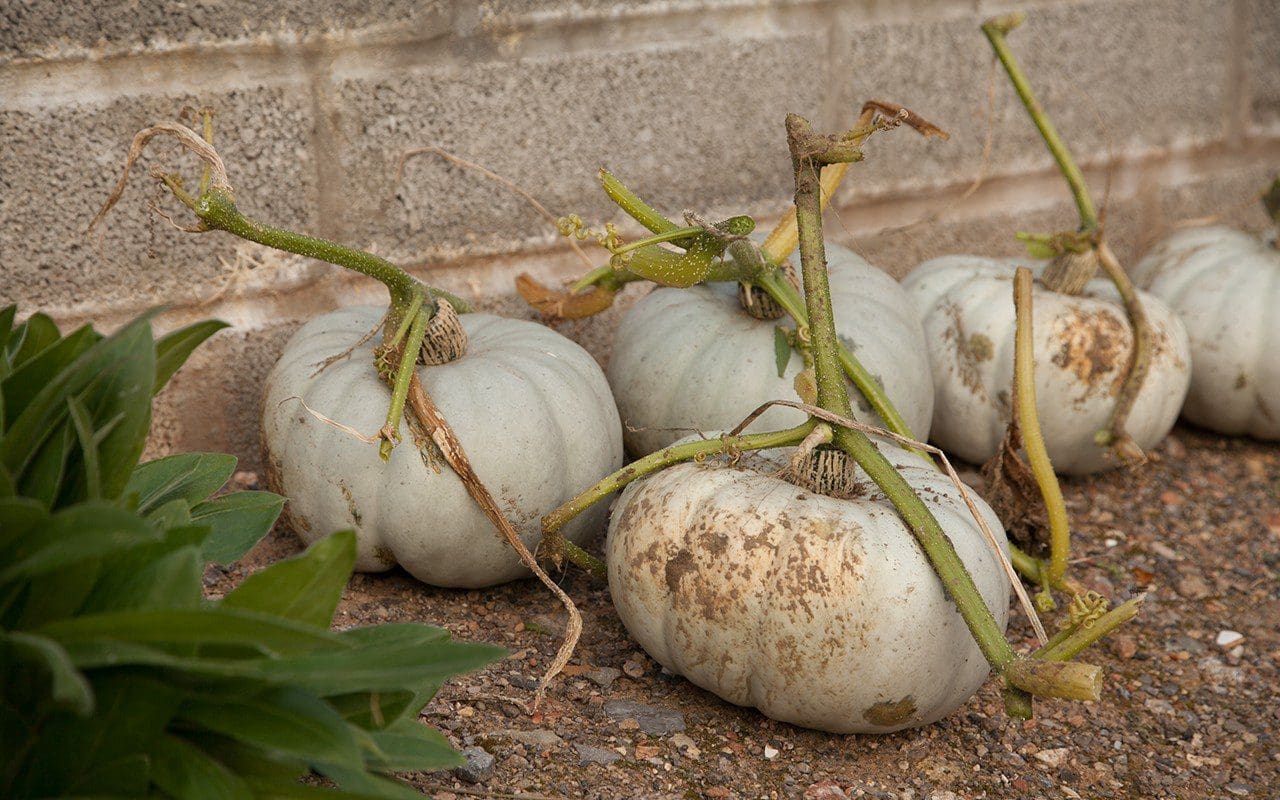
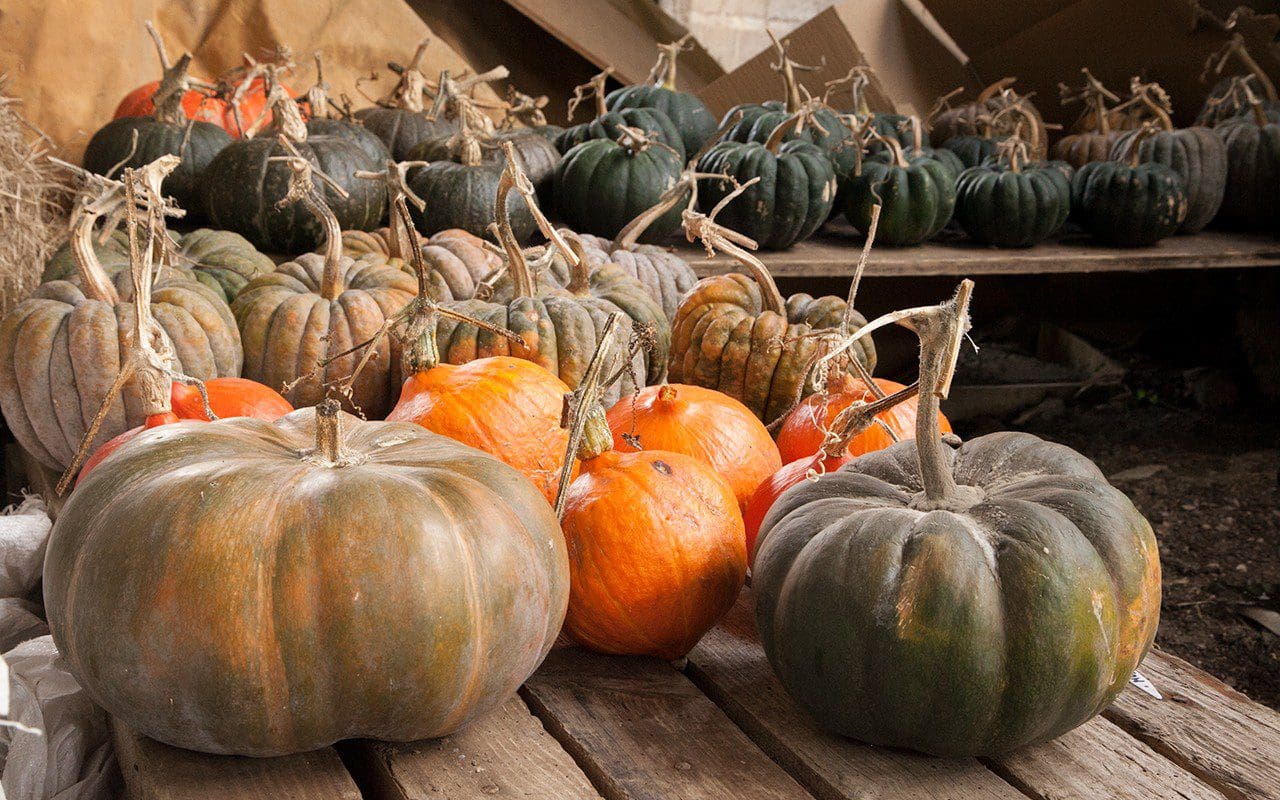
We have had a similar experience this year with ‘Rouge Vif d’Étampes’, another French variety with large fruits of a strong red-orange. It also appears to need more heat to crop heavily and ripen fully. These two have been the first to be eaten, as we try and keep pace with the rot. All pumpkins and squash like heat and good living and our cool, damp climate sorts out those that are clearly missing the Americas. In contrast, ‘Crown Prince’ has been more adaptable here and one of the best croppers for a plant that needs space. It is also an excellent keeper. The saffron flesh is firm and sweet while the thick, grey-green skin means that they can keep into March in a cool, frost-free shed.
The varieties with dry, firm flesh are better for storing than the wetter ones, which I presume is due to their higher sugar content. We also prefer them for eating. Of the smaller growing varieties we have found the Japanese pumpkins to be the most consistent, with the highest yield for their economical growth and the most delicious flesh. They produce fruit of a moderate size, which is far more convenient to eat than opening up a Cinderella-sized pumpkin that feeds a horde and then sits on the side, the remainder unused, making you feel guilty.
 ‘Uchiki Kuri’
Of the Japanese varieties ‘Uchiki Kuri’, or the red onion squash, is the one you see most often in Japan and the one I will eat on an autumn visit to Hokkaido where it is grown extensively. It is a moderate grower, with smallish foliage and an even and reliable yield, with each plant producing 8 or more 1-2kg pumpkins. The deep orange teardrop-shaped fruit are small enough to provide for one family meal and, with a good balance of flesh to seed, there is little waste. Kuri means chestnut in Japanese, and the flavour and texture of this and the other kuri varieties explains why. They are excellent baked, with a rich, floury texture that also makes superlative mash and soup with plenty of body.
 ‘Cha-cha’
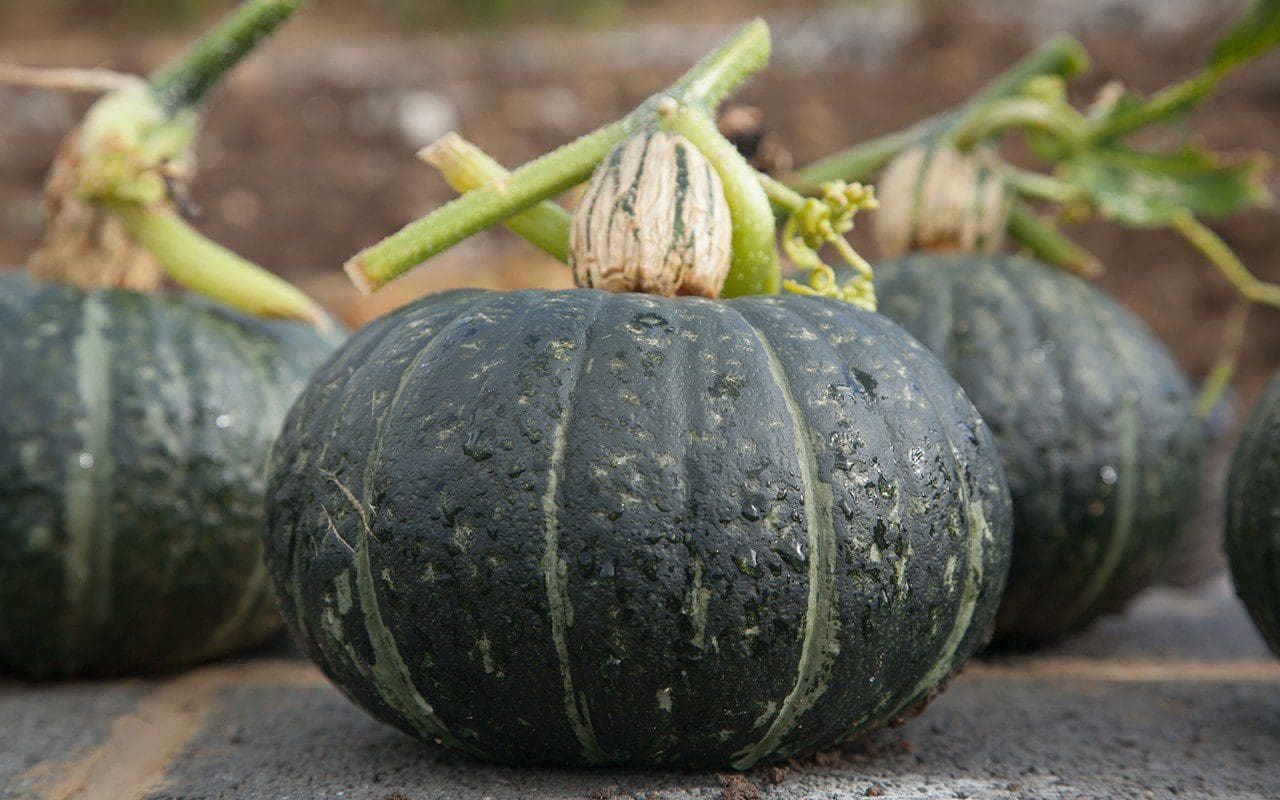
Kabocha is the Japanese word for pumpkin, derived from the corruption of the Portugese name for them, Cambodia abóbora, since they were brought to Japan from Cambodia by the Portugese in the 16th century. This year we grew ‘Cha-cha’, which closely resembles ‘Blue Kuri’, a Japanese kabocha variety we have previously had success with. It has also proven to be very good. Slightly larger than ‘Uchiki Kuri’ the flesh is also dry, rich and sweet, and the thin skin is edible when roasted.
 ‘Black Futsu’
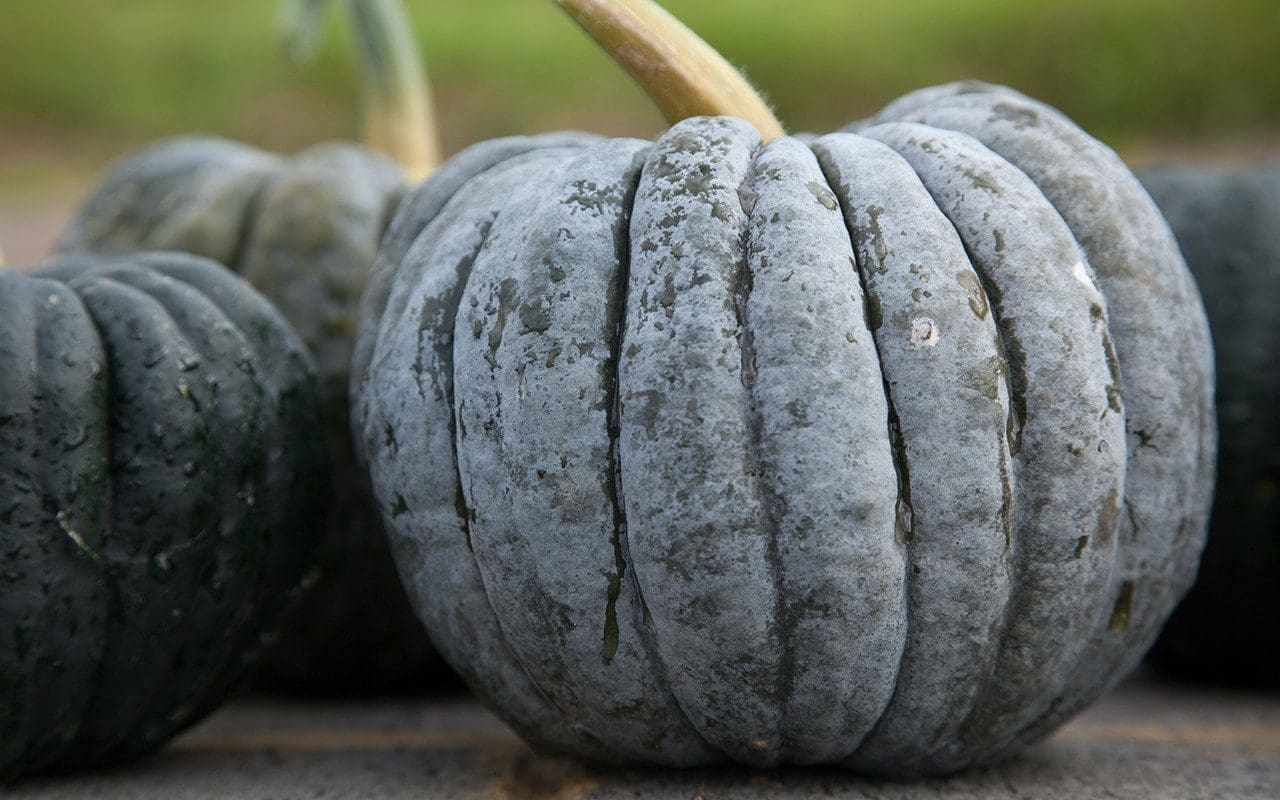
‘Black Futsu’, another Japanese variety with sweet, nutty flesh, is of a similar size. The fruits are heavily ribbed and dark, black-green when picked, quickly developing a heavy grey bloom, beneath which they ripen to a tawny orange. Though beautiful to look at, the ribbing does mean they are more work to cut and peel, but it is a small hardship in terms of yield and substance.
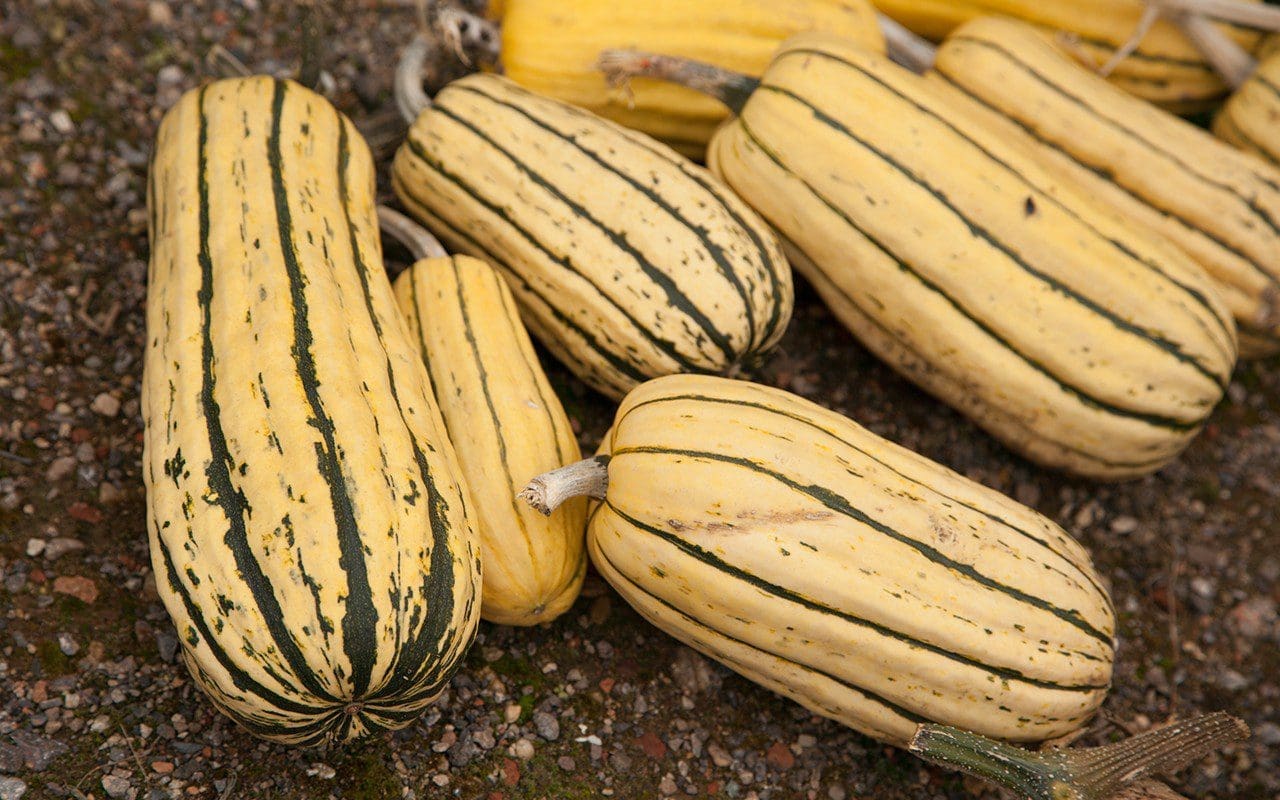 ‘Delicata’
Another heavy cropper, although not such a good keeper, is ‘Delicata’, also known as the sweet potato squash due to it’s mild, sweet flesh which is moister than the varieties described above. Although kept and eaten as a winter squash ‘Delicata’ is of the summer squash species with a very thin skin (hence its name) and so has a propensity to soften quickly in storage. However, it needs no peeling as the skin is edible, so it has its uses in the earlier part of the season. The beauty of this very decorative variety is its high yield of long, cylindrical fruits (perfect for stuffing) in a range of manageable sizes, some the perfect size for one, which makes it a very practical choice.
Although in the past I have let the first frost strip the summer foliage before harvesting, it is best to remove it by hand in September when the plants have done their growing and there is a little heat left in the sun to do a final ripening. It is best to pick the fruits before they get frosted or they don’t keep well, and care must be taken not to damage the hard, waxy skin which keeps them airtight through the winter. The stalks should be left intact for the same reason, as any wound quickly leads to rot.
Left in a warm, sunny place for a couple of weeks after picking the carbohydrates in the flesh turn to sugar and the skin hardens. The colour also changes, but this continues to develop in storage. When ripe they should be stored in a shed or outhouse on wire racks or a bed of straw to allow air to circulate beneath them. For now, I have them on old palettes in an airy barn, but when it gets colder they will be put into perforated plastic plant trays and moved to the frost-free tool shed.
We are gradually making our way through this year’s crop with roast, mash, soup and finally preserves, before the rot sets in. It nearly always does and, although the decay has its own beauty, I’d rather not waste a summer of effort. Both ours and the pumpkins’.

Words: Dan Pearson / Photographs: Huw Morgan
In two weeks we are off to Greece on holiday. The island we have been going to for the past few years is small and secluded with only a passing tourist trade, so the few restaurants are used mainly by locals, or holidaying Athenians and Greek expatriots from America and Australia. Alongside the ubiquitous Greek salad there are a number of traditional vegetable dishes served by all the establishments and one of our favourites is the inspiration for this recipe.
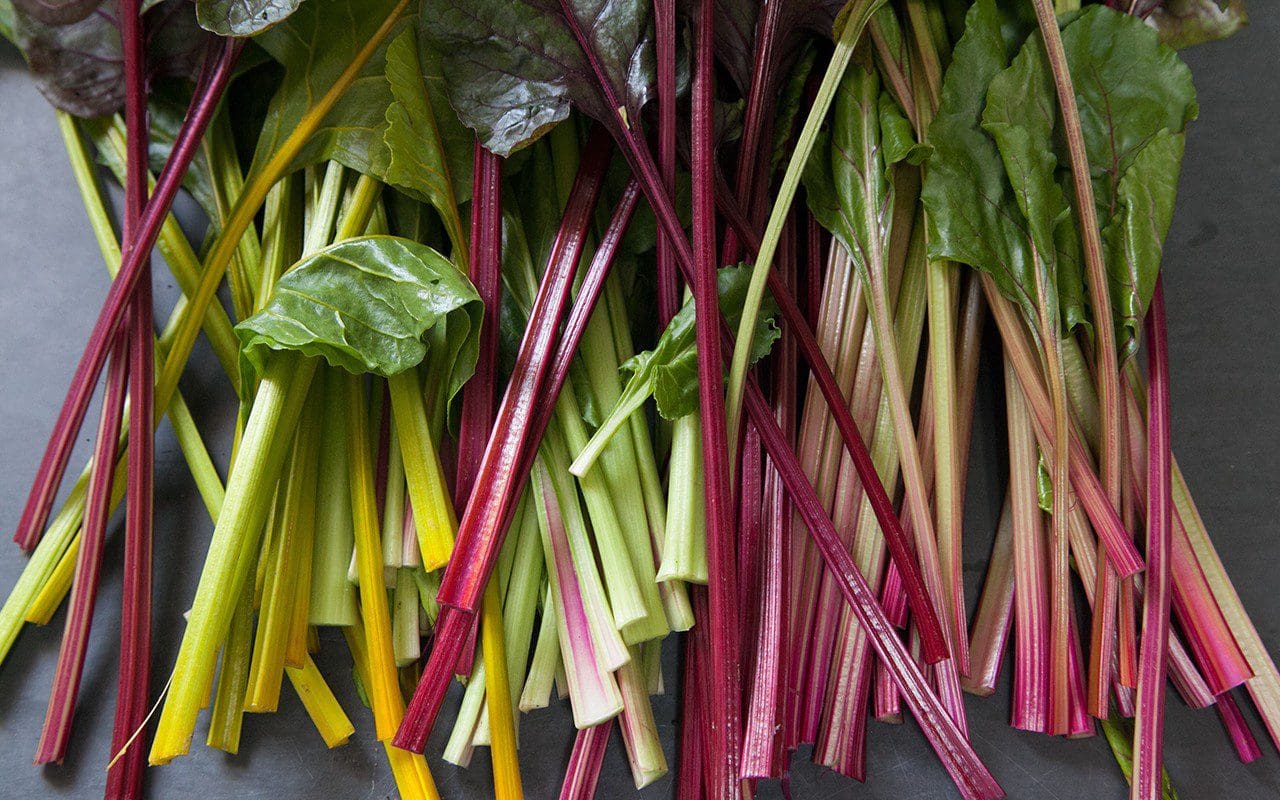
The first time we ordered this a large plate of simply dressed beetroot came to the table, piled on top of the wilted leaves and covered in rich garlicky Greek yogurt. It was so simple, and so delicious, we couldn’t believe that we had never thought to eat beetroot greens before. They had always ended up on the compost. We get through a lot of chard and spinach and we now often eat the beetroot leaves alone like these two crops, wilted in olive oil with garlic and dressed with lemon juice. They have the earthy flavour of beets, and the stalks have something of the succulence of chard, but with a distinctive sweetness. It is important to use the leaves of young beetroot and discard the oldest leaves as the stalks of these are stringy.
For variety we grow a number of different coloured beets and the appearance of this dish is lifted by the mix of colours. However, it is just as good with plain purple beets.
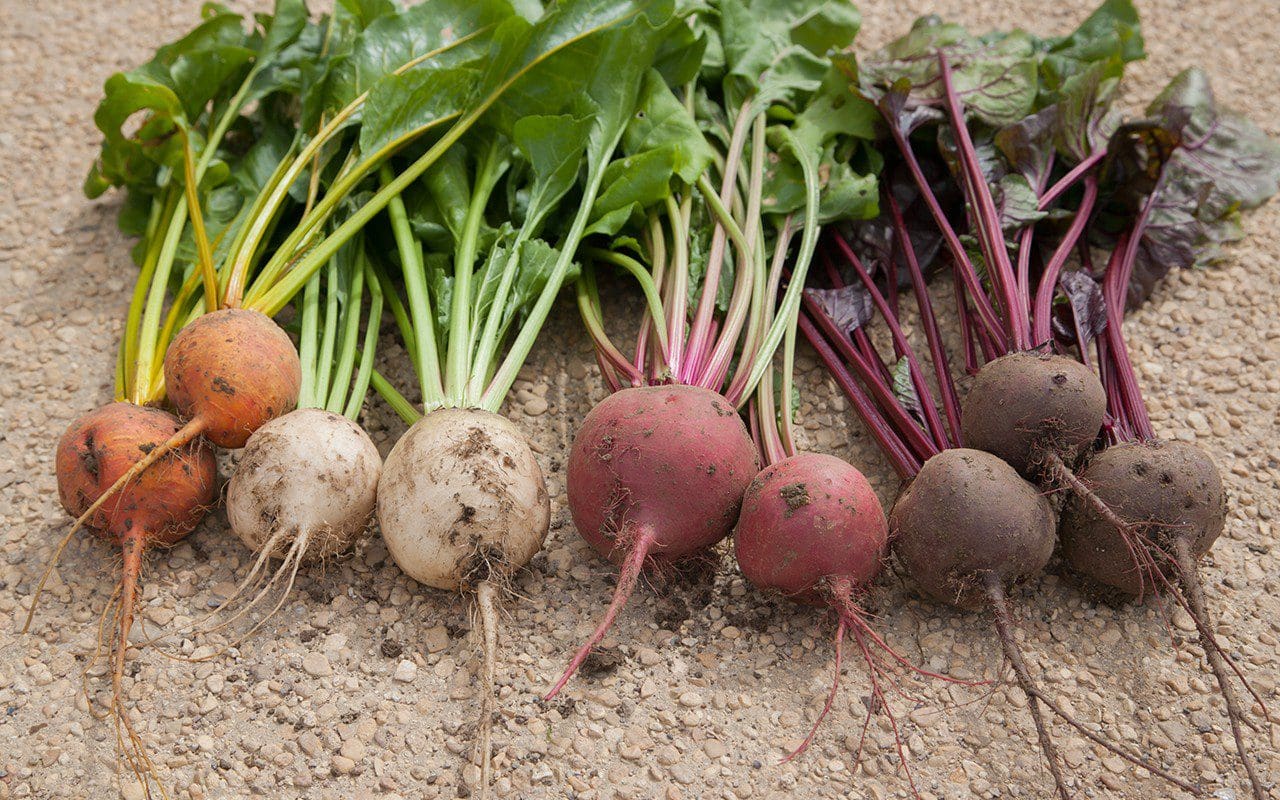
From left to right: Beetroot ‘Burpees Golden’, ‘Snowball’, ‘Tonda di Chioggia’ and ‘Egitto Migliorata’
Walnuts and dill are natural companions to beetroot. The earthiness of the nuts complements that of roots and the dill adds a fresh, sweet note that prevents the dish from feeling too heavy. Fennel, parsley or mint could be used instead.
Given the limited number of ingredients this dish is surprisingly rich and a little goes a long way. It can be served as part of a table of meze, with hummus, fried halloumi, meatballs and spanakopita, or as a side dish to accompany grilled white fish or chicken.
Serves 6
Ingredients
1kg beetroot with leaves intact
2 cloves garlic
100g walnut pieces
Juice of one lemon
Extra virgin olive oil
200g Greek yogurt
Dill leaves and flowers
Sea salt
Method
Preheat the oven to 200°C.
Remove the leaves from the beetroot and discard the oldest ones.
Scrub the beetroots well and wrap individually in tin foil. Put into a baking tin and, depending on their size, cook for 40 – 60 minutes until you can pierce them easily with a sharp knife. Remove from the oven and allow the beetroot to cool for 20 minutes in their foil jackets. Before turning off the oven spread the walnut pieces out on a baking sheet and toast in the oven for about 3 minutes until lightly coloured and fragrant.
Remove the foil from the beetroot and rub the skins off under a cold running tap or in a bowl of cold water. Slice from top to bottom into eighths to produce slim wedges. Put into a bowl and dress with lemon juice, olive oil and a little salt. If using mixed colours of beetroot you will need to use separate bowls for each variety to prevent the colours from bleeding into each other.
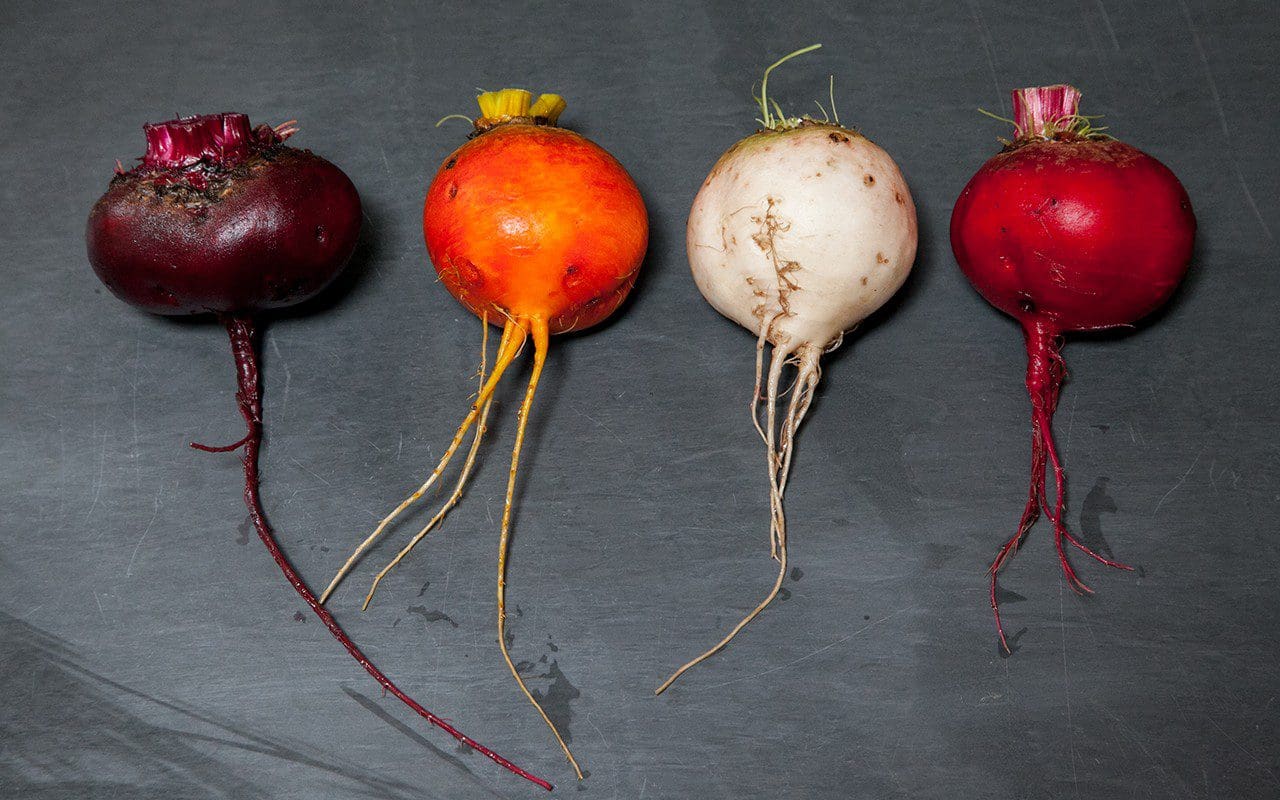 From left to right: Beetroot ‘Egitto Migliorata’, ‘Burpees Golden’, ‘Snowball’ and ‘Tonda di Chioggia’
Put a large lidded pan on a high heat. Wash the reserved beetroot leaves and immediately put into the pan with as much water as possible still clinging to them. Put the lid on tight. From time to time shake the pan and check to see that there is enough water in the pan to create steam. You may need to add an egg-cupful of water if looks like it is getting dry. They are done when you can pierce the stalks with a sharp knife. Remove from the heat, take the lid off the pan and immediately dress the leaves with lemon juice and olive oil until well coated. Season with salt and allow to cool.
To make the yogurt dressing grate the garlic cloves into a bowl large enough to hold the yogurt. Add the yogurt, salt and 4 tablespoons of olive oil. Stir vigorously until well combined.
To serve arrange the wilted leaves on a plate, place the beetroot wedges on top, then spoon on the yogurt dressing and scatter over the walnuts. Decorate with dill leaves and flowers and a final drizzle of olive oil.
Recipe and photographs: Huw Morgan
Artichokes are one of the pre-eminent Italian ingredients and so it makes sense to look to Italy for ways in which to prepare them. This recipe is from the River Café Cook Book Green which, alongside Jane Grigson’s Vegetable Book, is the cook book I turn to most frequently when looking for inspiration for good simple vegetable recipes.
Recipes for artichoke are legion, but they usually follow one of a number of tried and tested treatments; boiled and eaten with vinaigrette or another sauce such as bagna cauda, braised with herbs in stock or oil (sometimes with a stuffing), deep-fried, roasted or chargrilled or, more unusually, sliced very thinly and eaten raw as a salad vegetable.

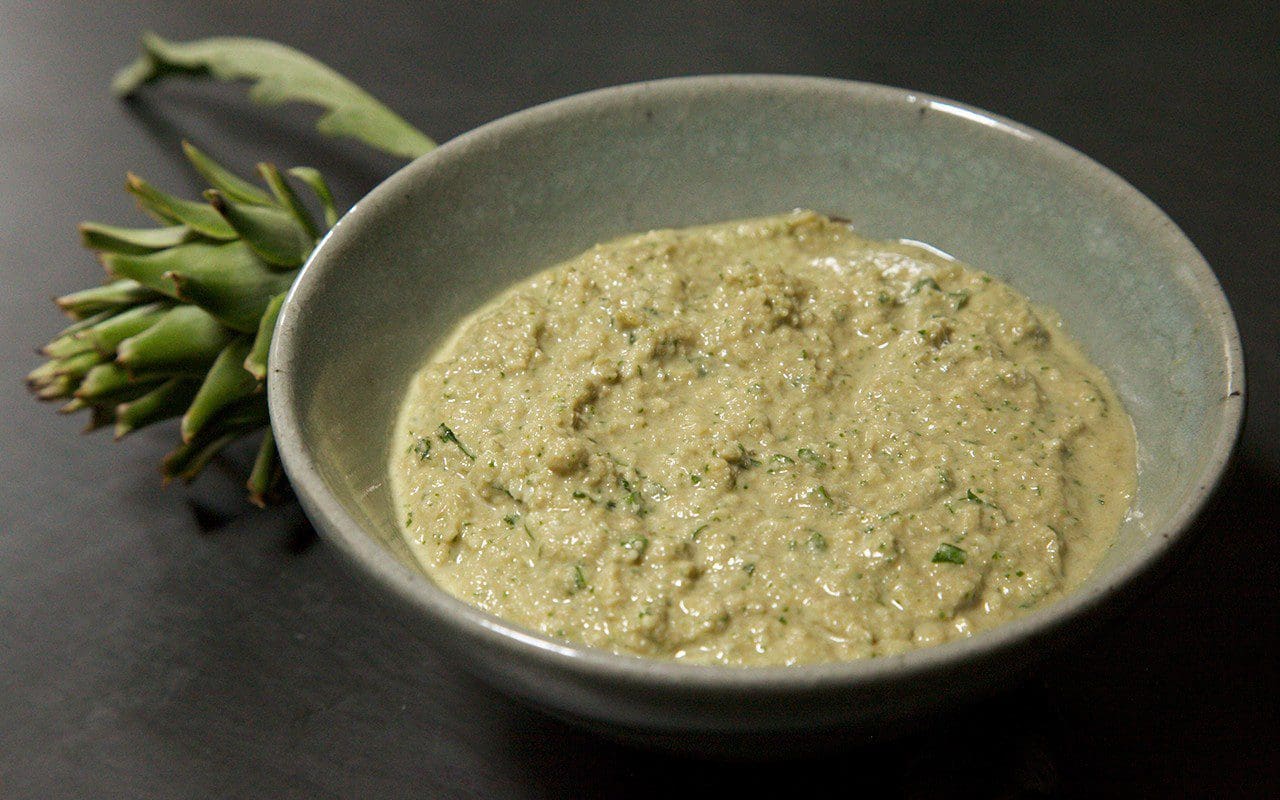
This recipe attracted my attention as the artichoke hearts are used raw to make a pesto-like sauce for pasta. The pesto itself is a pale beige colour and so this is not necessarily the most photogenic of platefuls, but it is the delicate flavour of the artichokes that is so readily captured; their slightly resinous and nutty flavour foregrounded by this simple treatment. The sauce is deliciously creamy and rich, yet it has a completely vegetal freshness. I have halved the number of garlic cloves called for in the original recipe as, to my taste, they overwhelm the subtlety of the artichokes.
At this time of the year I trim the stalks and bases from all the artichokes, even the smallest, as these parts become increasingly fibrous towards the end of the season. If you make this earlier in the season with young artichokes it is possible to use the first 5cm of the stalk too, once the fibrous outer layer has been peeled away.
The pesto can also be used like a tapenade on bruschetta or crostini topped with some shaved Parmesan or Pecorino, or a slice of Parma or San Daniele ham. To use it in this way prepare as for the sauce below, but allow the pesto to cool after adding the butter.
Serves 6
Ingredients
400g spaghetti Sea salt and freshly ground black pepper Freshly grated Parmesan
ARTICHOKE PESTO 6 small globe artichokes 2 lemons 100g pine kernels or blanched almonds 2 cloves garlic 250ml milk 2 handfuls flat leaf parsley 150g Parmesan, freshly grated 150ml olive oil 75g unsalted butter
Method
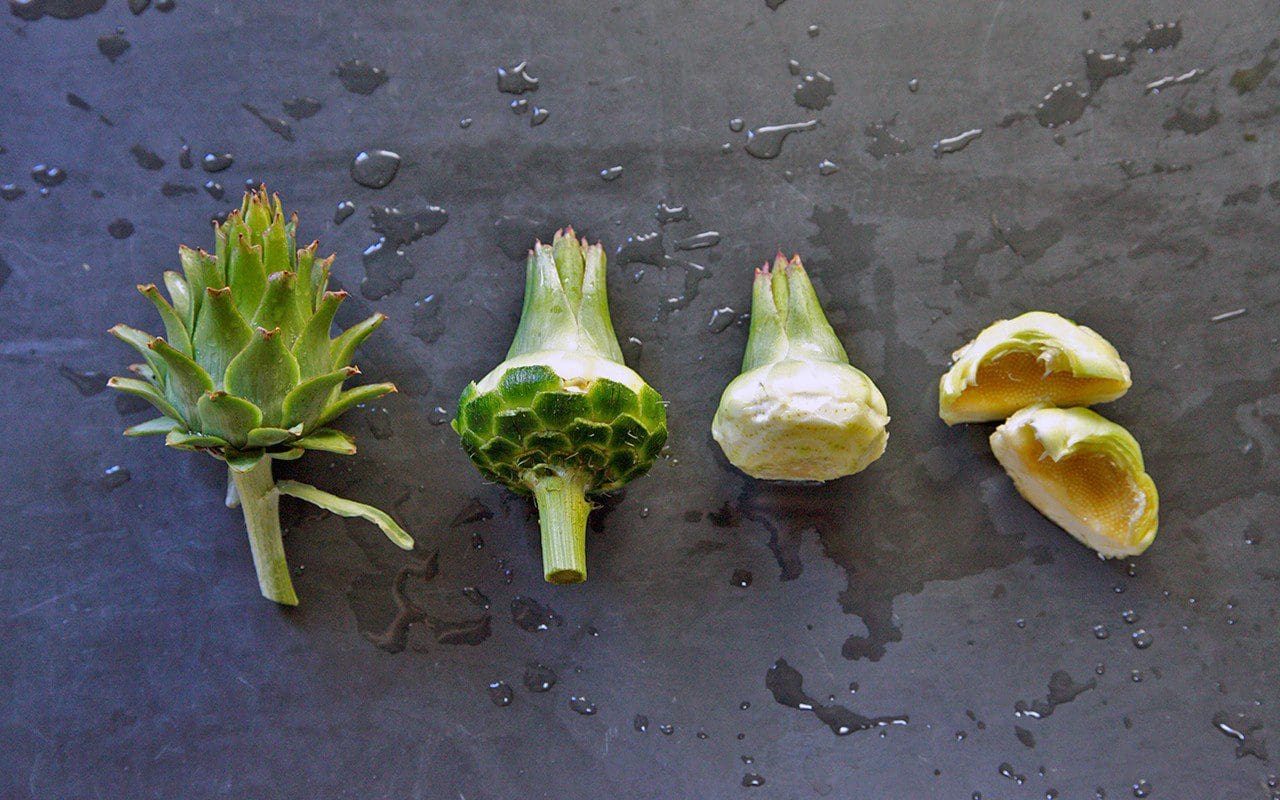
First prepare the artichokes. Squeeze one of the lemons and put the juice and the quartered lemon hull into a bowl containing enough cold water in which to submerge the prepared artichokes. Slice the second lemon in half and keep close by.
Carefully pull the tough leaves away from the base of the artichokes, proceeding in concentric circles until you reach the softer cream leaves towards the heart. With a small, very sharp knife carefully remove the stalk and trim any dark green remnants of the leaves from the base. Immediately rub all cut surfaces with one of the lemon halves.
Cut off the green and spiny tops of the leaves and discard. Cut each artichoke heart in half and remove the hairy choke in the centre with a small teaspoon. Rub all surfaces with one of the lemon halves again and put the artichokes into the acidulated water. Continue until they are all done. You should have around 200g of artichoke hearts.
Drain and dry the artichoke hearts and put into a food processor with the garlic and pine kernels or almonds. Process quickly until coarsely chopped. Add the milk, parsley leaves and Parmesan and process quickly again. With the food processor running at a slow speed gradually add the olive oil. You should have a fairly wet cream, but it will thicken as it stands. Season with salt and put into a small saucepan.
Cook the spaghetti in boiling salted water until al dente. Drain and return the spaghetti to the pan with a ladleful of the cooking water. While the pasta is cooking add the butter to the pesto and put over a low heat. Stir frequently until the butter has melted and is well incorporated and the sauce has heated through. Add the sauce to the pasta and stir well to coat. If it seems a little thick add some more of the pasta water until a coating consistency is achieved. The sauce should be quite wet.
Serve with freshly grated Parmesan and a sprinkling of coarsely chopped flat leaf parsley.
Words & photographs: Huw Morgan
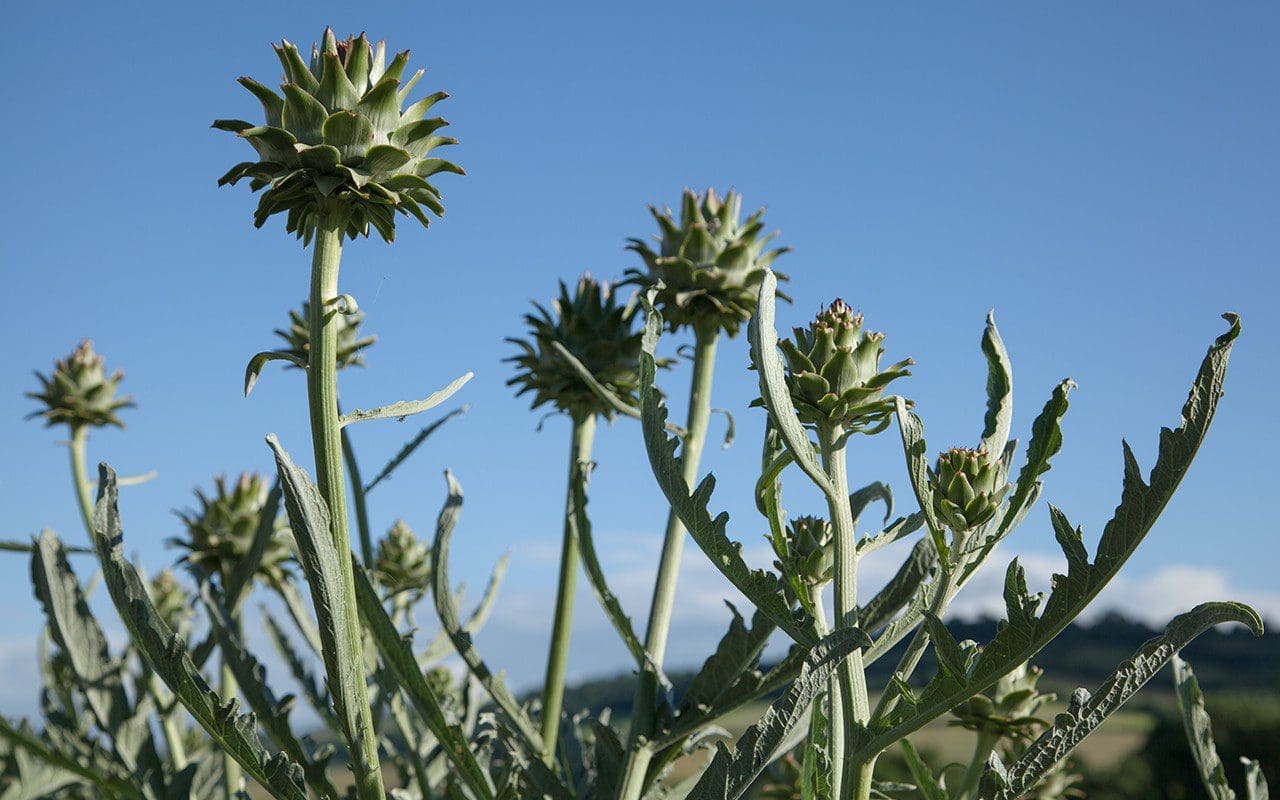
The globe artichokes (Cynara cardunculus Scolymus Group) were some of the first plants to go into the new kitchen garden. They are a luxury vegetable, taking far more space than they provide reward for and shading their neighbours if, indeed, there is room left in their shadow. Nevertheless, I gave them a bed to themselves, in prime position and against the radiated heat of the newly built wall.
They have grown in spectacular fashion – which is the greater part of the reason for having them – doubling and trebling their bulk in the course of the first summer and continuing onward to take all the space which was offered them. Cold weather in combination with winter wet is their nemesis but, since they were planted, both winters have been mild and they have only had a brief down time in the darkest months when they retreat to a core cluster of leaves.
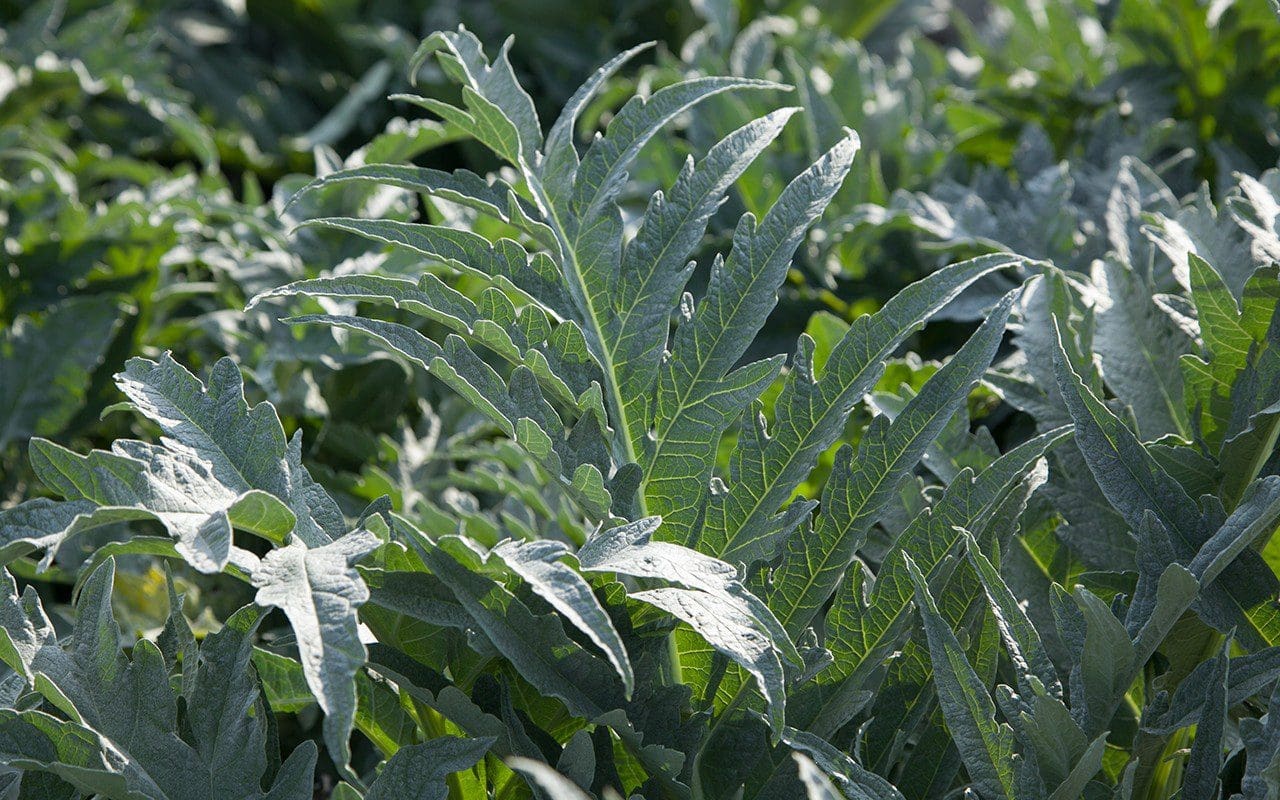
Their aluminium foliage is wonderful in its ascendancy and as good as acanthus in its architecture. As soon as the weather warms in March it reaches from the clump, each leaf larger and more dramatic than the last, scrolling and bulking steadily until you see that, some time in May, the parent foliage has gathered enough energy for the flower spikes. These push proud of the forest of leaves, but it is whilst the heads are small that you need to curtail their reach and harvest the artichokes.
We grow a variety called ‘Bere’, which Paul Barney of Edulis Nursery offers, and is the selection his father found growing in the walled garden there in the 1950’s. It is spinier than some of the named varieties, but Paul says it is the best tasting of them all. Indeed, it is a wonderful plant if you pick the heads whilst they are still young and before they are fully armoured. The best and meatiest parts are still soft when the leaf spines are forming, but leave them to harden and fulfil their thistly leanings and you end up with an impossibly fibrous mouthful.
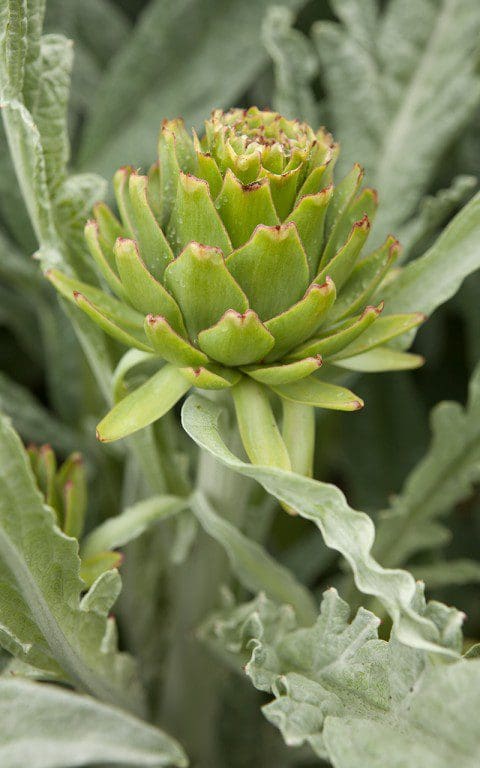 Cynara cardunculus Scolymus Group ‘Bere’
I plan to split my clumps in the spring, when growth is on the move and the crowns are manageable. Being mediterranean, they start life as soon as there is warmth and moisture in combination but, being sensitive to the cold, you have better chances in spring than if you move them at end of the season. It is a two-man job to lift the clumps and then prise a division, with root, from the clump. The divisions or ‘starts’ will be planted in the new herb garden, where they will provide ornamental architectural structure amongst the herbs.
I have six plants now, far too many of the same variety, so the plan is to thin the ‘Bere’ to three and equal it with the same number of purple-tinged ‘Romanesco’ to make up the half dozen. ‘Romanesco’ is an altogether friendlier plant without spines, and the scales that form the thistle head are soft and can easily be harvested and prepared without the need for gloves.
Each plant will be spaced a metre apart and inter-planted with stands of bronze fennel, which will cover for the artichokes’ collapse, which happens in high summer once all their energy has gone into flower production. At this point, once the old leaves start to fail revealing bare ankles, it is best to cut the lot to the ground and let the foliage regenerate. It will be back for the autumn, whilst the fennel covers during the recovery period.
In Italy the cardoon is also prized in the early spring for its edible leaves. The midribs, which look like celery, are stripped of the leaves and fibres, and then blanched and buttered, or baked in a gratin. You need rhubarb amounts of room for such a short season vegetable, but if you do have a spare corner in sunshine they are sure to provide you with drama at the very least.
I first grew the ornamental cardoon (Cynara cardunculus) as a border plant at Home Farm. Innocent looking divisions arrived from Beth Chatto, as beautifully wrapped in damp newspaper as they are described in her catalogue. They were planted in an ambitious group of three on a sunny slope and took their position, rearing up in a mound of metallic foliage. Tapering in August to a magnificent pinnacle of branching flower, the plants reach about three metres in height, and need staking if they are not to topple once the flowers break colour. Look up and you see bees staggering about drunk on the fist-wide pools of neon violet filaments.
The butterflies love them too, but the giant needs to be felled if it is not to leave you with a gaping hole once the collapse starts to happen. At Home Farm I planted it within a corral of late summer perennials, spaced at a sensible distance so that they can swallow the hole whilst it regenerates. Asters and rudbeckia will do the job, but you have to give the cardoon space in spring as it is an early season riser.
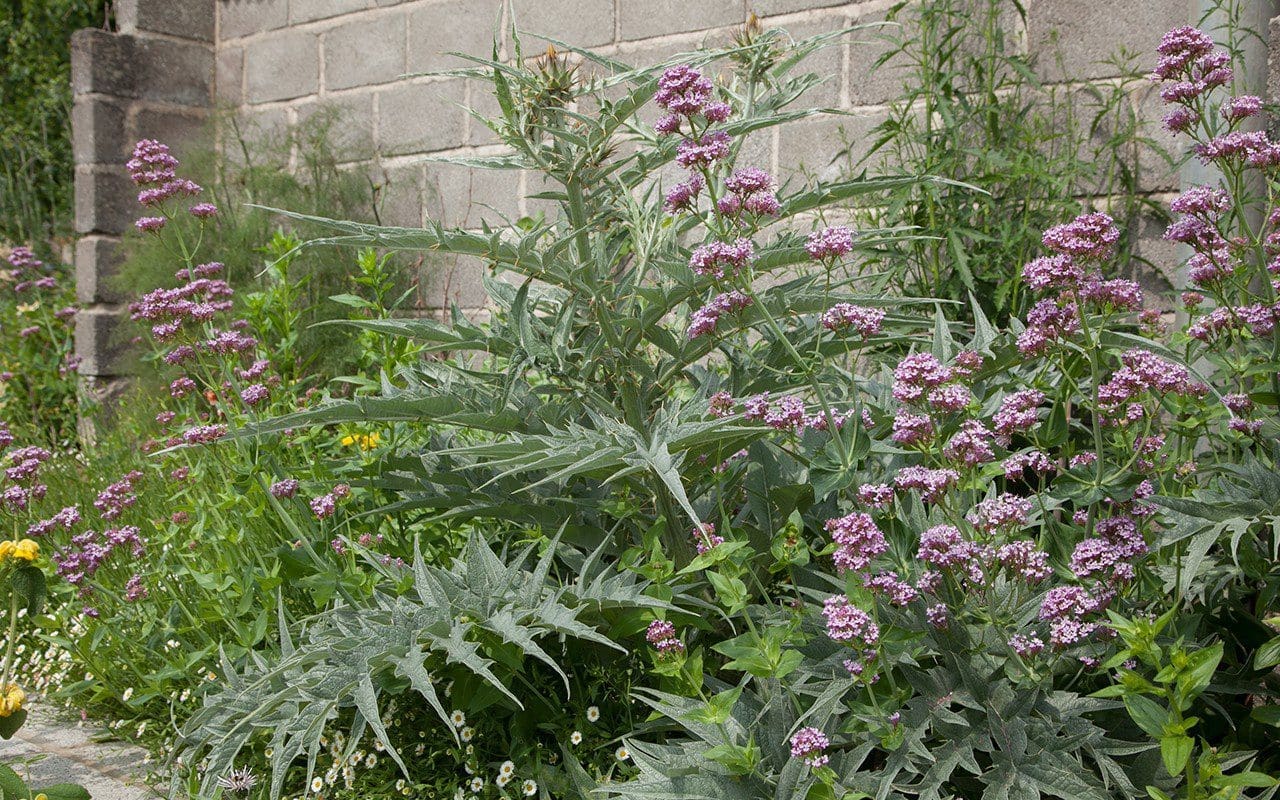 Cynara cardunculus ‘Dwarf Form’ with Centranthus lecoqii
Fergus Garret pointed me to a dwarf form that they have in the garden at Great Dixter and I grow it here against the barn. I am not usually a fan of plants selected for dwarfism, but this cardoon makes for a better-behaved plant. It is distilled in all it’s parts, and more evil to the touch, the undersides of every leaf defended with an armoury of needle-sharp spines. Its foliage is as beautiful, possibly more finely divided, and certainly more compact. It tops out at about a metre and so avoids the need for staking. In the border where I grow it with Centranthus lecoqii and Romneya coulteri it has taken it’s territory, but the repercussions are altogether more manageable, and I still feel I have the drama I am looking for.
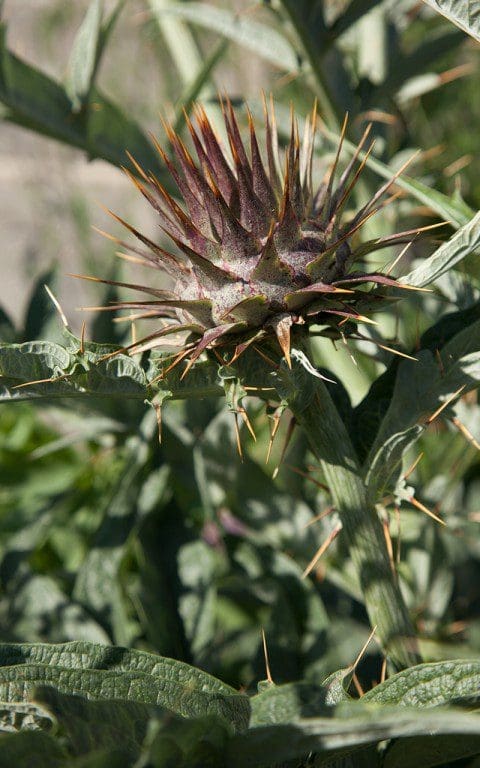 Cynara cardunculus ‘Dwarf Form’
Words: Dan Pearson / Photographs: Huw Morgan
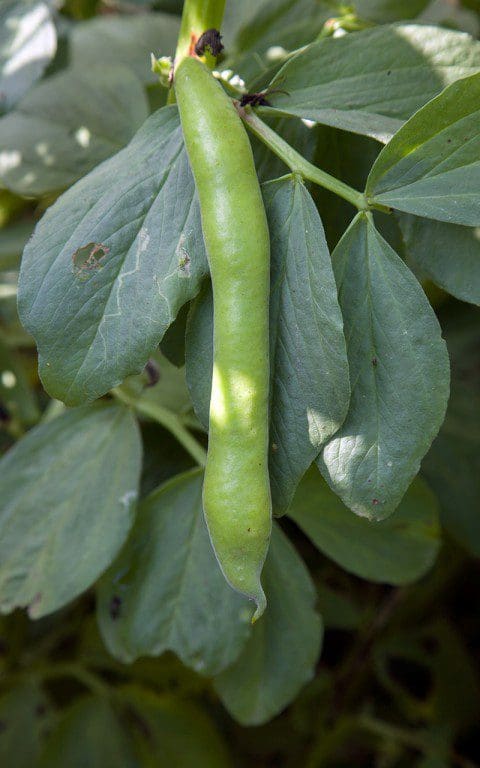
Broad beans (Vicia faba) are a kitchen garden staple for us and, gratifyingly, one of the easiest crops to grow. Every year we make an autumn sowing from October to early November, depending on the weather. If sown early in a warm autumn they can grow too large before winter and are then susceptible to wind rock, frost or snow. If sown too late in a cold, wet autumn there is not be enough time for them to get away before winter descends. Autumn sown beans are less prone to black-fly, produce stockier plants and an earlier crop of beans. In a warm spring this is sometimes as early as mid-May.
Our first harvest this year was in early June, but we also made a spring sowing of beans in 9cm pots in early March, which were brought on in the cold frame and planted out in April. These plants are starting to crop now, just as we have taken the last of the beans from the winter sown plants. In a good year this means that we can have beans from mid-May until mid-July.
In our experience spring sown plants tend to be leggier and less productive, so it is worth choosing shorter-growing varieties as the taller ones will need staking. We habitually sow Super Aquadulce in winter and Hangdown Green in spring. As soon as the beans are finished you should cut off the growth above ground, but leave the roots in the soil as they fix nitrogen. Replant with later summer leaf vegetables which thrive on the nitrogen, such as salad or chard.
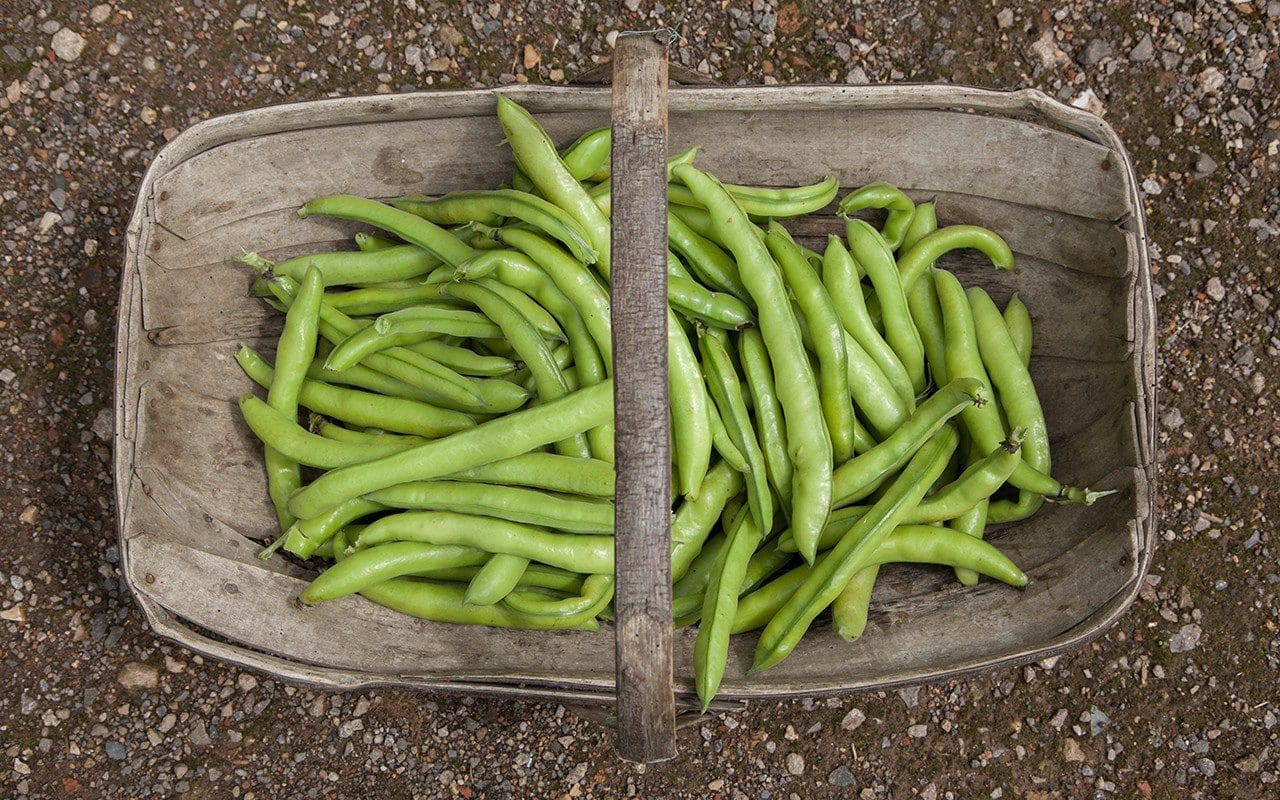
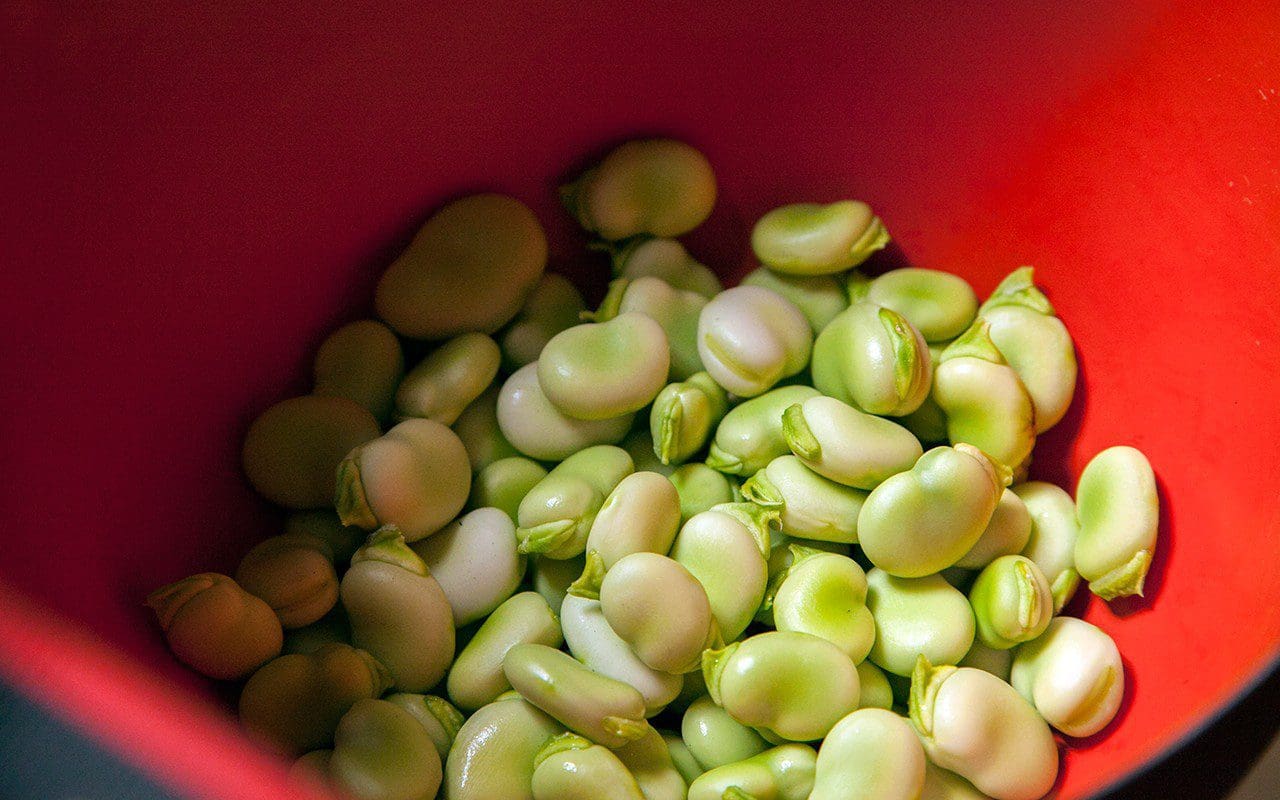
At this crossover point from the winter to spring sown beans we often end up with a mixed harvest of large and medium sized beans, with their tougher, more bitter skins, and very small, sweet beans which can be eaten straight from the pod. If so I will cook them in two batches, cooking the larger beans for 3 minutes and just blanching the smaller ones for a minute.
This is such a simple recipe and one I return to every year in some shape or form. Who doesn’t like fresh garden vegetables on toast ? It is extremely adaptable and, as the season progresses the broad beans can be replaced with peas, chargrilled courgettes, roasted young beetroot or carrots, wilted chard, chargrilled chicory or blanched french beans. The herb can be substituted with others as available and appropriate – dill, fennel, chervil, basil or parsley. If you can’t find ricotta substitute with goat or sheep’s curd, or a soft young goat’s cheese.
Serves 2
Ingredients
150g podded broad beans
200g ricotta
2 thick slices of sourdough bread
Extra virgin olive oil
A clove of garlic
Zest and juice of 1/2 a large lemon
A handful of mint leaves, coarsely chopped, a few reserved to finish
Salt and ground black pepper
Method
Bring a pan of water to the boil. Cook the beans in batches for 1 – 3 minutes, depending on size. Drain and put into a bowl of cold water to refresh. Drain again.
Remove the large and medium beans from their skins – the very smallest can be left with their skins on – and put into a bowl with the mint, half the lemon zest, the lemon juice and two tablespoons of olive oil. Season to taste and stir.
Season the ricotta with salt and pepper to taste.
Drizzle or brush olive oil onto both sides of the sourdough bread. Grill each side until well browned with some light charring. Alternatively bake in a hot oven (200°C) for 8 to 10 minutes, turning them over at the half way point. When done and while still hot, rub the upper side of each slice of toast with the clove of garlic.
Spread half of the ricotta on each slice of toast. Spoon on the broad beans. Finish with the reserved mint leaves, the remaining lemon zest and a drizzle of olive oil.
Serve immediately.
Recipe & photographs: Huw Morgan
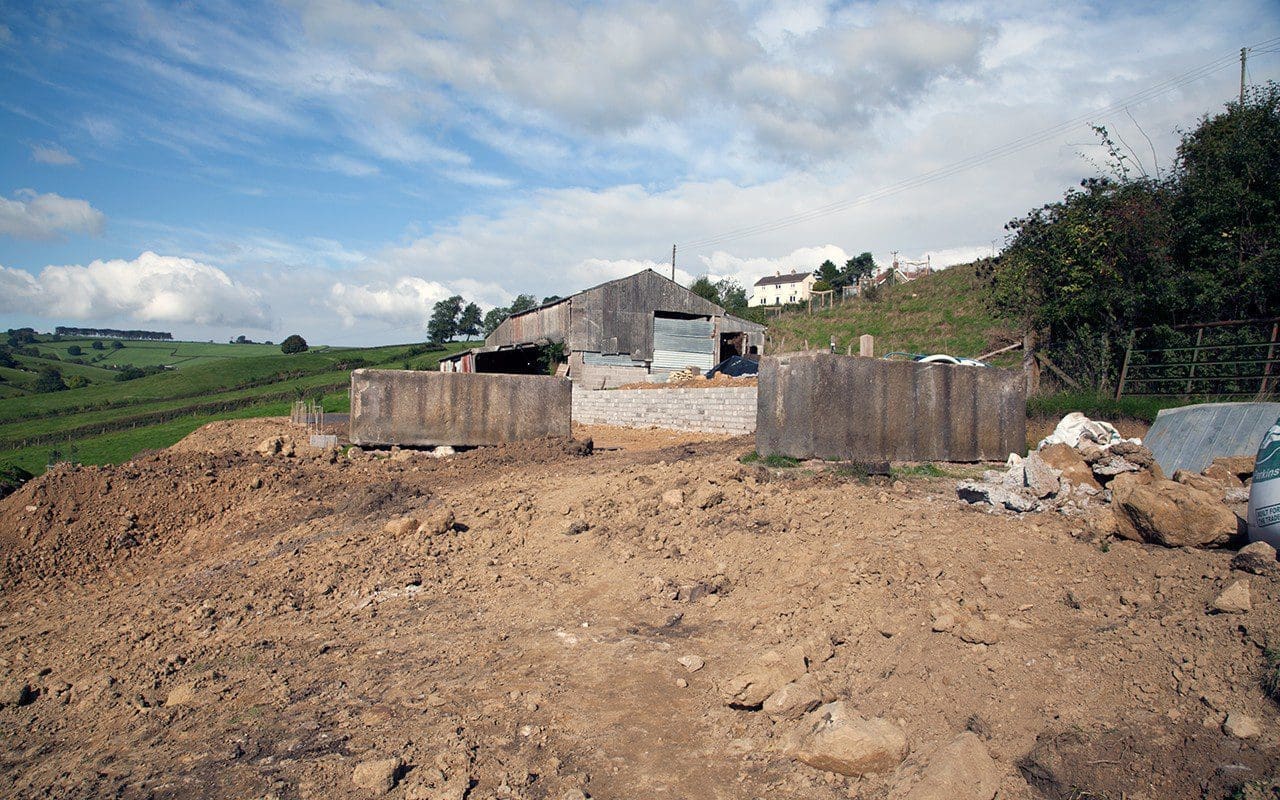
When we arrived here the flat ground was literally no more than a strip in front of the outbuildings. We perched a table and chairs there to make the most of not being on the angle. The floor of the boot room and those of the outhouses, the barns and levels of the farmyards were a patchwork of concrete, poured in mismatched batches and at a rake with the slope. The acuteness of the land had been diminished to create these spaces, but only enough to ease the grade. I didn’t know until we set out to create a new level why the farmer before us had minimised his excavations. Cut into the land and you quickly find the spring line.
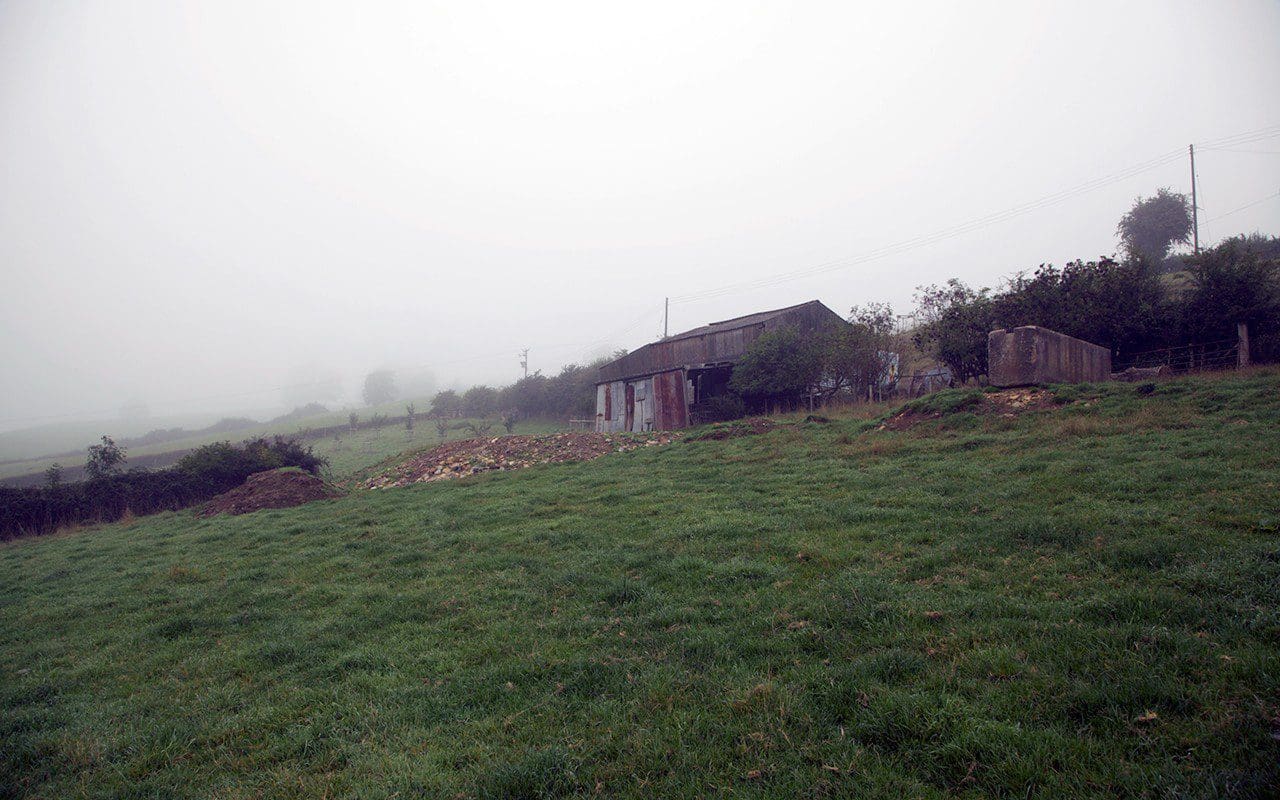 Autumn 2012
Two summers in it was clear that we needed a dedicated garden for fruit and vegetables. They were being challenged for space in the trial garden and we had become tired of negotiating the slopes for the detailed work that is part of growing your own. Sowing, thinning, weeding and harvesting on a slope were all that much harder with one leg shorter than the other and tools and buckets balanced. Beyond the tin barns the newly planted orchard was beginning to show, and the barns were the natural anchor point for a productive garden. We planned to grow figs and espaliered pears against the south facing breeze block walls of the barns and, on newly flat ground, soft fruit and vegetables, both annual and perennial.
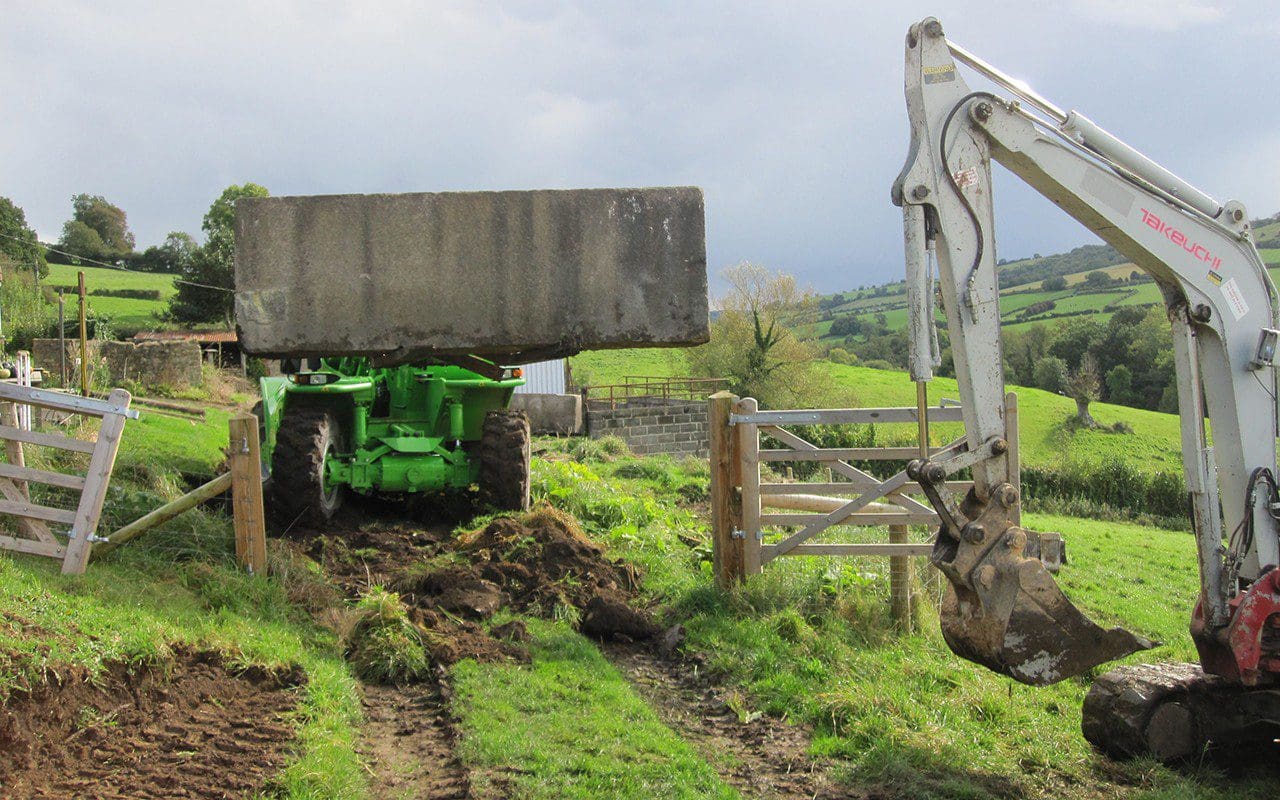 October 2012
The first step in the process was made in October 2012 with the installation of a pair of monolithic 18th century granite troughs. I had three in total, brought all way from Yorkshire, but originally from eastern Europe where they had been used for tanning leather. They were magnificent things and I planned a pair as a division between the house and the long view west to the new kitchen garden. It was a Herculean task to get them in place. Each weighed four and a half tonnes and, in combination with the fifteen tonne fork-lift used to move them, the track collapsed and the concrete farmyard literally buckled under their weight. In the process we lost the drains from the house as the fork-lift crushed them, but my landscaper who was driving never flinched as the trough tilted the machine at a perilous angle. We threw rubble into the ruts and started again and, though it took all day to inch them to where I wanted them, they eventually reached their positions.
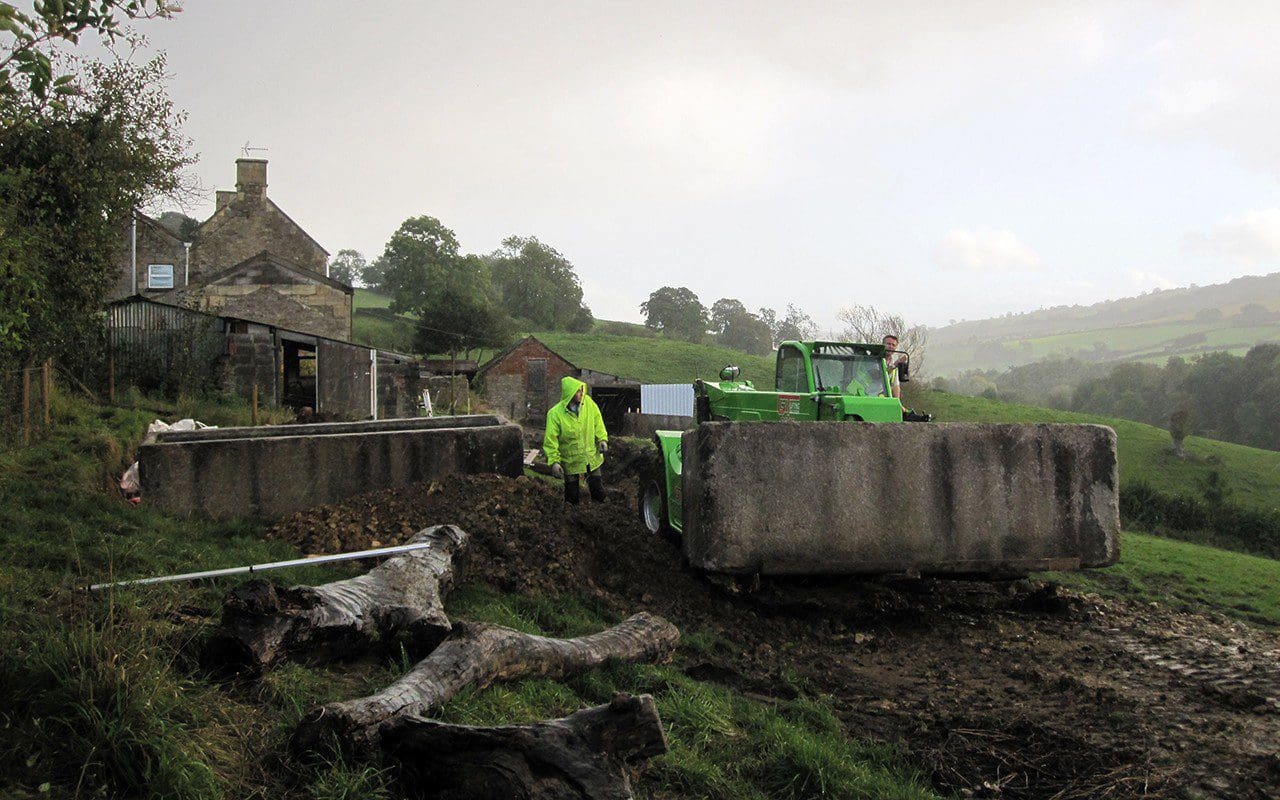
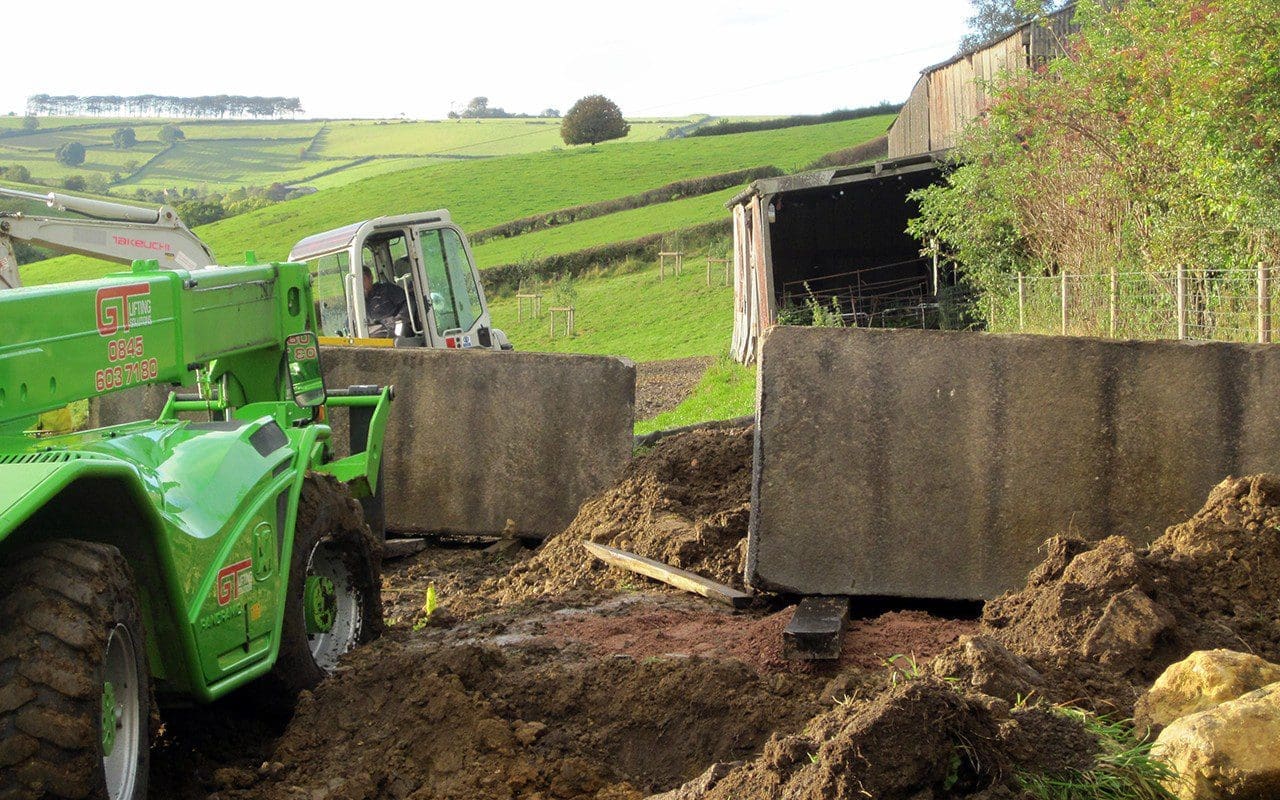 October 2012
I wanted the troughs to sit as an offset pair, running across the spine of the new level that links the house with the barns. Here they would act as a gateway to the vegetable garden, while also screening it from the house and defining the space. Their bold outline would echo the straight line of trees on the distant horizon. One would be filled with rainwater from the roofs for hand-watering, the other would eventually be fed by the disused hydraulic ram pump down by the brook in a long-term plan to refurbish it. When you passed between them, an orderly set of beds would run like ribs north south off the east, west axis. The orientation of the beds would allow for the best and most even light for each of the crops.
 September 2013
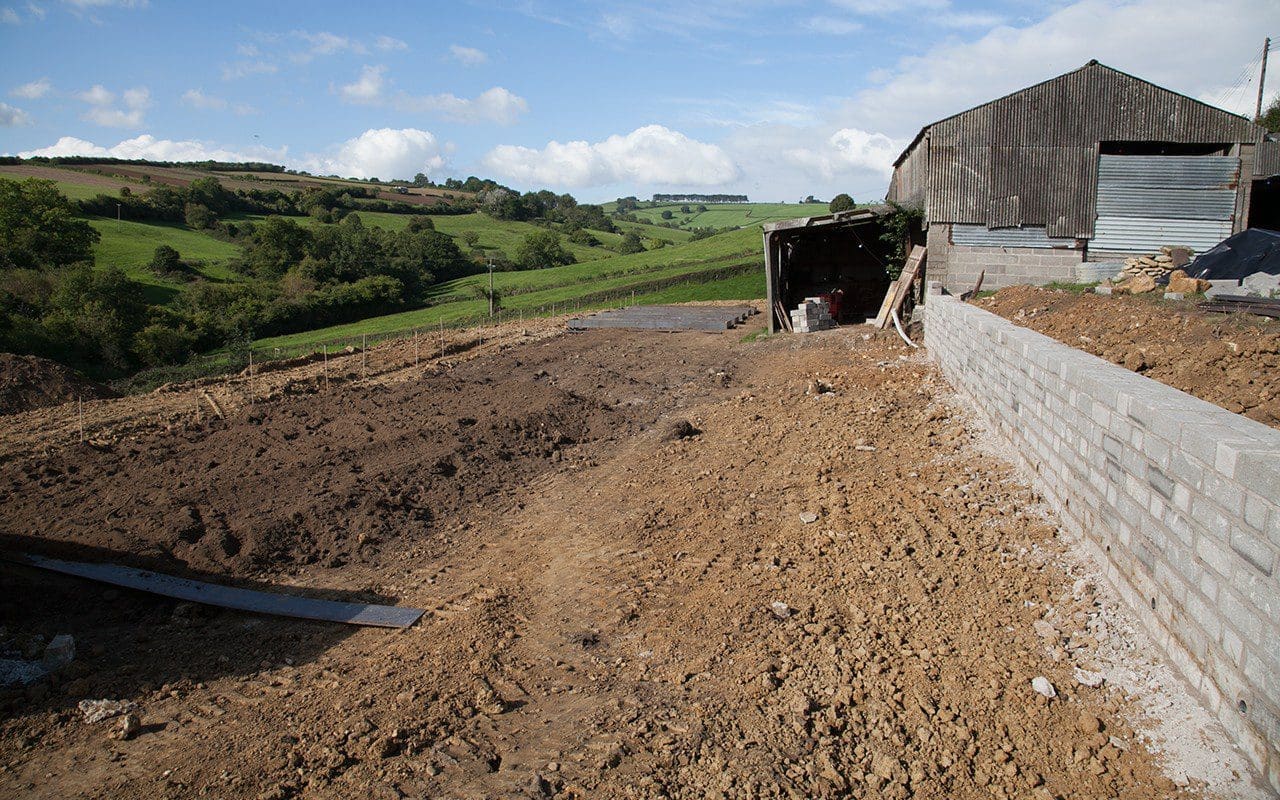
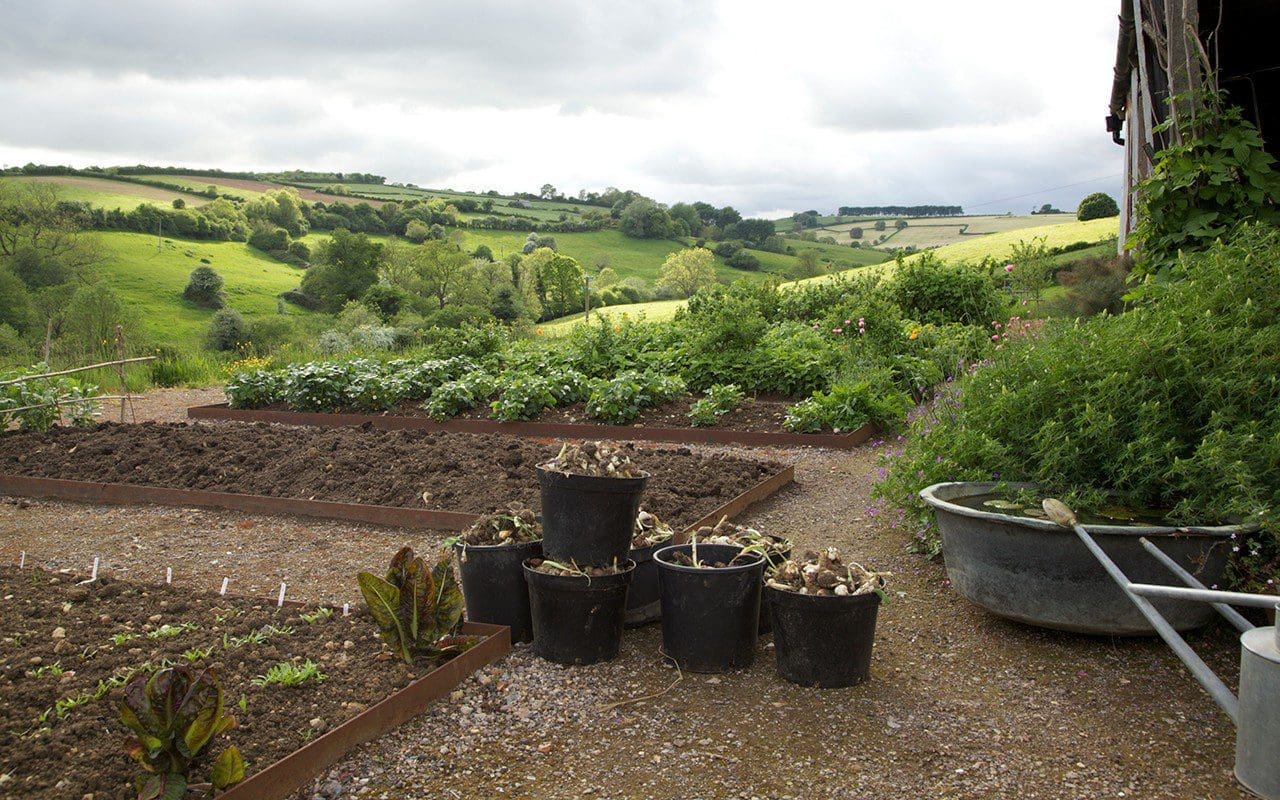
Nearly a year later in the last week of August and riding good weather for the best part of three weeks, we started the land-forming to create the garden beyond the troughs. The digger scraped back the slope to make a spine of flat land between the house and the barns, while another cut made to level a sloping track in the field above the house provided the subsoil to make up the level from the barns. A breeze block wall was made to hold the land to the upper side of the spine, and provided the garden with a wall for espaliered pears and shelter for vegetables that would like the radiant heat – an asparagus bed, globe artichokes, courgettes and climbing beans. Breeze block felt like the right material to use as it sat well with the agricultural aesthetic in which things had been built in the past.
 September 2013
The topsoil, and the turf that came with it, were harvested and piled in the field below the new garden. It was stacked wider than it was high at 4’ or so, because if you stack soil higher the soil bacteria at the bottom of the pile get smothered and the soil becomes infertile. The sod rotted down to add organic matter, as the pile had to stay where it was until the following summer for, in mid-September, the rains came and made the site unworkable.
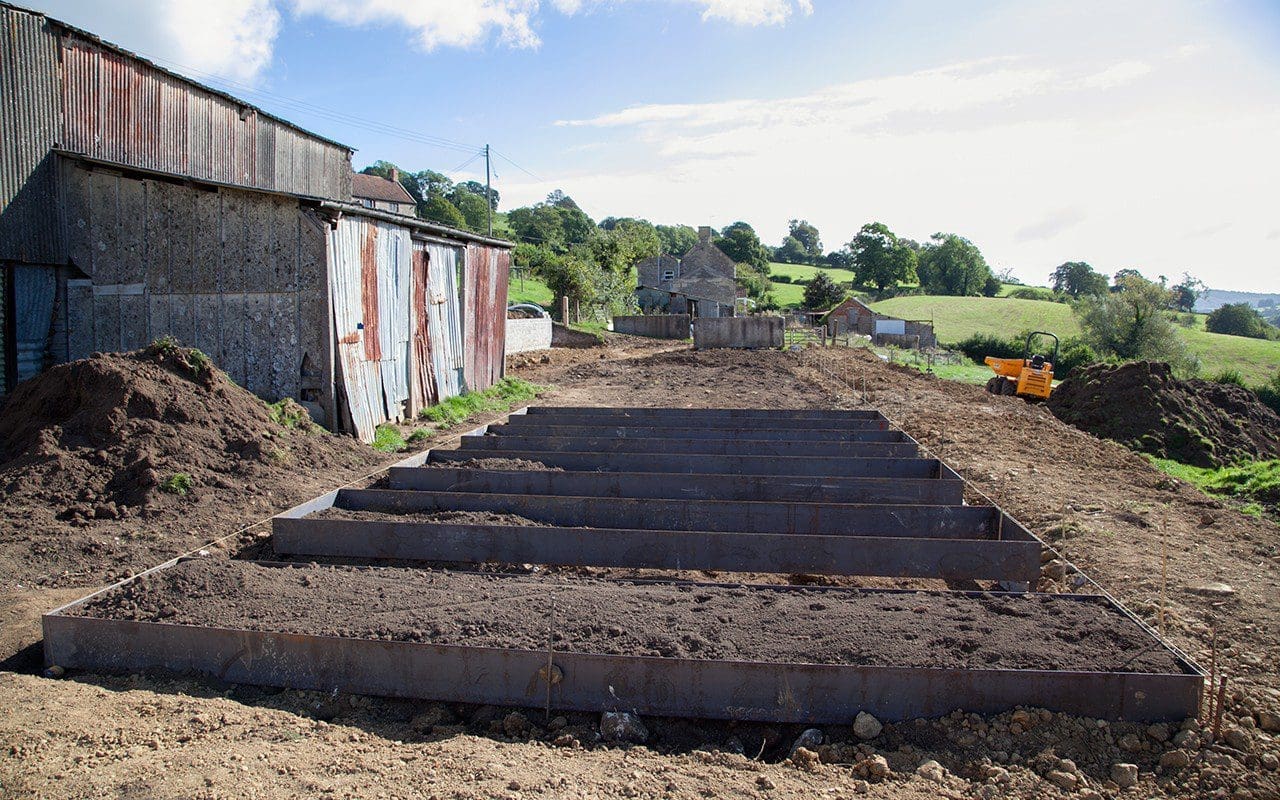
The scraping revealed the rubbly limestone brash that was perfect for making up the levels, but the brash sat on clay and, as soon as the rains came, a number of springs that had been moving through the slopes unseen, began running over the surface. As luck would have it, we had poured the footings for the wall by this point, but the workmen suffered, moving through the mud in slow motion to build the wall and then constructing a series of steel-edged beds. Mud stopped play not long after but, as soon as the weather was dry enough the following spring, the beds were soiled up to the depth of a generous spit.
 September 2013
 Spring 2014
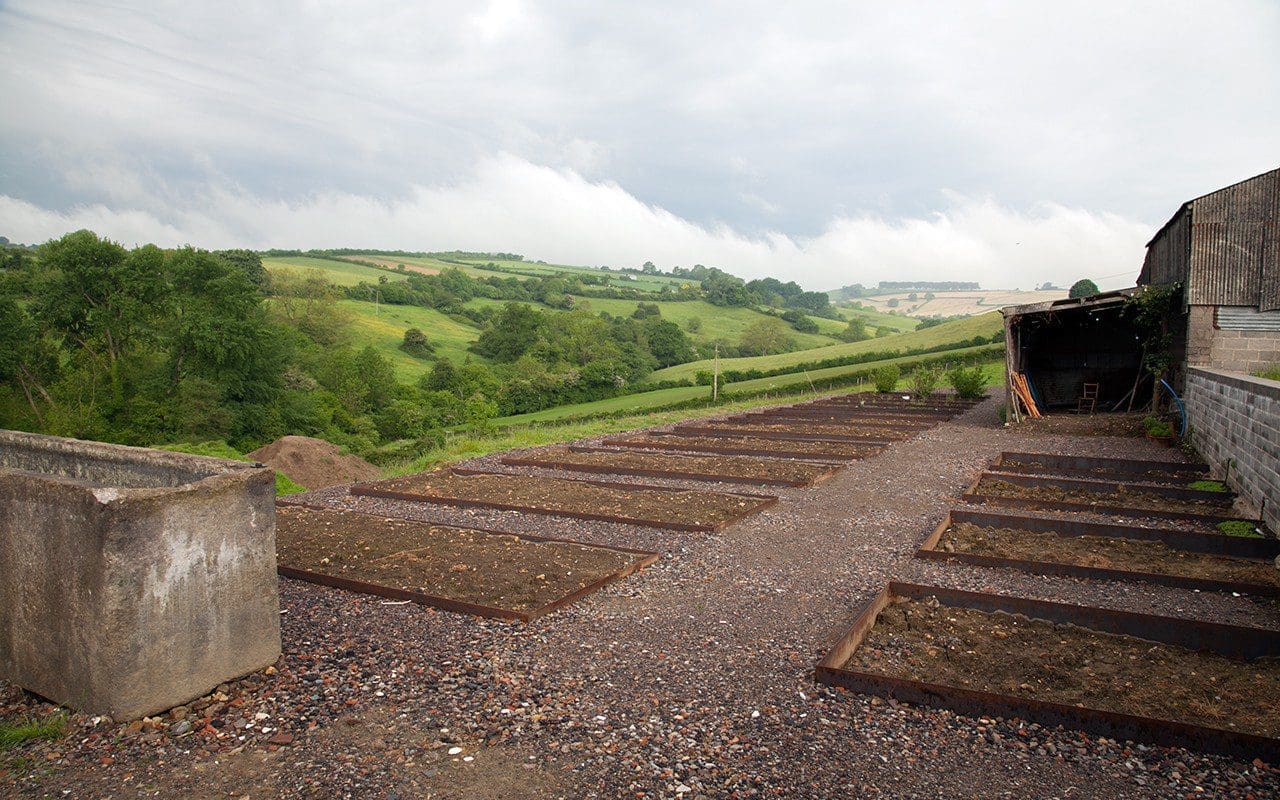
I graded the beds, starting with narrow metre wide beds at the windward westerly end of the garden. These were planted with the woody currants, gooseberries and raspberries to provide some wind protection. All the paths between the beds are a metre twenty wide to allow plenty of room for a barrow and growth to encroach from either side. The beds scale up in size to one and a half metres and then two metres wide, but no more, so that it is easy to work the beds from either side without having to tread on the soil more than necessary. That first summer we left the majority of the beds fallow, removing perennial weeds and mulching them with manure, which we dug in over the winter. We did plant a couple of the beds with brassicas and winter sown broad beans to make us feel like we were moving in the right direction.
Last year was our first summer growing in this new space and we are learning again with a new position and the challenges that come with it. Our knees and backs are certainly better for the flat ground – we can move about freely without having to watch our step – but we are finding that some crops are missing the protection afforded by the hedge in the old garden. We are working on the soil with our own compost this year and talking about making a couple of the beds no dig next year. But for now, the summer and whatever it will teach us, lies in waiting.
 Spring 2016
Words: Dan Pearson / Photographs: Dan Pearson & Huw Morgan
Although asparagus only became prized as a culinary vegetable in Britain in the 17th century it was grown, and indeed prized, by the ancients as a medicinal herb and vegetable. The Romans even froze it in the High Alps, with the Emperor Augustus creating the Asparagus Fleet to take the freshly pulled spears to be buried in the snow for later.
The tips, which are the sweetest part and known as the love tips or ‘points d’amour’, are always best when eaten fresh and, though we think nothing of seeing it on the supermarket shelves as an import, there is nothing like eating it in season, right there and then, when the energy of the new season is captured in young spears.
So it is a good feeling to have planted an asparagus bed, as they represent longevity and permanence. Plant one and it will take two to three years to yield, but established crowns can easily crop for a couple of decades if you give them the care they need; namely good drainage, plenty of sunshine and little competition at the root. The roots, which radiate out from a crown in spidery fashion, are shallow, and hoeing is not advisable, so an asparagus bed is also a commitment to hand weeding. You will have to work for your reward.
“…established crowns can easily crop for a couple of decades if you give them the care they need…”
Being a coastal plant, Asparagus officinalis is tolerant of salt, indeed tradition has it that the beds be salted to keep weeds at bay. However, I do not. In truth my bed is far from text book perfect. I have not raised it above the surrounding ground like the carefully drawn diagrams in the books, and the Californian poppies and Shirley poppies have seeded into the open, weed-free ground to become the, admittedly attractive, weeds in the patch.
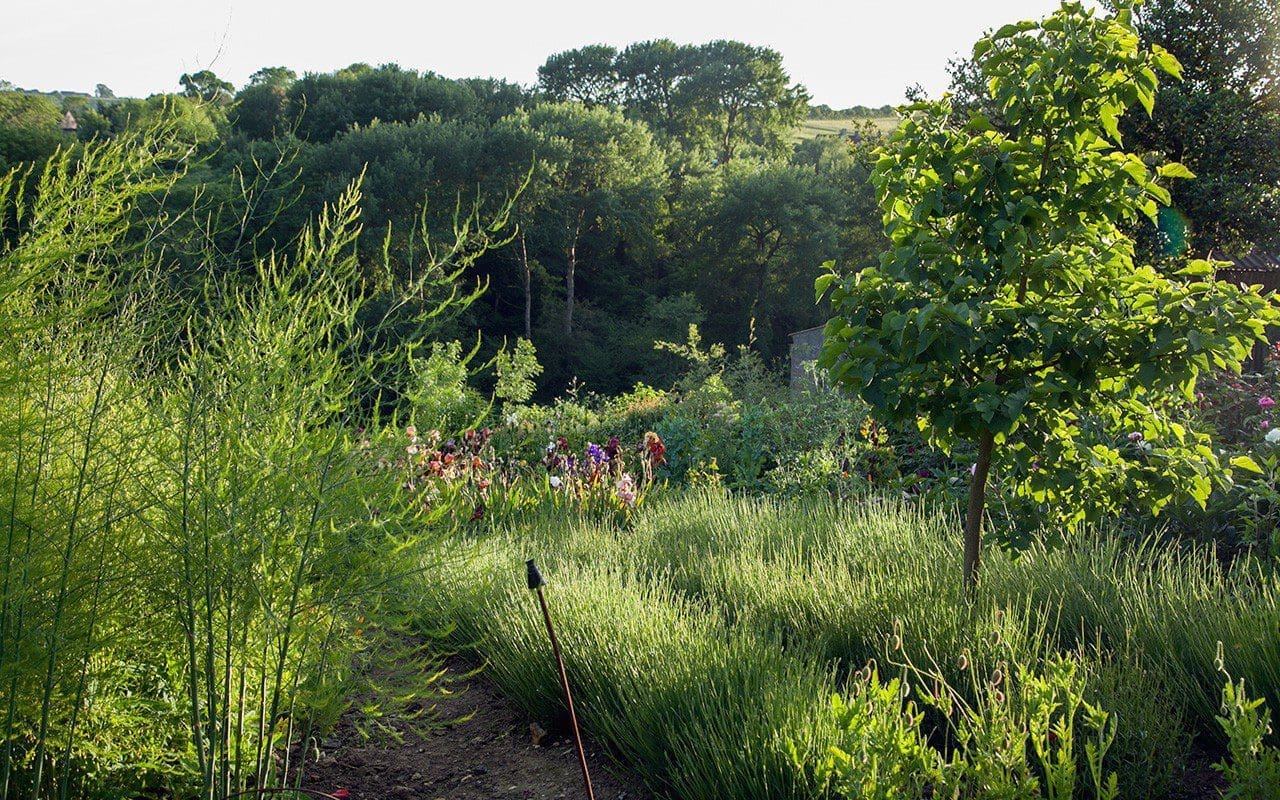
I winkle the Eschscholzia out where they seed too close to the crowns, but leave a handful, as they like the same conditions and sit brightly beneath the fronds once the asparagus is allowed to grow out after cropping. The few plants that are female pepper themselves with scarlet, pea-sized fruits, which hang in suspension like beads caught in a net as the fronds fade to butter-yellow later in the season. It is a fine but unadvisable association, if playing things by the book is your thing.
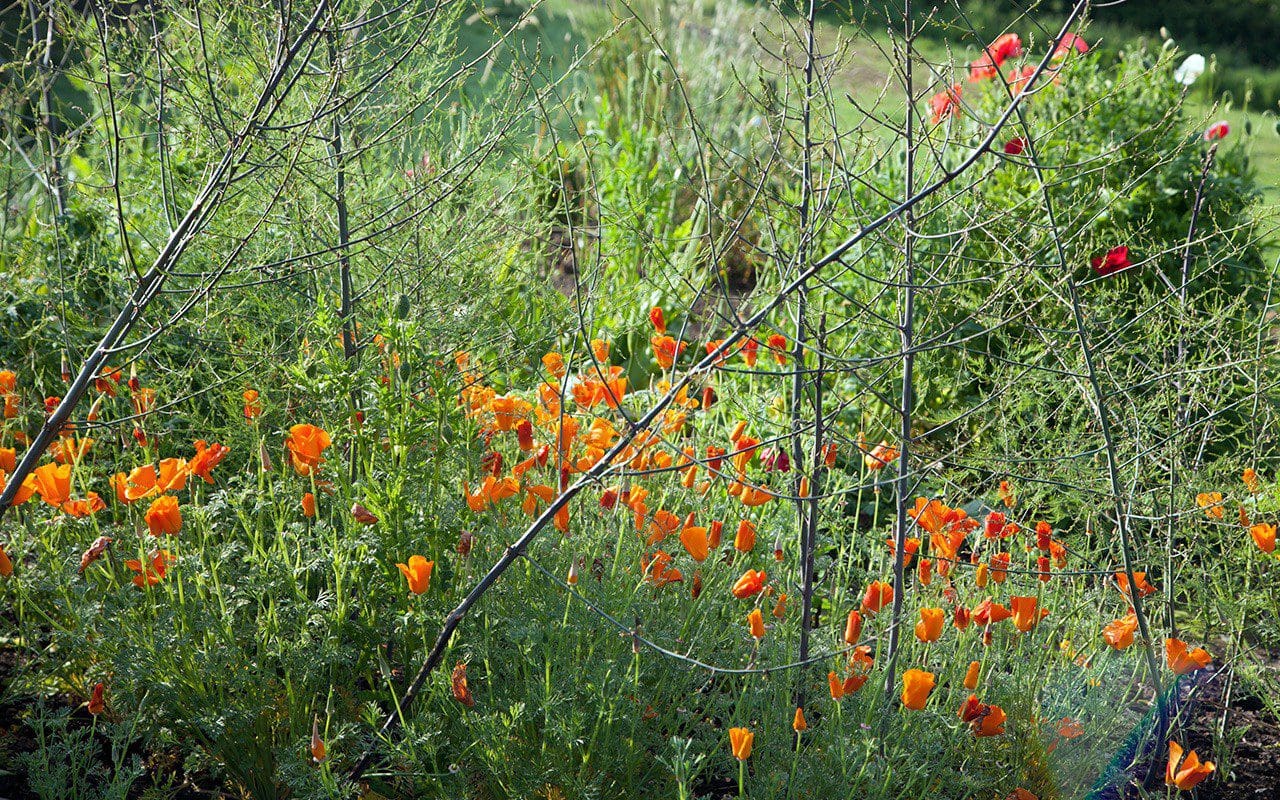 Californian poppies provide interest beneath the asparagus ferns later in the season
Our first asparagus bed was planted four years ago in the original mixed vegetable and trial garden. The crowns, which are best planted bare-root in the spring, arrived by post and were carefully planted in late April. The soil was manured the previous summer and the crowns laid out on an 18” grid. The books advise two feet between rows, but our slopes are sunny and the ground hearty, so I took the risk with a closer planting.
I opened a trench and fashioned a little mound of soil for each plant to allow the roots to radiate out, down and away from the crown. The trench was then backfilled with the crown just below ground level and marked with a cane to protect the position of the first emerging spears. Over the first year the crowns gather in strength, each frond outreaching the next so that, by the end of the first summer, they are already showing their potential. It is essential to wait before cropping to allow the plants to build up their reserves. I cropped them for the first time last year, but took only a few spears to avoid weakening them. This year, there will be no need to hold back.
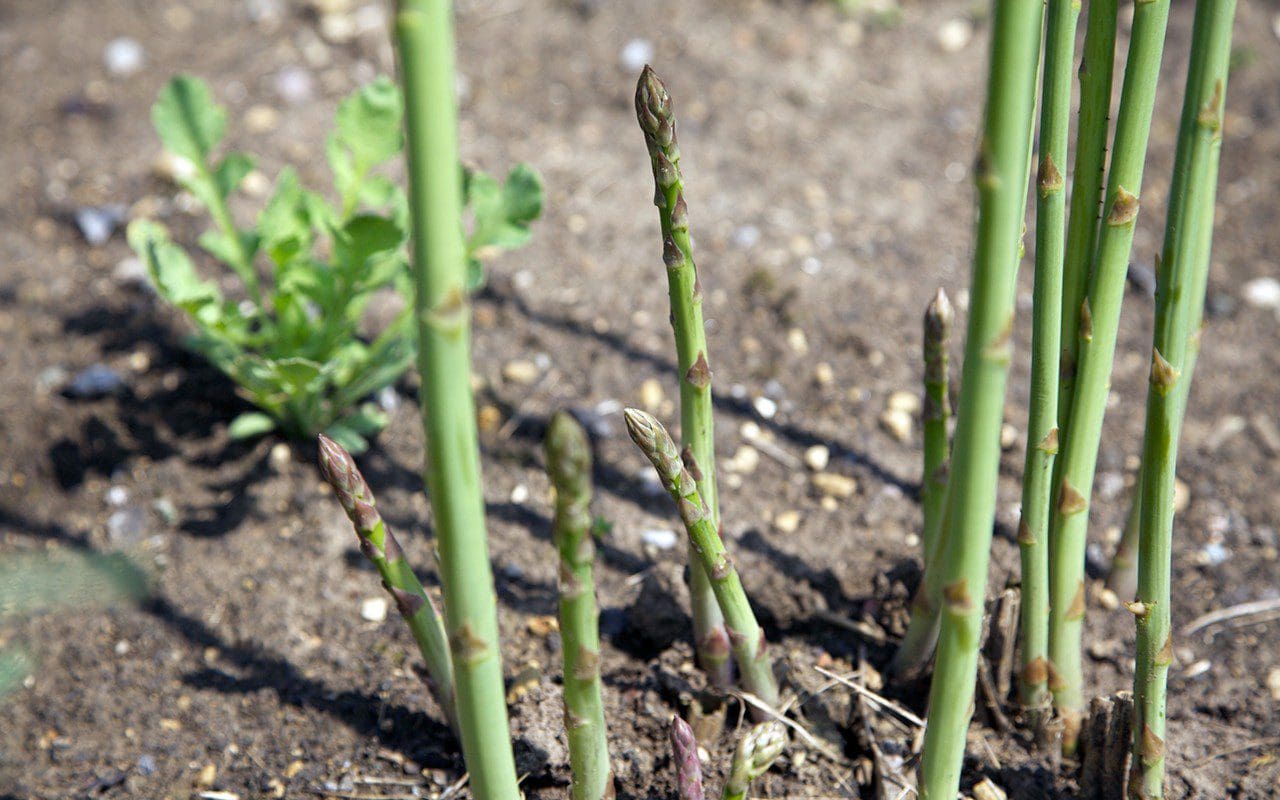 Asparagus officinalis ‘Connover’s Colossal’
I bought two varieties initially, both male, so I am not sure how I have females in the mix, but no matter. Male plants are more productive and so, according to the rules, the berrying females should be weeded out. ‘Connover’s Colossal’, an old 19th century variety, is a reliably strong cultivar, but ‘Stewart’s Purple’ has been disappointing. It is supposed to be higher yielding than many of the green varieties, but you only really know and understand what a plant’s habits are when you grow it for yourself and, for me, ‘Stewart’s Purple’ doesn’t cut the mustard.
A third of the plants have failed and, although the spears are a beautiful inky purple colour and deliciously sweet, even the plants that have survived have cropped very erratically. They require far too much space to waste on such a meagre harvest. Anthocyanins, which give vegetables and fruit their purple colouring, are valued as antioxidants, but I wouldn’t grow this variety again other than to possibly work it into the herb garden as an ornamental. Here, with moody fronds rising up prettily above chives and purple sage, occasional spears could be harvested and thinly sliced raw into salads.
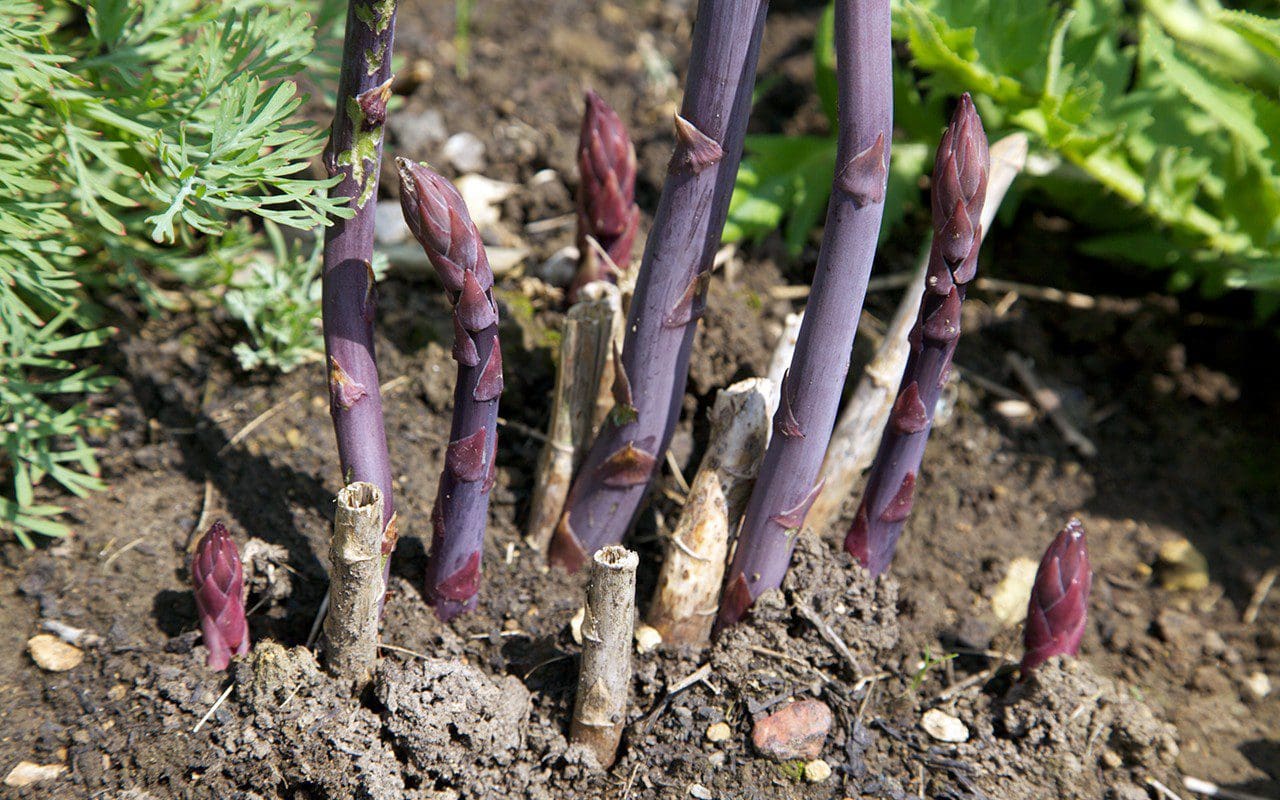 Asparagus officinalis ‘Stewart’s Purple’
There is an associated guilt attached to my original asparagus bed, which comes from the knowledge that the bed could never have been long-term. I always knew the test garden would give way to a new ornamental garden and, over the last couple of years, I have been relocating the vegetable garden to the other side of the house. The diggers are coming in shortly to shape the land for the new garden, but the asparagus bed will remain for one more year, like a boat anchored off shore.
Last spring I planted an F1 variety called ‘Gijnlim’ in the new vegetable garden to pave the way for the hand over from the old bed to the new. Having been selected for its hybrid vigour ‘Gijnlim’ is said to crop within a year, but I am still leaving it this year to build up reserves, mulching the bed with home-made compost before the spears emerge. It won’t be easy to cut my old bed adrift when I have to later in the autumn, but for now we are enjoying the luxury of eating the spears absolutely in season, when the garden is beginning to rush with energy.
“It won’t be easy to cut my old bed adrift when I have to later in the autumn….”
When a bed is up and moving in the spring, you can visit it daily for three weeks or so of harvesting. A sharp knife inserted carefully at the base of a spear and just below ground level is the best way to pick what you need, but be careful not to damage the crown. See it as a surgical exercise and, for best and sweetest results, pick just before you eat. Steam and serve al dente and every mouthful will be worth the commitment.
If you read up about asparagus yields to try and arrive at an ideal number of plants for a bed that suits your needs you get wildly differing advice. An American website says that 24 plants produce enough for a family of four. Big portions I’m guessing, but advice closer to home advises ten to twenty plants for the same number of people. We have sixteen crowns in the new bed and hope that this will be plentiful enough to pick what we need without providing a guilt-inducing glut. I’d have liked for there to be two varieties, so that we have an early cropper and a late, but we have had to draw the line somewhere. There is only so much ground that can be committed to perennial vegetables, even one as delectable as sparrow-grass.
Words: Dan Pearson / Photographs: Huw Morgan
We are sorry but the page you are looking for does not exist. You could return to the homepage