ALREADY A PAID SUBSCRIBER? SIGN IN
ALREADY A PAID SUBSCRIBER? SIGN IN
ALREADY A PAID SUBSCRIBER? SIGN IN
ALREADY A PAID SUBSCRIBER? SIGN IN
Twenty six years ago I bought a newly published recipe book, which was to have a major impact on the way I cooked. It was the first River Café Cookbook. Throughout my university years I had been cooking from the books of Elizabeth David, Jane Grigson, Marcella Hazan, Richard Olney, Elisabeth Luard and Claudia Roden, but there was something strikingly different about Rose Gray and Ruthie Rogers’ approach to the Mediterranean kitchen.
Looking back, it is hard to imagine that their approach felt so new, so accustomed are we now to the ideas of seasonal eating and only using the best quality produce, but their minimal approach to preparation and presentation, so artfully expressed in the clean graphic design of the book itself, was not the norm and it was this simplicity of approach and insistence on the very best produce which still sets The River Café apart.
When I worked in film in the 1990s I was lucky enough to eat at The River Café on numerous occasions, my bill charged to various people’s expense accounts. Although it was, and still is, a glamorous destination the food was so memorable that after those heady days were over Dan and I would return whenever we wanted a meal to mark a special occasion; a fortieth birthday, a special friend visiting from overseas, a pre-marriage celebration, the purchase of Hillside. In the abstract, if you look at their menu, the food certainly looks expensive, but in all the years I have eaten there I have never once felt that the food is overpriced. The attention to detail in every aspect of the experience elevates it to a level that makes total sense of restaurant eating. If anyone ever comes to London and asks which is the best restaurant we can recommend I always answer, without hesitation, ‘The River Café’.
Several years ago, faced with this very question from Midori Shintani, head gardener at Tokachi Millennium Forest and an inveterate foodie, we booked ourselves a table. As the first plates were brought out I suddenly saw in the expression on Midori’s face that, although the ingredients may have been European and unusual to her, the care taken with the food was instantly comprehensible. Their restraint and reverence for seasonality and ingredients at their best and the honesty of presentation is comparable to that of domestic and commercial kitchens the length and breadth of Japan.
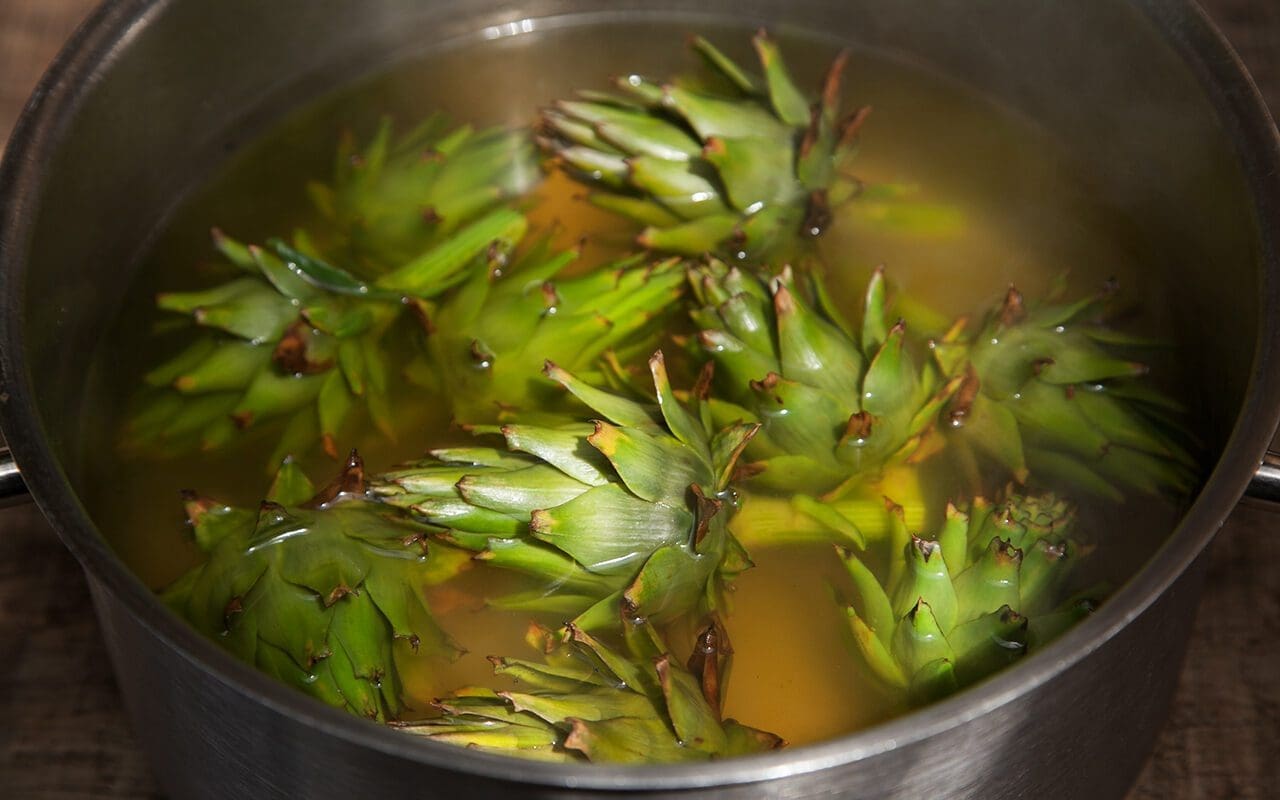
A favourite recipe from that first book, and one I have lost count of the number of times I have made, is for vignole, a Roman stew of fresh spring vegetables. Also known as vignarole, the vegetables traditionally used are artichokes, broad beans and peas. However, regardless of how good a spring we have or what countless restaurant kitchens would have you believe, these could never really be considered spring vegetables in Britain, so it is a dish I normally make in early summer. The vegetable garden got off to a very slow start this year and, although we have had artichokes for several weeks, it is only now that all three primary ingredients are cropping together. Given the lateness of the season we now also have the first Florence fennel, shallots, courgettes, bush beans and new season garlic, so this dish, based on the method used for vignole, uses everything that is at its best in the vegetable garden right now.

Recipes like this are infinitely adaptable. The only thing to remember is to add the vegetables to the pan in the order of those requiring the longest cooking first. Quartered baby turnips, carrots or the tiniest new potatoes near the start of the cooking time. Earlier in the season, asparagus spears make a fine addition. Add them at the same time as the broad beans. Young chard leaves or spinach can be added at the last minute or tiny radishes. Although mint is the customary herb to use for vignole, at this point in the year I like to combine it with basil which is growing in profusion in the polytunnel, the aniseed flavour of which complements the fennel well.
Serve warm to allow full appreciation of the different flavours and textures, this can be eaten alone as a starter with grilled bruschetta, accompanied perhaps with a melting burrata or fresh mozzarella or to accompany a piece of firm white fish such as halibut.
10 small artichokes with stalks
400g of peas in their pods or a mixture of peas and mange tout – 150g shelled weight
400g broad beans in their pods – 150g shelled weight
150g fine French beans
4 banana shallots – around 300g
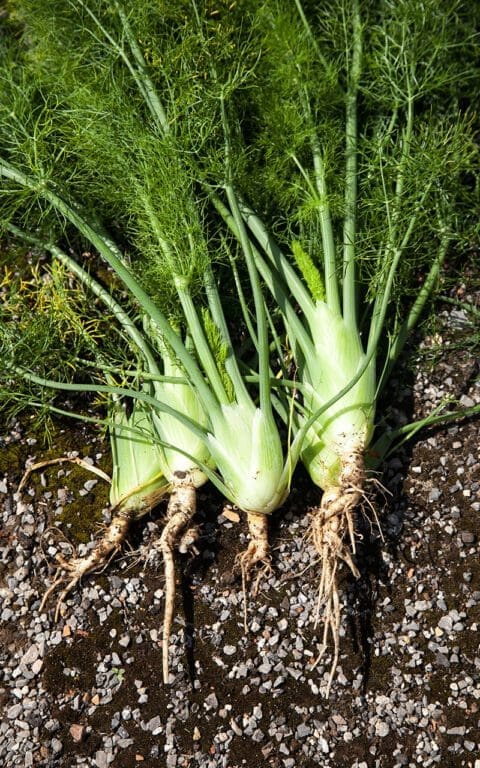
4 baby Florence fennel – around 125g
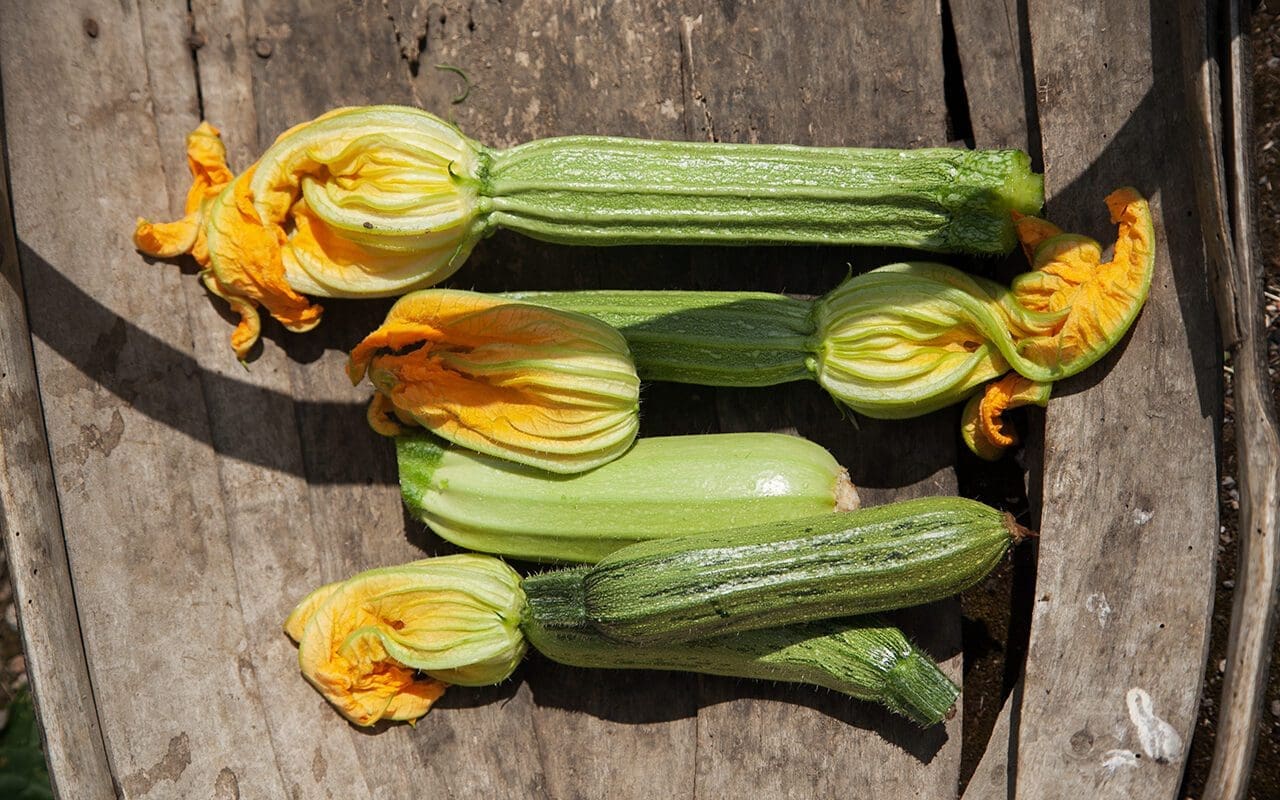
3 small courgettes with flowers – around 250g
2 Little Gem lettuces
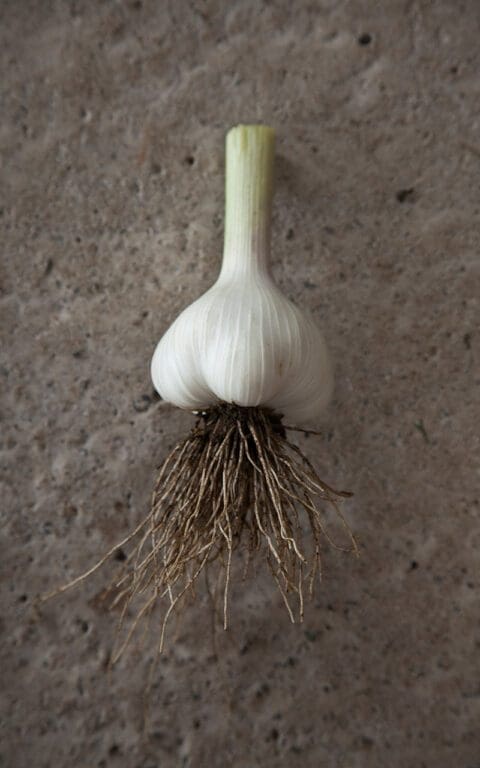
2 fat cloves of new season garlic
A small glass of dry white wine, water or stock – about 120ml
A small bunch of Genovese basil
A small bunch of fresh garden mint
The juice of two lemons
Serves 4 to 6
Bring a large pan of water to the boil. Cook the whole artichokes for 5 minutes. Drain and allow to cool.
Shell the peas and broad beans and put in a bowl.
Cut off the stalk ends of the French beans.
Remove the roots, outer leaves, stems and foliage from the Florence fennel. Cut lengthways into eighths.
Peel the shallots and trim off the roots, retaining enough at the base, however, to hold the pieces together when cut lengthways into eighths.
Peel and finely chop the garlic.
Remove the flowers from the courgettes and retain. Cut off the top and bottom of the courgette. With the courgette lying horizontally on the chopping board cut off a diagonal piece from left to right. Roll the courgette a quarter turn away from you and make the same diagonal cut again. Keep turning and cutting until you have wedge shaped pieces of comparable size.
Remove the outer leaves from the lettuces until you are left with the hearts. Keep the leaves for a salad. Trim off any thick stalk, then cut the hearts lengthways into eighths.
In a heavy bottomed large pan gently heat the olive oil over a low heat.
Make a cartouche from a piece of dampened greaseproof paper large enough to cover the inside of the pan.
Add the shallot and garlic to the pan. Stir to coat with the oil. Lay the cartouche over the top, tucking it in to the sides so that no steam escapes. Put the lid on the pan and leave to cook on the lowest possible heat for about 10 minutes until the shallots are translucent and lightly coloured.
Remove the cartouche. Add the fennel and stir. Replace the cartouche and lid and cook for another 3 minutes
While the shallots and fennel are cooking remove the outer leaves from the artichokes and scrape any fibres from the stalk with the edge of a knife. Cut the spiny tops from the inner leaves. Cut the artichokes in half, remove the chokes with a teaspoon and then drop the hearts into a bowl of water to which you have added the juice of one lemon. When they are all done remove them from the water with a slotted spoon and add to the pan of shallots and fennel with the courgettes and French beans. Stir gently. Pour over the glass of wine. Replace the cartouche and lid again and cook for a further 3 minutes.
Lay the lettuce hearts on top of the other vegetables, add the broad beans and peas, replace the cartouche and lid and cook for another 3 minutes.
Remove the pan from the heat and allow to stand for 10 minutes to cool slightly. Then season with salt and lemon juice to taste. You can add some more olive oil now too if you like.
Coarsely chop the basil and mint. Remove the bases from the courgette flowers and discard. Slice the flowers lengthways into thin ribbons. Add all of these to the pan and stir everything together very gently so as not to break up the vegetables.
Leave to stand for another 5 minutes for the flavours to develop before serving.
Recipe and photographs | Huw Morgan
Published 17 July 2021
This year our pride and joy (as well as provider of steep learning curve) has been the polytunnel. As soon as we decamped to Somerset before lockdown in mid-March, we started to discuss the pros and cons of finally biting the bullet and getting one, which we have discussed at length and then shelved on several occasions. The reason to defer was always the same. We weren’t here enough and, once a polytunnel is up and running, it simply can’t be left for days untended. Suddenly we were compelled to be at Hillside for the foreseeable future and, with the thought of more complete vegetable self-sufficiency firmly in the forefront of our minds, we decided to take the plunge.
Our dreams of a cornucopia of tomatoes, peppers, aubergines, chillis, cucumbers and melons haven’t been fully realised due to a shortage of seed and plug plants immediately after lockdown, and the fact that the polytunnel couldn’t be delivered until the end of May. So our initial plan for a tomato trial with three plants of ten varieties quickly increased to twelve plants of each and so this year, although we have three chilli varieties and two of cucumber, the polytunnel has been pretty much dominated by them. I will write at more length about the polytunnel at a later date, once I have some more experience under my belt, but suffice to say that growing tomatoes in grow bags has this year taught me the importance of a regular watering regimen, the effects of lack of ventilation and the dangers of not starting to apply tomato feed early or regularly enough. We lost almost all the second trusses and, due to the cool August, the third and fourth trusses are only now just starting to ripen. Everyone will be getting Green Tomato Chutney for Christmas this year.
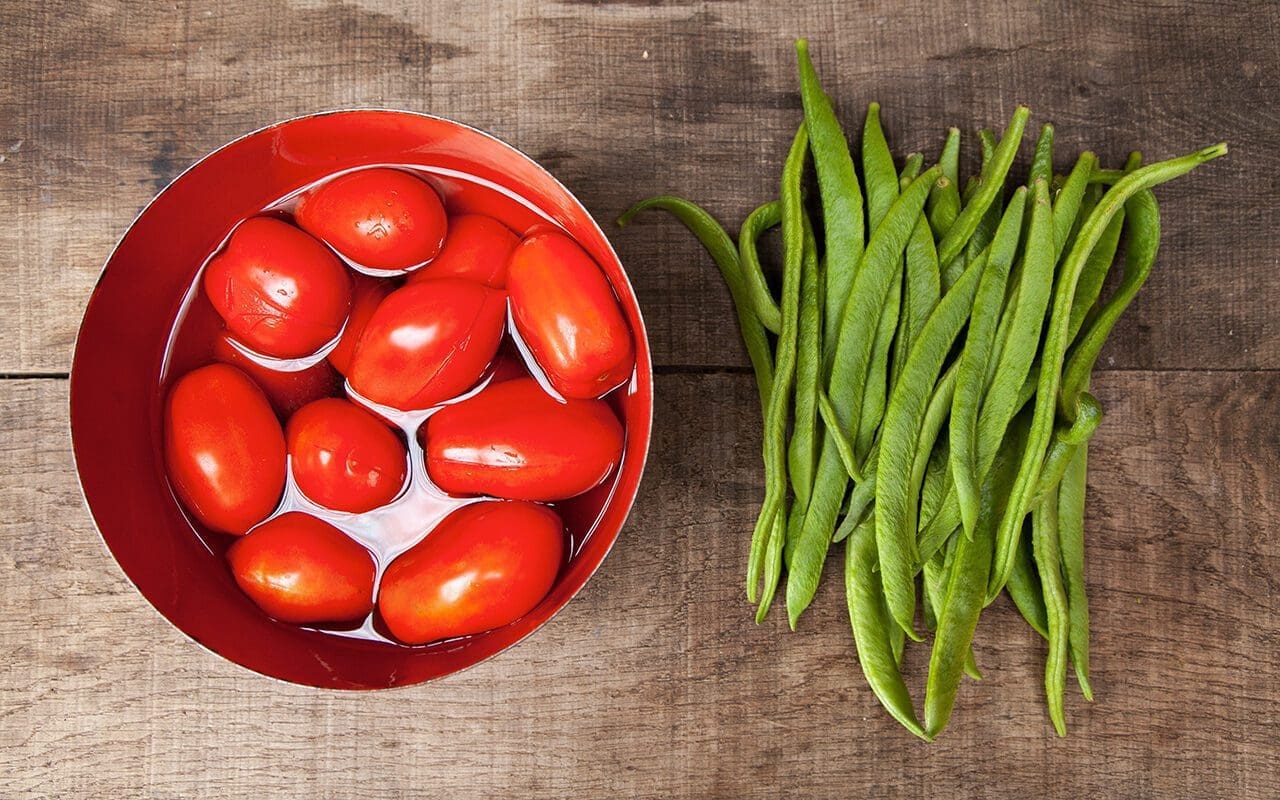
Apart from firm favourites ‘Sungold’ and ‘Gardener’s Delight’ I was keen to trial some plum tomatoes and chose the best known and most reliable varieties, ‘San Marzano’ and ‘Roma’. These are the varieties that are almost invariably in any tin of tomatoes you might buy at the shops. They were surprisingly productive at first and the mini-glut in early August produced ten large jars of bottled whole and chopped tomatoes, as well as several litres of passata and ketchup. Although ripening is definitely slowing down now, somewhat surprisingly it is still the plum tomatoes that are providing the largest usable harvests. This I don’t mind, since I cook with tomatoes pretty often in winter and the idea of being able to use my own preserved ones and not shop-bought is very appealing.

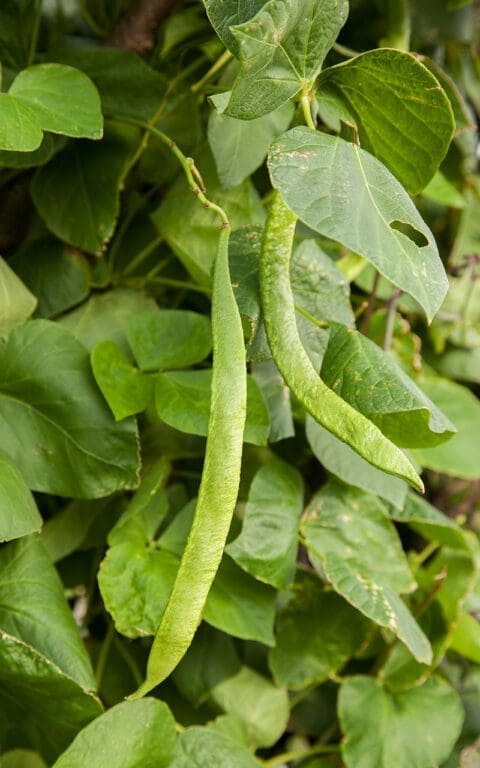
Despite their productivity only the best plum tomatoes are good enough for bottling, so there are always plenty left over. These end up as passata or a simple tomato sauce (which I either bottle or freeze depending on available storage space) and in ketchups, salsas and chutneys. Quite often, however, they end up in our dinner and one of my daily challenges of recent weeks has been ‘What can you make with any combination of courgettes, tomatoes and runner beans ?’. After many nights of making things up as I went along I have started to run out of inspiration and so this week there has been much rifling of recipe books.
I very seldom present another cook’s recipes here, although my own are often tweaked and altered versions of dishes I have eaten or cooked from recipes in the past. However, when I came across this yesterday, it jumped out at me for the intriguing use of two of my main available ingredients in a previously completely unimagined form. What is in effect a tomato and bean pie is elevated in this recipe into a memorable dish of unctuous and exotic richness. Given the apparent humility of the primary ingredients I was unprepared for quite how delicious it is and feel that it is only right to share the original, untweaked, recipe with full credit to Maria Elia from whose excellent book of modern Greek cuisine, Smashing Plates, it is taken. As she says (and as I did myself) it is best to make the filling the day before you plan to assemble it so that the flavours can come together overnight. Of course, not everyone has access to vine-ripened plum tomatoes, so I weighed mine and they came to around 600 grams, equivalent to around two cans drained of their juice.
To balance the richness this would be good served with something fresh and bright such as a citrussy Greek cabbage and carrot coleslaw or a raw fennel, chicory, orange and watercress salad.

Serves 6-8 as a main, 8-12 as a small plate
100 ml olive oil
2 Spanish onions, halved and finely sliced
2 garlic cloves, finely chopped
2 tsp ground cinnamon
5 tbsp tomato purée
10 vine-ripened plum tomatoes, skinned and roughly chopped
500 g runner beans, stringed and cut into 4cm lengths
A pinch of sugar
1 bunch of dill (approx. 30 g), finely chopped, or 2 tbsp dried
1 packet of filo pastry (9 sheets)
100 g melted butter
100 g Medjool dates, stoned and finely sliced
250 g feta, crumbled
6 tbsp clear honey
Sea salt and freshly ground black pepper
Heat the olive oil in a large, heavy-based pan over a low heat and sauté the onion until softened and sticky; this can take up to 20 minutes. Add the garlic, cinnamon and tomato purée and cook for a further 2 minutes. Add the tomatoes and their juices and cook over a medium heat for about 8 minutes, before adding the runner beans, sugar, dill, a pinch of sea salt and 150ml water.
Reduce the heat to a simmer, cover and cook the beans for about 40 minutes, stirring occasionally, until the beans are soft and the sauce is nice and thick. Check the seasoning and cool before assembling.
Preheat the oven to 180°C/gas mark 4. Unfold the pastry and cover with a damp cloth to prevent it from drying out. Brush a baking tray (approximately 30 x 20cm) with melted butter. Line the tin with a sheet of filo (cut to fit if too big), brush with butter and repeat until you have a three-layer thickness.
Spread half the tomato and bean mixture over the pastry, top with half each of the dates and feta. Sandwich another three layers of filo together with melted butter and place on top. Top with the remaining tomato mixture, dates and feta. Sandwich the remaining three filo sheets together as before and place on top.
Lightly score the top, cutting into diamonds. Brush with the remaining butter and splash with a little water. Cook for 35 – 45 minutes or until golden. Leave to cool slightly before serving, drizzling each portion with a little honey.

Words & photographs: Huw Morgan | Recipe: Maria Elia
Published 12 September 2020
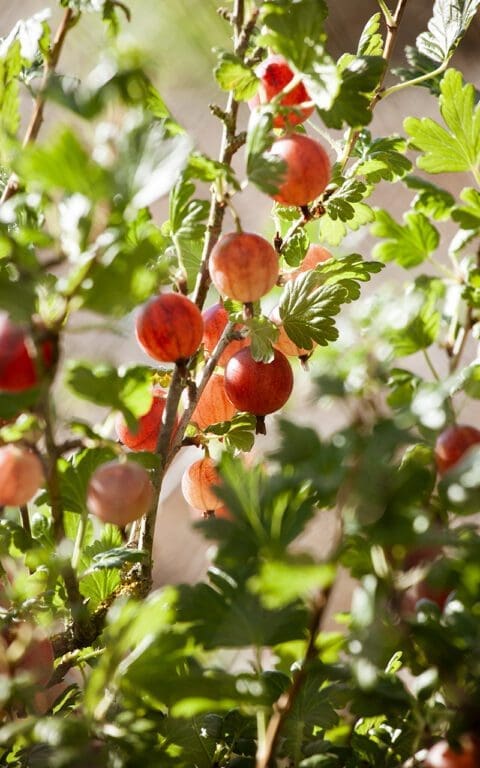
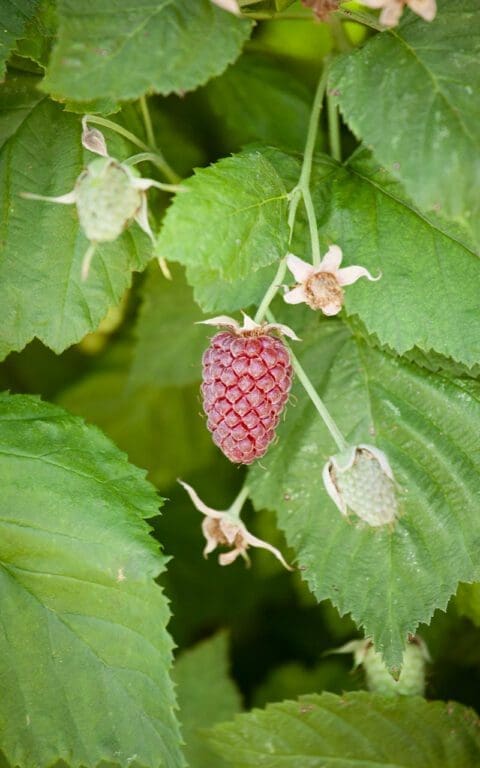
A tsunami of soft fruit is about to break. The gooseberries are first and so this weekend I’ll be crouched on a milking stool in the cool shade of the blackcurrant bushes picking ‘Hinnomaki Green’. As I pick, the blackcurrants brushing my shoulders will be a constant reminder that soon there will be consecutive weekends of picking. We have three varieties, each with different fruiting times to extend the season and the harvest. Last year around this time I found our dear friend Sophie (AKA Champion Picker) among the bushes at daybreak on a post heatwave misty morning, picking and breakfasting in tandem. A whole bush stripped before coffee time is par for the course for Sophie. This year it will be down to me, Dan and the lucky birds.
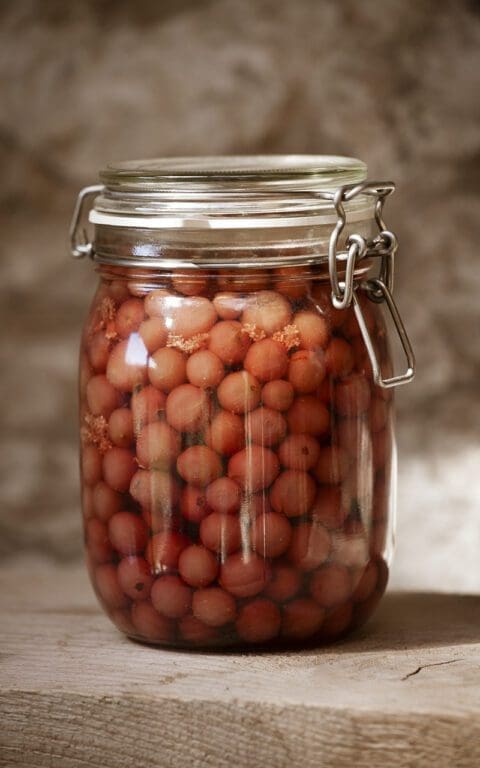
The gooseberry ‘Hinnomaki Red’ take a little longer to reach maturity than the green, which is a relief, since a Kilner jar full of the remainder of last year’s harvest has been judging me silently from a shelf in the pantry for a while now. We always reach this point in the year when the approaching harvest starts to throw a very different light on the frozen ends of last year’s crop in the freezer. A quick stock take this week revealed two half carrier bags full of gooseberries (green) and blackcurrants respectively, a huge Tupperware full of redcurrants and damsons. Just enough to stew for a week of breakfasts, unlike last year’s June’s freezer clearance which resulted in a memorably messy and sticky summer’s day making damson ketchup, damson chutney, damson shrub and damson fruit leather, again with Sophie, and other willing helpers.
Now that the kitchen garden is beginning to produce in earnest we are really missing our regular weekend housefuls to help harvest, prepare and cook food from the garden together, then share it at a large and usually raucous table late into the evening.
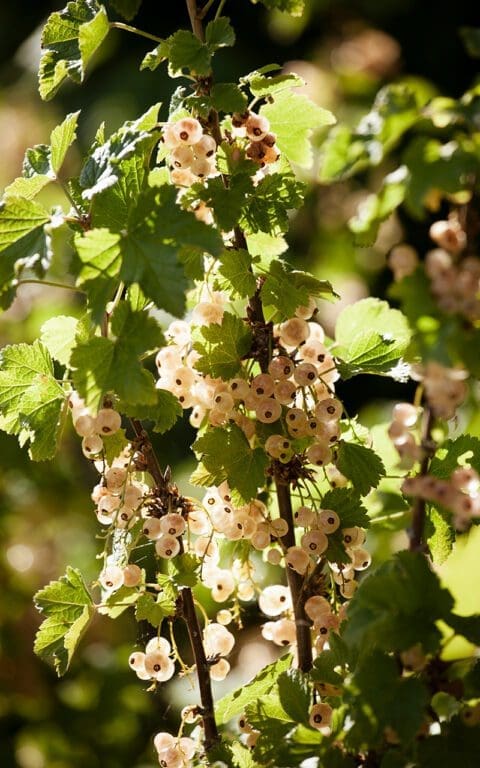
The absence of visitors in this unusual year has also meant that I have found far less reason to make puddings in recent months. When we do end a meal with something sweet it is invariably with some variety of stewed fruit and a spoonful of yogurt, sometimes cream. However, with that jar of red gooseberries on my conscience, a quick pass through the kitchen garden revealed that the whitecurrant and tayberry were dripping with jewel-like fruit, and a summer pudding of this and last summer’s fruits started to materialise. Sweetened with some elderflower cordial made last week and using up the end of a stale loaf of bread that was consigned to the freezer for breadcrumbs several weeks ago and is now taking up valuable space. Space that will very soon be filled by a new generation of soft fruit.
INGREDIENTS
750g mixed soft fruit – raspberry, blackcurrant, strawberry, gooseberry, bayberry, loganberry, redcurrant, whitecurrant
3 tablespoons elderflower cordial
3 tablespoons light honey or caster sugar
A couple of heads of elderflowers
7 slices 1cm thick of slightly stale good white bread
METHOD
Put any fruit that needs cooking (blackcurrants and gooseberries) into a lidded pan on a very low heat with two tablespoons of water and the honey or sugar. Cook until they start to burst and release their juices. Remove the pan from the heat and add the rest of the fruit. Remove the elderflowers from their umbels by dragging the tines of a fork through them over the pan of stewed fruit. Stir, return the lid and leave to stand until cool.
Cut a circle from one slice of bread to fit the bottom of a 1 litre pudding basin. Cut all but two of the remaining slices of bread into triangles of the same height as the pudding basin and use to line the inside of the basin. Fill any gaps with smaller pieces of torn bread. Once the basin is lined pour all of the stewed fruit (reserving three tablespoons) into the cavity. Press down with the back of a metal spoon and smooth level. Cut the remaining slices of bread into as few pieces as possible to make a lid that fits on top of the stewed fruit.
Take a side plate the same diameter as the top of the basin and put it on top of the pudding. Then secure the plate well. I use extra strong elastic bands or well-tied string to exert pressure on the pudding, but you can weight the plate down with a heavy jar. Stand the pudding basin in dish to catch any juice and put in the fridge overnight or for a minimum of 4 hours. Put the reserved stewed fruit into a small pan with a couple of tablespoons of water and one of honey or sugar and bring to a simmer. Press through a sieve and reserve.
When ready to turn out slide a blunt knife between the pudding and the basin until it is loosened. Take a deep serving dish and invert it over the pudding basin. Holding the basin and plate tightly together with both hands invert the whole lot and shake gently but firmly. You should hear the pudding slip out of the basin and onto the plate with a satisfying slurp. Carefully lift off the basin. Pour over the reserved fruit sauce. Decorate with more fruit if you like and serve with cold pouring cream.
Recipe and photographs: Huw Morgan
Published 27 June 2020
I don’t exactly remember when I first tasted elderflower cordial. Romantic though it would be to imagine, it didn’t feature in my childhood, when summer drinks ran the gamut from orange squash to lemon barley water to Coca Cola and back again. However, I have an inkling that it may have been at the country house of Stephen Keynes (a great-grandson of Darwin and nephew of John Maynard Keynes) who was my London landlord for a while when I was in my early ‘20’s. Stephen was a polymath; a banker, an intellectual, an historian, an appreciator of the arts, a raconteur, a patron, a naturalist, a naturist. Yet the thing I remember him best for was his love of good food and the ability to make it without fuss or fanfare.
Stephen cooked in a way which has become quite fashionable in recent years. Very basic, simple food – some might call it nursery food – redolent of a time of housekeepers, nannies and cooks, waste not, want not, rationing and grow your own. For breakfast he might serve an egg coddled with the top of the milk and a slice of good white, heavily buttered toast, lunch could be a poached kipper with floury boiled potatoes or a bacon and egg pie with his own greenhouse tomatoes, for dinner a pork chop with creamed spinach from the garden. Pudding would usually be a seasonal fruit tart or pie, with his own pastry and served with cream or custard. At Christmas he made the best mince pies I have ever eaten. He was also an expert preserver in the old tradition and so the pantry was always full of his home made jams, jellies, chutneys, pickles and syrups made from garden and hedgerow.
At his house near Newmarket (which at weekends was filled with the chatter and laughter of bright, young things) Stephen had a proper vegetable garden and greenhouse, as well as fruit cages and fruit trees, including the first medlar I had set eyes on. Every year he religiously made pounds of medlar jelly, and it is this memory of him standing (naked) at the Aga over a hot preserving pan which makes me think that it was probably he who was taking the time to make elderflower cordial for those long summer days we spent lounging around on the lawn by his oh-so-decadent swimming pool.

Despite the conspicuous lack of a pool here, I still enjoy a lounge on the grass on a hot summer’s day, and no summer is now complete without the ritual of making elderflower cordial. This isn’t always possible though, since elder flowers from the end of May until the end of June, a notoriously unsettled time weatherwise, so for several years I have been stymied in my desire to go elder picking by cold, heavy June drizzle. The past few weeks have been no different and so I seized the opportunity last weekend when the sun finally shone on Sunday morning.
Elder flowers should be picked early on a dry morning. Select the newest umbels that have not yet fully opened and pick the whole flowerhead, but not the coarse stalk. Gently shake them to dislodge any small insects and lay carefully in a trug. I used to cram carrier bags with the flowers, but since it is largely the pollen that flavours the cordial you lose too much of it collecting them this way. It is better to go gently, which makes the whole process more enjoyable.
As Dan wrote last week I was inspired to make this cordial after seeing a dog rose growing through one of our largest elders a couple of weeks ago. However, our wild roses aren’t highly scented enough to bring much flavour, so I used the blooms of the most highly scented of our David Austin roses in the cutting garden, ‘Gertrude Jekyll’ and the dark, velvety ‘Munstead Wood’. Any highly scented rose will do, but the darker the rose the pinker the cordial will be. Of course, they must be absolutely free of pesticides, fungicides or other sprays. Pick flowers that are just opening, again early on a dry morning.
Over the years I have tried a number of different elderflower cordial recipes, many of which use whole lemons, pith and all, but I find these too bitter, so now only use the zest and juice. In others the proportion of sugar produces a syrup that is too sweet and deadens the floral flavour. The citric acid allows the cordial to be kept for 3-4 months in the refrigerator. If you leave it out it will keep for 3-4 weeks.

25 large heads of elderflower
5 large heavily scented roses
Grated zest and juice of 4 unwaxed lemons
1.5 litres water
1 kg sugar
1 heaped teaspoon citric acid
Remove all of the petals from the roses and put into a large ceramic or glass container with the elderflowers, lemon zest and juice.
Bring the water to the boil and add the sugar. Take off the heat and stir until dissolved. Leave to cool a little then, while still hot, pour the syrup over the flowers. Cover the container well so that no insects can get in and leave in a cool dark place – an outhouse is ideal – for 2-3 days.
Strain the syrup through a fine muslin. Transfer to a large saucepan and bring to a gentle simmer. Simmer for 3 minutes, then add the citric acid to dissolve.
Pour the hot cordial into sterilised bottles, seal immediately and allow to cool before storing.
Dilute to taste – a proportion of 1 part cordial to 5 parts water gives a good flavour without excessive sweetness. Sparkling water makes the rose flavour more pronounced.
Makes approximately 2 litres.
Recipe & Photographs: Huw Morgan
Published 23 June 2019
Today’s posy draws upon some of the fine detail in our fully blown August garden. A garden arguably never more voluminous and drawn together now with a growing season behind it. Look up and out and your eye can travel, for the grasses and the sanguisorba are asserting their gauziness. The first of the asters are beginning to colour, in wide-reaching washes that I’ve made deliberately generous. At this time of bulk and volume, however, it is also important to be able to look in and find the detail in something intense, finely drawn and requiring close examination.
Most of the flowers in the garden here are deliberately small, so that they feel part of the place and cohesive with the scale of the surrounding meadows. Some, like the sanguisorba, appear en masse and register together to create a wash or a veil through which you can suspend an intensity of contrasting colour or screen another mood that appears beyond it. The Bupleurum falcatum, which has now seeded freely in the gravel garden, does just this in the posy to enliven the mood with it’s fine, acidic umbels. At another scale, the Fagopyrum dibotrys does the same in the borders, towering tall and creamy. This perennial buckwheat is prone to wind damage, snapping rather than flexing, but I have found it a sought-after niche close to the buildings to help to narrow the feeling alongside the steps. The scale of its flowers, and their airy distribution, is why it retains a feeling of lightness.
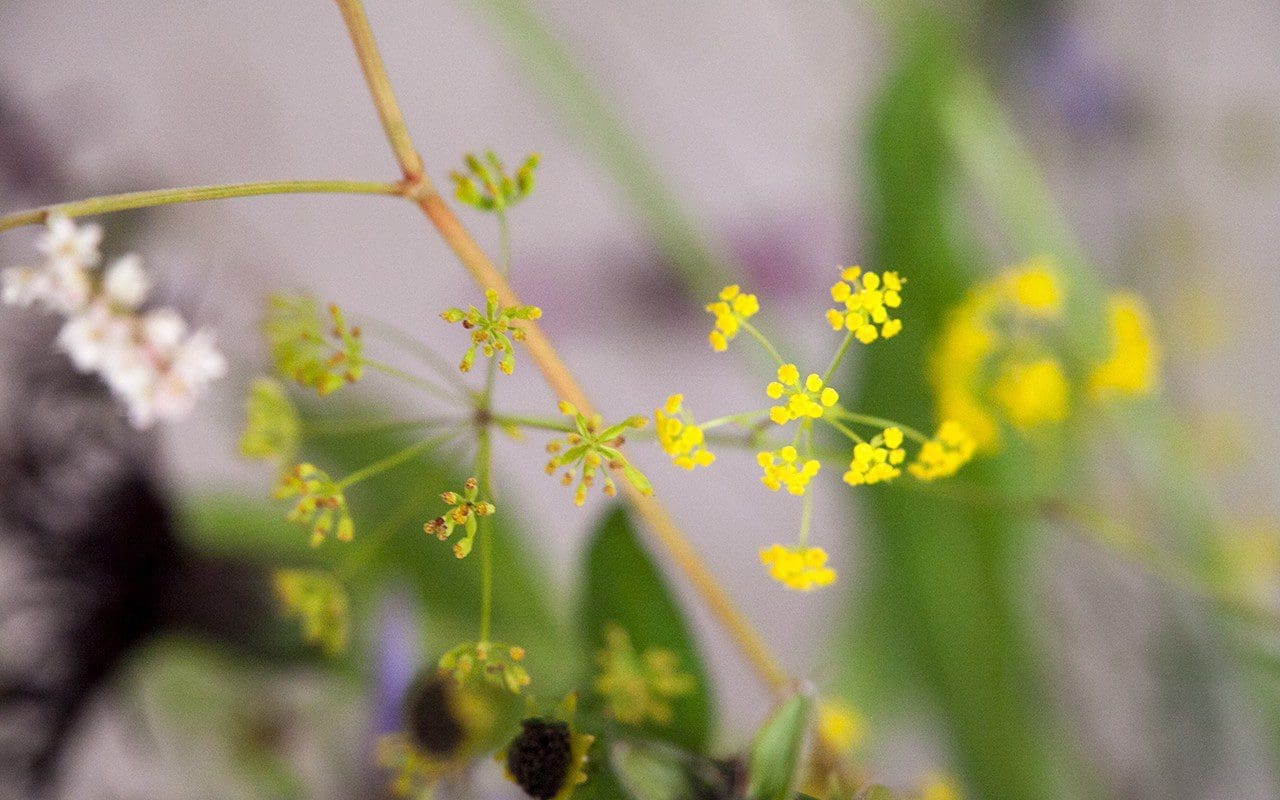 Bupleurum falcatum
 Fagopyrum dibotrys
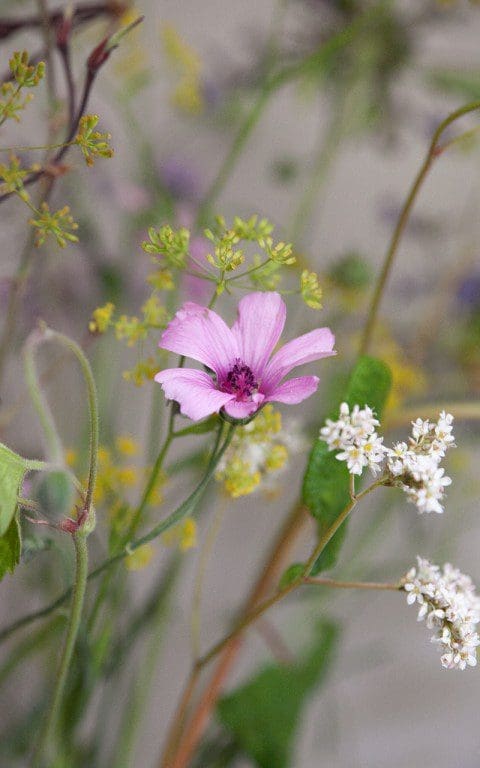 Althaea cannabina
Some plants are more interesting for having to find, but their subtlety requires careful placement. The Clematis stans was initially planted down by the barns whilst I was seeing what it was going to do here, but it has been good to have it closer for the detail in the flower is up to regular inspection. This herbaceous clematis is rangy when growing in a little shade but here, out on the blustery slopes, it makes a compact mound of a metre or so across. Prune it hard to a tight framework in February and it rewards you quickly with bright, expectant leaf buds and then foliage that is elegantly cut and not dissimilar to Clematis heracleifolia. In high summer, when the light levels change, it begins to produce clusters of powder-blue flower buds which taper and colour as they move toward flower. Reflexing just the tiniest amount to form a bell like a hyacinth, they have a delicate perfume, which is lost if you bury the plant too deeply in a bed.
 Clematis stans
![]() Centaurea montana ‘Black Sprite’
Centaurea montana ‘Black Sprite’
 Potentilla ‘Gibson’s Scarlet’
Earlier, in the heat, I was beginning to debate whether I’d take out the Centaurea montana ‘Black Sprite’, for it appeared to hate the brilliance of this summer and the exposure. Already a plant of some modesty, the relief of rain has them with flushed new growth to prove me wrong and it is a delight to come upon it, for it has to be found. The dark, filamentous flowers are as dark as blackcurrants, but combined with silvery Lambs Ears (Stachys byzantina), they are thrown into relief. The hunt is furthered by merging the groups with four-leaved black clover (Trifolium repens ‘Purpurascens Quadrifolium’) and Potentilla ‘Gibson’s Scarlet’. The clover is actually brown, and the potentilla punches colour strongly, but in tiny pinpricks that flash and then disappear as they open and close during the day. Walk the path in the morning and they will be blinking bright, but walk it again in the evening and they are closed, clocked-out for the day.
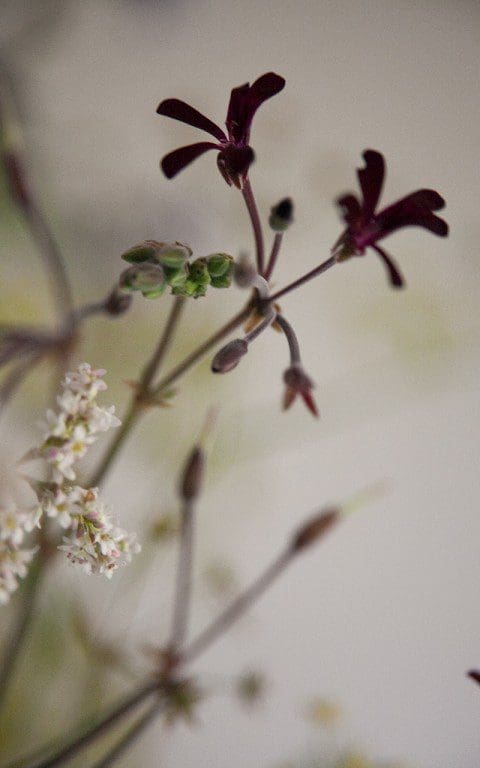 Pelargonium sidoides
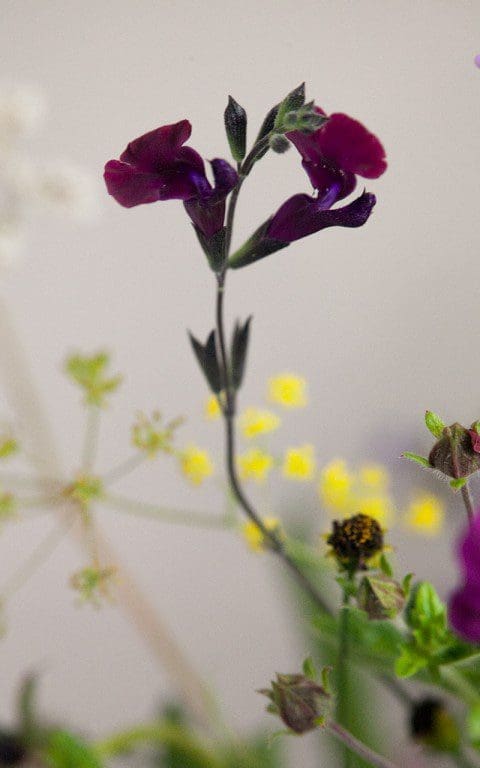 Salvia ‘Nachtvlinder’
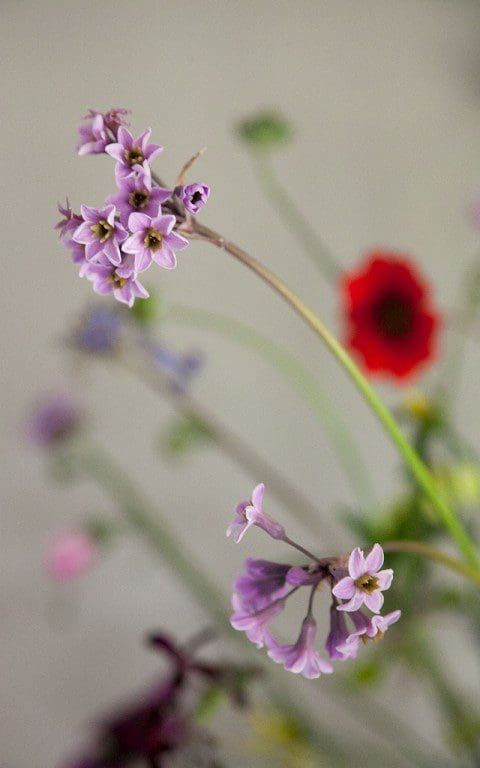 Tulbaghia ‘Moshoeshoe’
Over time, and now that the garden has grown and is demanding my attention, I’ve limited the number of pots up around the house. The Pelargonium sidoides are an exception and these are my original plants from what must now be twenty years ago. They have proved their worth despite their subtlety, but I help in having them close by the front door. They are grouped with pots of Tulbaghia ‘Moshoeshoe’. Early in the season and before they start their relay of flower, you might at first think that a potful of tulbaghia were chives, for the majority have a lingering garlicky perfume. The confusion of flower and savoury association is not always digestible, but this selection from Paul Barney at Edulis is an exception. The leaves do not smell and the perfume of the flower is delicate and sweet, particularly at night. They continue to push out flower from June until the frost, when I move the pot to the frame and deny it water for the winter and they survived last winter to prove their resistance when kept on the dry side.
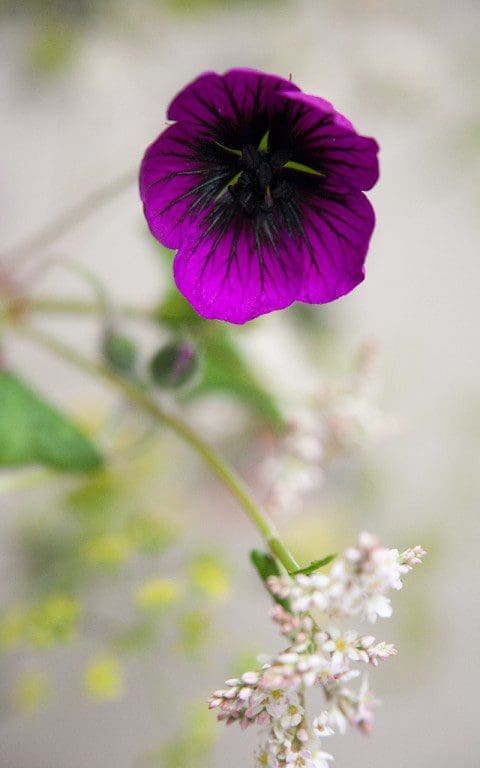 Geranium ‘Sandrine’
 Coreopsis verticillata ‘Moonbeam’
 Succisella inflexa
There are several new additions to the garden this year on which I am keeping a close watch and reserving my judgement, but Geranium ‘Sandrine’ looks promising. It is a little larger flowered than G. ‘Anne Folkard’, but it has a similar rangy habit and bright green foliage and will find its way amongst other plants, so far without dominating. The flowers, which with many perennial geraniums are bang and bust, do not come all at once, but stagger themselves throughout the summer. This makes them more precious and they pulse with their darkly-veined centres. Succisella inflexa, a Balkan perennial, is entirely new to me, but this looks good for being so late in the season. Finely elongated foliage scales the stems, but stops to leave the thimbles of pale lilac flower hovering at knee height. It has a similar presence to Devil’s-bit Scabious, which is flowering now too in this window between summer and autumn. We will see if it comes back with good behaviour next year, but for now I am watching closely.
Words: Dan Pearson / Photographs: Huw Morgan
Published 18 August 2018
Whether it’s fish and chips after a day on the beach, calamares fritos at a Spanish bar or Indian pakora with an ice-cold Tiger beer at a festival, deep fried food is something that always tastes better outdoors and when the weather is hot.
In Greece recently I was staying with friends who, in late June, were already struggling to keep up with their courgette glut, so for lunch one day we decided to make kolokithokeftedes, the traditional Greek courgette fritters. Courgettes are coarsely grated, salted and then squeezed to remove as much water as possible, before being mixed with onion, garlic, feta, egg, breadcrumbs, dill and mint. Traditionally shaped into patties and shallow fried, they can be a little heavy, so my host decided to put loose spoonfuls of the mixture into deep boiling oil so that the shards of onion and courgette that made their way free of the mass became crispy and a deep, caramelised brown. They came out looking like tiny deep-fried, soft-shelled crabs. Served with a bowl of cold, garlicky tzatziki, six of us devoured about forty of them in quick succession.
In Japan, of course, it is tempura that fulfils this role. It is no surprise to learn that the technique of deep frying batter-coated fish and vegetables was brought to Nagasaki by the Portugese in the 16th century. Peixinhos da horta is believed to be the original dish that inspired a way of cooking that we now primarily associate with Japanese cuisine. These ‘little garden fishes’ are green string beans, coated in batter and deep fried, and were eaten in Portugal during Lent, when meat was off the menu. The Japanese took this idea and ran with it, and now tempura describes the method of cooking any fish, meat or vegetable in this way.
One of our favourite places to eat when in London is Koya Bar, a tiny Japanese restaurant in Soho, where fast-cooked food is prepared in front of you behind a long seating counter. While the queue to get a table can sometimes seem intimidating, the turnaround is so fast that waiting in line for 30 minutes is a small price to pay for food this delicious. It is the most authentic Japanese eating experience we have had outside of Japan. Although they specialise in udon noodles, there is always a blackboard of seasonal specials on offer and, of these, it is the kakiage tempura that we order without fail whenever we go. Kakiage tempura differs from regular tempura in that it is a mixture of sliced vegetables (sometimes combined with fish) in batter rather than the individual pieces of fish, crustacean and vegetables that we are more familiar with. Seasonality is key and, at Koya, they can be made of anything from wild carrot with carrot tops to broad beans and peas or squid and chrysanthemum.
We are now in the midst of our courgette glut and looking for new ways to use them as often as possible, while our sweetcorn is challenging us to eat it quicker than it becomes starchy. I have grown ‘Double Red’ this year, a new variety with seed from The Real Seed Catalogue, who sell some of the most interesting vegetable varieties in the country. The plants are highly decorative with stems and husks stained a deep purple-red and cobs of dark burgundy, almost black, kernels, which are almost too beautiful to eat. They have made a good partner to our ornamental red and tan amaranth this year. We have also just lifted all of our onions and so the combination of vegetables here reflects what is best to eat at this very moment. I could also have used green beans, carrots and beetroot or, later in the season, pumpkin, sweet potato, mushrooms, celeriac, kale or salsify. You can also add any herbs that you like to the mix. Here I have used the traditional purple shiso (Perilla frutescens var. crispa), which is used to impart the pink colour to umeboshi plums. It has a flavour somewhere between aniseed and basil. Dipped into batter and fried at the end of cooking the leaves also make a beautiful garnish.
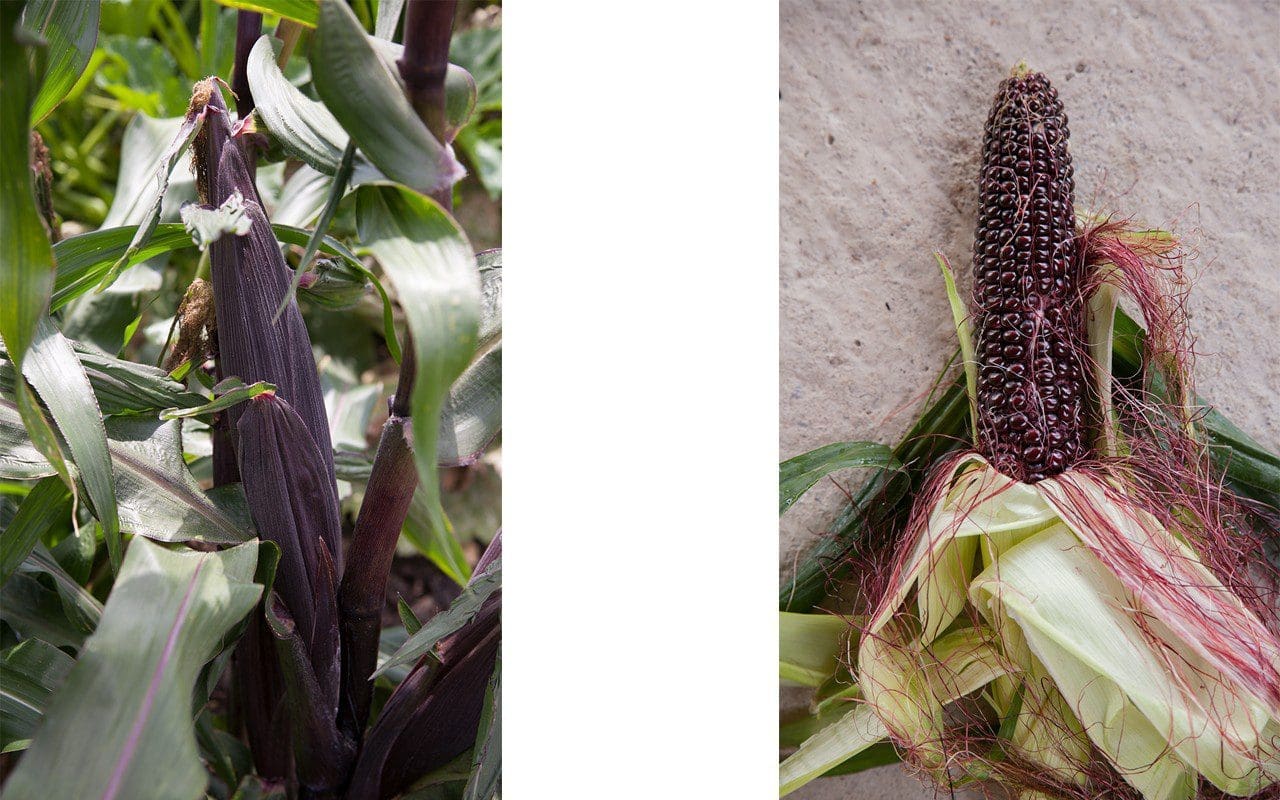
Sweetcorn ‘Double Red’
Although there is a plethora of recipes for tempura batter using either whole eggs or whisked egg whites, I have found that the simplest batter of just flour and water makes the crispest coating. However, there are a few golden rules to ensure that your tempura turns out as well as possible. Firstly, all of the vegetables must be cut to a size where they will cook in the same time. It is traditional for the vegetables to be coarsely julienned or grated. Secondly, get your oil hot enough to cook before you make the batter. It should be between 170°and 180°C. Thirdly, the batter should be as cold as possible, and must not be over-mixed or whisked which stretches the gluten and makes it tough and chewy. Chopsticks are used traditionally and it should have lumps of flour in it. Fourthly, before placing the batter-coated vegetables in the oil, allow as much batter to drain from them as possible. This ensures the lightest coating and avoids a doughy centre. Fifthly, only cook a couple of spoonfuls at a time, so as not to crowd the pan and lower the temperature of the oil. Sixthly, use a small wire strainer or slotted spoon to remove any overcooked bits of batter from the oil between batches to avoid them flavouring the oil and attaching to the next lot of fritters. And finally, do not be tempted to ‘worry’ the fritters in the oil, be patient and leave them be until they are ready to turn, or the batter will not have cooked and they will fall apart.
It is customary to serve tempura with a simple dipping sauce of dashi, soy sauce and mirin, but the lemon and miso sauce here, adapted from a recipe by Elizabeth Andoh from her excellent book of Japanese home cooking, Kansha, complements the richness of the fried fritters perfectly.
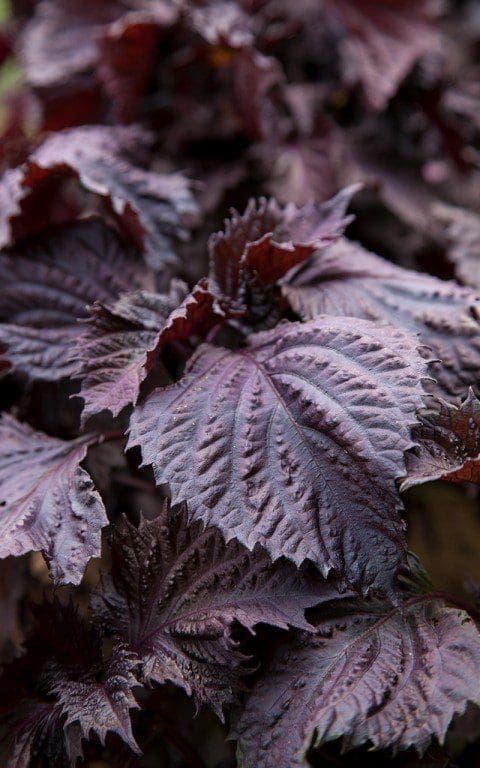 Purple shiso
INGREDIENTS
350g courgette, coarsely julienned or grated
2 large sweetcorn cobs, shucked
1 medium red onion, about 175g
8 large and 6 small shiso leaves
Sea salt
Sunflower or rapeseed oil
Batter
175ml iced sparkling water
65g self raising flour
65g cornflour, plus 1 tablespoon more
A few ice cubes, 4 to 6
Dipping Sauce
3 tablespoons white miso
3 tablespoons lemon juice
Finely grated zest of half a lemon
1 tablespoon maple syrup or lightly flavoured honey
1 tablespoon mirin or sake
Makes about 12, enough for 6 people
METHOD
Put the courgette into a sieve and sprinkle lightly with sea salt. Use your hands to mix the salt in well and then leave to drain over a bowl for 20 to 30 minutes.
To make the dipping sauce, put the miso and lemon juice in a small bowl and stir well. Add the maple syrup or honey and mirin and stir well again. Add the lemon zest and stir again. Transfer to a serving bowl.
Using a very sharp knife shave the corn kernels from the cobs over a bowl. Slice the onion in half down the centre and then cut each half across the grain into crescents the thickness of a coin. Separate the onion crescents and add to the bowl of corn.
Take small handfuls of the salted courgette and squeeze hard to remove as much water as possible. Add to the bowl of corn and onion. Cut the eight large perilla leaves into fine ribbons and add to the bowl. Using your hands, mix all of the vegetables and herbs together until the courgette strands are separated and all is well combined. Sprinkle over the one tablespoon of cornflour and toss with your hands again until everything is lightly coated. This helps the vegetables to stick together when fried.
Pour the oil into a medium-sized (25cm), deep-sided frying pan to a depth of about 2cm. Put over a medium heat until the surface begins to shimmer. Turn the heat down a little and make the batter. Put most of the iced water and some ice cubes into a bowl. Sift the two flours onto the water and then quickly mix together. The batter should be the consistency of single cream and just coat your finger. If it is too thick add more iced water. Turn the heat up under the oil and, when just smoking, test the temperature with a few drops of batter. It should sink and then immediately rise to the surface and puff up.
Pour two thirds of the batter over the vegetables and mix quickly until everything is lightly coated. Add a little more if you think it needs it. However, you may not need to use it all. The vegetables should not be swimming in batter. Using a tablespoon and a fork, take a scant tablespoonful of the vegetable mixture and hold it above the bowl, allowing most of the batter to run off. Then slowly place the vegetables into the hot oil, using the fork to quickly spread them out so that you have a thin fritter about 8cm in diameter. Now wait 30 seconds for the underside of the fritter to cook, before using two forks – or chopsticks – to carefully turn the fritter over. Cook for another 30 seconds until the other side is cooked and lightly coloured. In a medium-sized pan you should aim to cook no more than two fritters at a time, always allowing the oil to return to temperature before frying the next batch.
Remove the fritters from the oil with chopsticks or a slotted spoon, and hold them above the pan to allow as much oil to drain from them as possible, before transferring to a hot plate lined with absorbent paper. You can now either choose to serve them as they come from the pan or put the plate into an oven heated to 100°C to keep warm, while you cook the rest of the mixture.
When all of the mixture is cooked transfer the fritters to a clean plate. Quickly dip the remaining shiso leaves in the batter and fry until crisp. A matter of seconds. Remove and drain quickly on absorbent paper, then use to decorate the plate of fritters. Serve immediately with the dipping sauce.
Recipe & photographs: Huw Morgan
Published 11 August 2018
We are sorry but the page you are looking for does not exist. You could return to the homepage