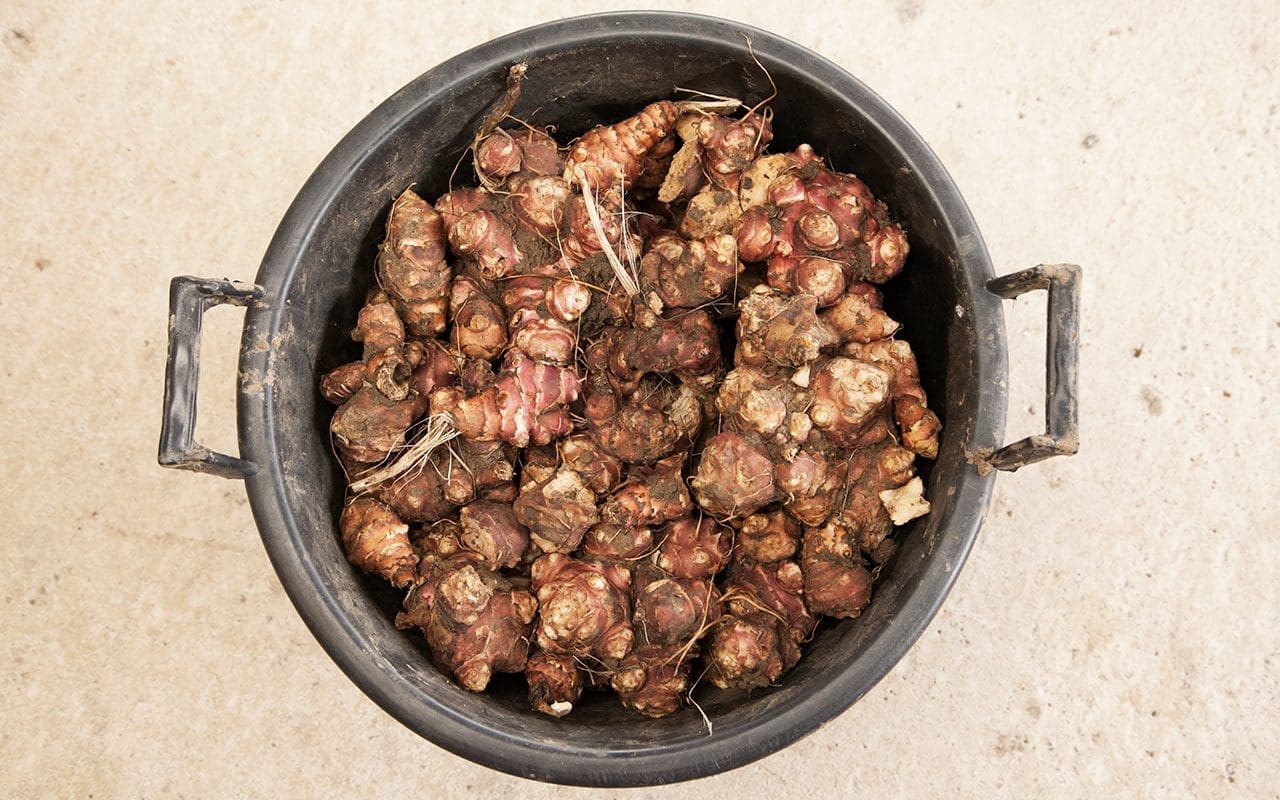
Last year was the first time that we have grown Jerusalem artichokes here. Not from a lack of desire, but a lack of space. That may sound crazy when our vegetable garden is larger than many peoples’ gardens, but Jerusalem artichokes are voracious plants and you must have enough space to give over to them if they are not to become problematic.
Growing to three metres tall and two metres across they should be placed on the north side of the garden so as not to shade out other crops. On the other hand they can be useful if you have vegetables that need shading or protecting from wind like some brassicas (broccoli, Brussels’ sprouts, kale), salad leaves and oriental greens. We fenced a new productive compound around the polytunneI last winter, so in the spring I ordered five tubers from Otter Farm. Planted 60cm apart and 15cm deep in April by August they had overreached their 4 metre by 1 metre bed and, on our rich soil, have produced a crop of almost 20 kilos in one season.
Not from Jerusalem at all, but a native of North America, Helianthus tuberosus is, as its Latin name indicates, a type of sunflower, a perennial variety which means it should be planted where you intend to keep it, as it will return year after year. Prone to spreading they should be planted where you can get at them easily to curb their invasive tendencies. For the same reason, when harvesting it is important to try to dig up all of the tubers, as a single one left in the ground will cause your colony to proliferate the following year. I have kept five tubers back this year to replant in the same position. Like potatoes Jerusalem artichokes can be a good first crop to plant in previously uncultivated or heavy ground as the growth of the tubers and their subsequent harvesting break up the soil. However, you must remove all trace of them if you plan to grow other crops in their place afterwards.
Ready to harvest from late October onwards Jerusalem artichokes do not store well once lifted and so are best left in the ground and harvested as required. Incredibly hardy they will tolerate winter temperatures down to -30°C. If you have to dig them all up they are best stored in a cool, dark place such as an outhouse, cellar or shed, although they will keep, well-washed and well-dried, in the salad drawer of the fridge for a week or so.
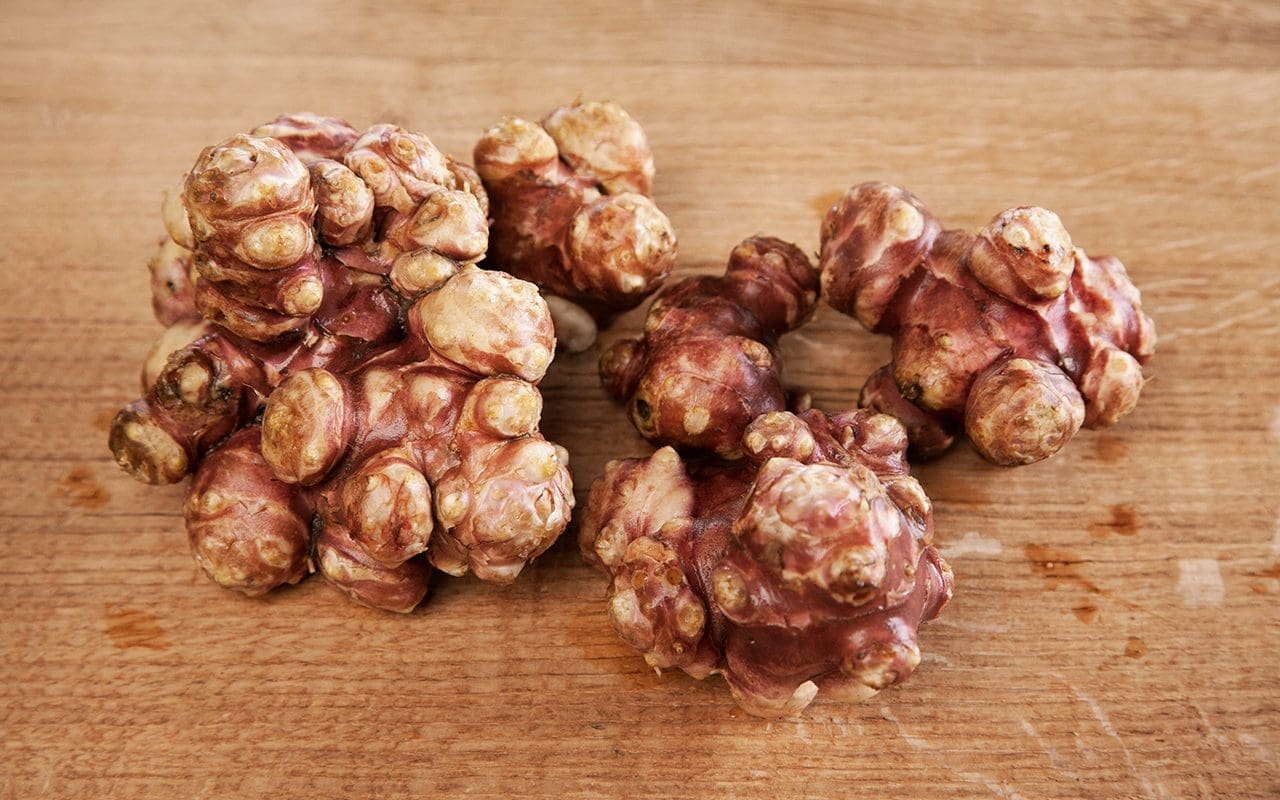
The fleshy, edible tubers are quite unlike any other vegetable in texture or taste. Although starchy like potatoes, they have a sweet, nutty flavour when cooked which is just about comparable to artichoke hearts, but also distinctly its own thing. Unlike potatoes they can be eaten raw, when their texture is reminiscent of water chestnuts. Thinly sliced with a sharp citrus dressing they make an unusual, crisp winter salad.
Their reputation for causing flatulence precedes them and is what often prevents people from growing or eating them. Caused by the inulin they contain, a starch which is difficult to digest, it is not a problem for everyone and it would seem, from personal experience, that the more often you eat them the less of a problem this is.
Their somewhat delicate, earthy flavour is also distinctive and although typically combined with woodsy flavours like bay, sage, thyme and nutmeg, it can hold its own with much stronger flavours and works unexpectedly well with punchy Mediterranean ingredients; tomatoes, red onions, black olives, capers and anchovies.
This recipe is for a rich, velvety and warming soup for a frosty day. Add more liquid if you prefer a thinner soup. Cooked with half the amount of water the resulting purée is a good accompaniment to game birds, chicken and firm white fish. Substitute the artichokes with celeriac or good floury potatoes if the prospect of a windy evening puts you off.
1kg Jerusalem artichokes
40g dried porcini mushrooms
1 small onion
A spring of thyme, to yield about 1 tsp of leaves
50g butter
4 tbsp rapeseed oil
150ml full cream milk
About 1 litre of water
Serves 4
Set the oven to 200°C.
Soak the dried mushrooms in 200ml hot water.
Heat 25g of butter in a large pan over a medium heat. Finely chop the onion and cook for a few minutes until soft and translucent, stirring from time to time.
Remove the porcini from their water. Squeeze the liquid out of them back into the bowl and retain. Coarsely chop two thirds of them and add to the onions with the thyme. Cook together for a few minutes more, stirring occasionally.
Scrub the artichokes extremely well and remove the fibrous hair roots. Trim off any black patches. Reserve one tuber of approximately 100g and cut the remainder into walnut-sized pieces. Put into a roasting pan in a single layer. Drizzle with olive oil and roast in the oven, turning occasionally, for about 30 minutes until softened and caramelised. Add them to the pot with the onions and mushrooms.
Make the mushroom soaking water up to 1 litre with fresh water and add to the pot. Bring to a gentle simmer and cook with the lid on for about 20 minutes until the artichokes are soft.
Blend the mixture until smooth. Add the milk and season with salt and pepper. Return to a very low heat to keep hot.
Melt the remaining butter in a small pan over a medium heat. Coarsely chop the remaining porcini and stew in the butter for a few minutes until soft and glossy. Remove from the pan and reserve.
Add the rapeseed oil to the a pan and raise the heat. Using a very sharp knife or mandolin slice the reserved artichoke very thinly. When the oil is smoking fry the artichoke slices in batches until brown. Drain on kitchen paper where they will crisp up.
Ladle the soup into warm bowls and place a few artichoke crisps and stewed mushrooms on top. Serve piping hot.
Recipe & photographs: Huw Morgan
Published 29 January 2022
In early July I sit down and think of winter. With my boxes of vegetable seed and Joy Larkcom on the table before me this is when I start to plan what to sow from the end of the month and into August and September. Although it takes some discipline at midsummer to cast my mind into a dark, cold future these are the crops that are starting to provide for us now, so it is time well spent, ensuring that we are not simply dependent on a diet of roots and brassicas through the cold months.
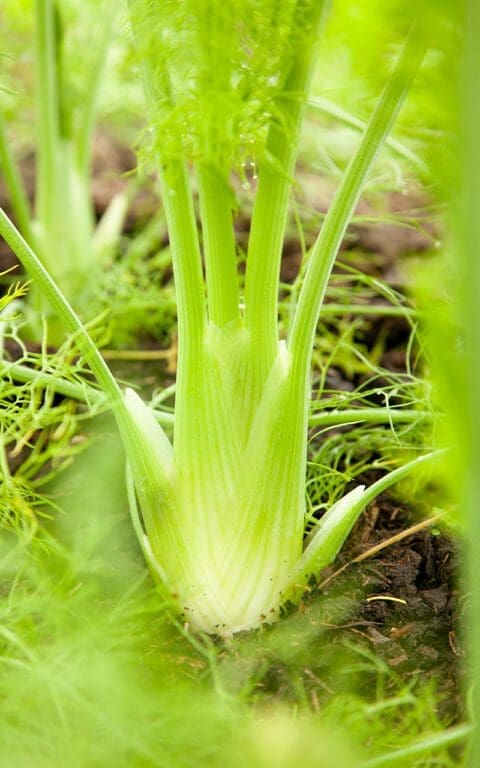
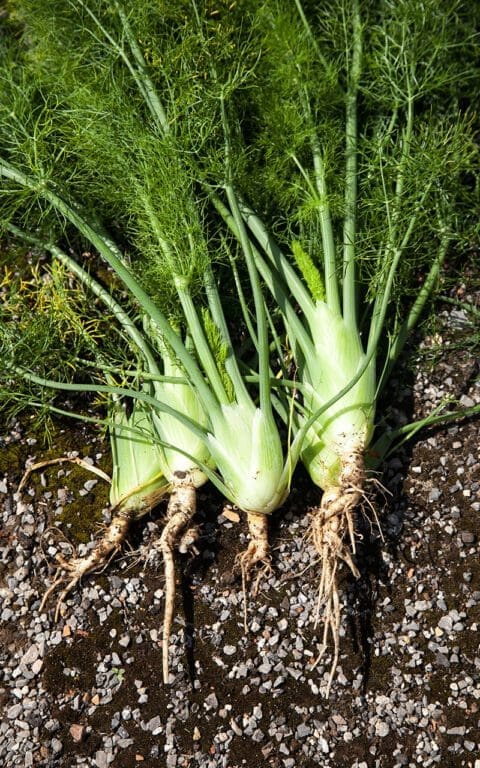
Fennel – also known as bulb or Florence fennel, to differentiate it from the soft herb – is one of my favourite of these midsummer sowings. Despite having a reputation for being tricky, for us it has so far proven to be easy to germinate, trouble-free to grow on, easy to transplant and productive. In early August I sowed 24 modules with two seeds to each to allow for failures. Once germinated I removed the weakest seedling from each module.
Like all umbellifers fennel produces long tap roots, so I use root trainer modules of the sort you might use for sweet peas or broad beans. These ensure that the roots have space to grow down and don’t become tangled and congested, which prevents them from growing away when they are transplanted. Ideally fennel prefers to be sown in situ, but these summer sowings are destined for the polytunnel, and in August we are in the middle of prime tomato production, so the modules were put into the cold frame to germinate and grown on for about a month before being planted out in mid-September.
Fennel is a Mediterranean marsh plant, which needs rich soil and constant moisture to do well. Cold and drought will cause it to bolt in record time, sending up a tough flower spike which quickly makes the whole plant stringy and inedible in a matter of days. Even with very regular watering I have found it impossible to grow the huge, swollen white bulbs you see at the greengrocer or supermarket, but the flavour is good – some would say better – from the smaller ones. You often see these sold as ‘baby fennel’. I have read that lining the trenches you plant the fennel in with perforated plastic sheet retains more moisture and replicates the marsh-like conditions they favour and so I plan to try this method next year to see if it produces larger plants.
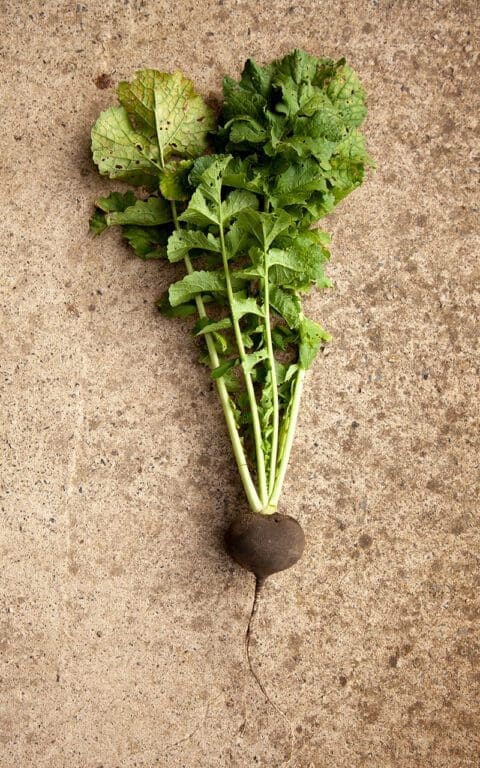
On the same day that I sowed the fennel I also made sowings of a new crop for us, ‘Black Spanish Round’ radishes. These were sown direct in the Kitchen Garden, in two rows 30cm apart with plants thinned to 15cm apart after germination. We have very bad flea beetle here which eat the emerging seedlings of all the brassicas we grow, but particularly turnips, swedes, Japanese mustard greens and radishes so all of these are covered with a layer of horticultural fleece or micromesh to protect them until the seedlings can grow away fast enough to leave the ravages of the beetles behind. A regular, careful check beneath the fleece is also needed to keep an eye on the ground slugs which can decimate a young crop. At this end of the season, you rapidly run out of re-sowing time if the first sowing is lost.
The radishes are now the size of tennis balls and have a rough dark skin, unlike the red-blushed breakfast radishes we are more familiar with. Beneath the skin the flesh is pure white, crisp and with the familiar radish pepperiness. They can be eaten raw when young or cooked in any recipe that calls for turnips, to which they bear a strong resemblance in flavour. Hardy up to -10°C they can be left in the ground all winter, but you will avoid slug damage or the predations of mice and voles if you lift them around now and store them somewhere cool and dark.
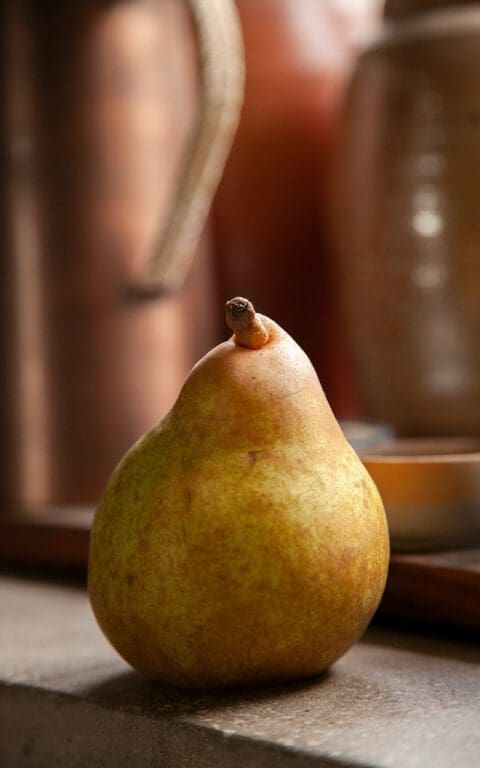
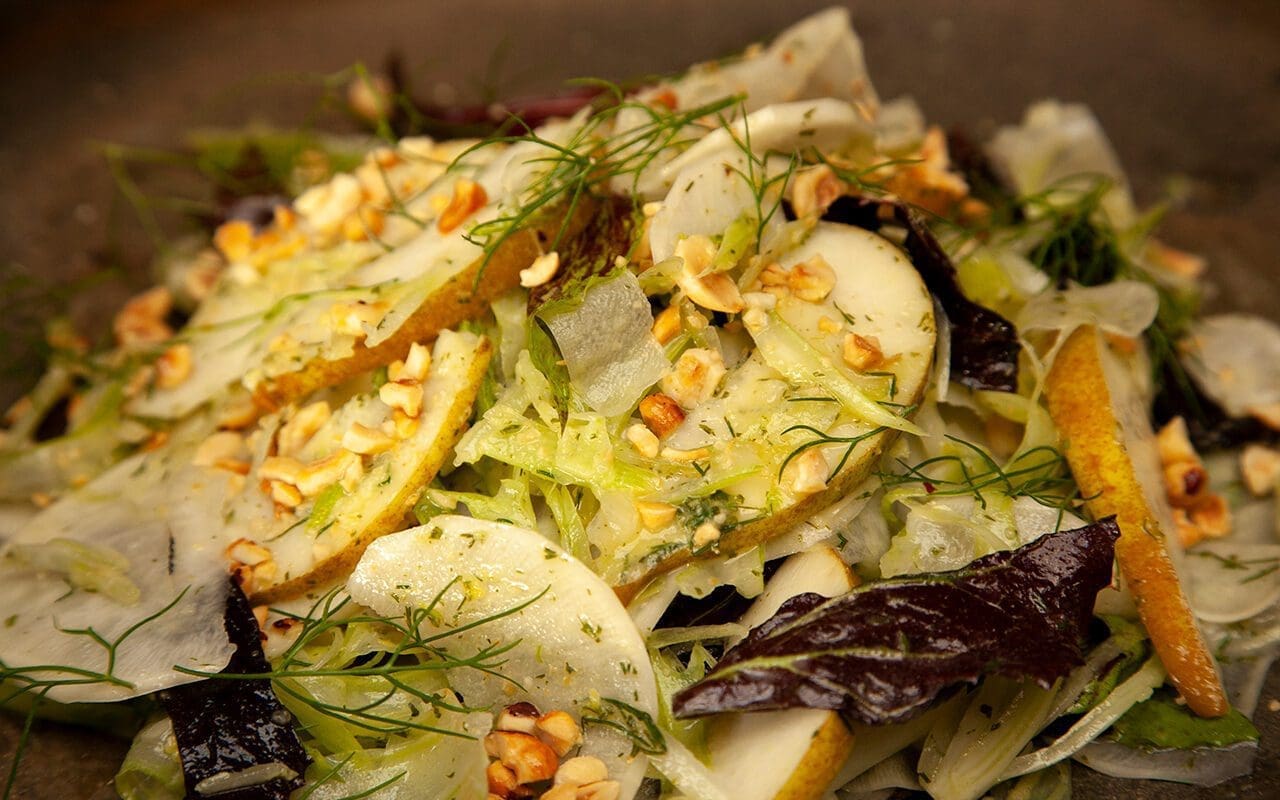
A fine, chilled sharply dressed fennel salad is one of the most uplifting of dishes for the winter table. The mild aniseed flavour and succulent crispness are invigorating and refreshing. While they are still young and tender enough I thought that these new radishes would pair well with the fennel and slices of succulent ‘Doyenné du Comice’ pear, harvested last month and which we are bringing into the house one at a time to ripen on the window sill.
Both the fennel and radish should be as finely sliced as possible using a mandolin or a very sharp knife. It is essential to put them both into iced water as this crisps them up and causes the radish to curl, which adds to the attractiveness of the plate.
If you are not able to get black radish then a small turnip will be a better substitute than breakfast radishes, which in any case are hard to come by at this time of year and too small to have the right kind of textural impact here. Alternatively, and perhaps easier to find, are the long Japanese radishes known as mooli.
This is a good companion to rich meat dishes, oily fish or a cheeseboard.
200g fennel
200g black radish, turnip or mooli
1 large, perfectly ripe pear
6 leaves of red or variegated chicory. e.g. Palla Rossa or Castelfranco
40g hazelnuts
1 lemon, juiced
Dressing
1 lemon, juice and zest
1 tbsp crème fraiche or Greek yogurt
1 tsp Dijon mustard
1 tsp honey or maple syrup
3 tbsp hazelnut oil
3 tbsp rapeseed oil
A small bunch of mint, leaves removed
A small handful of fennel fronds, removed from the stalks
Sea salt
Serves 4
Set the oven to 180°C. Put the hazelnuts into a baking dish in the oven and allow to toast for 10 minutes, checking regularly to prevent burning. Alternatively heat a small frying pan and toast the nuts until fragrant and lightly scorched. Allow to cool, rub off the skins and crush coarsely in a mortar.
Put all of the dressing ingredients, except the herbs, into a bowl and whisk to combine. Chop the mint and fennel very finely and add to the dressing.
Fill a large bowl with cold water and either add ice cubes or put into the freezer for 20 minutes to thoroughly chill.
Peel the radish and slice as thinly as possible using a mandolin or very sharp knife. Put the slices into the iced water. Do the same with the fennel.
In a medium sized bowl put the juice of the first lemon and a cup of cold water.
Carefully cut the pear into quarters, core and cut each quarter lengthwise into 6 slices. Immediately put the slices into the lemon water as you go to prevent browning.
Tear the radicchio into pieces.
Drain the radish and fennel. Put into a salad spinner or clean tea towel to get as dry as possible. Return to the bowl with the torn radicchio. Pour over about two thirds of the dressing and mix with together your hands to combine and coat everything.
Remove the pears from the lemon water and dry on a clean tea towel. Add to the salad and very carefully combine so as not to break the pear pieces.
Using your hands, carefully arrange the salad on the serving plate. Pour over the remainder of the dressing. Scatter a few reserved fennel fronds. Toss over the hazelnuts and serve.
Recipe and photographs | Huw Morgan
Published 13 November 2021
Almost without fail, every meal I cook begins with an onion. Despite the fact that I use so many and that they are both cheap and plentiful at the greengrocer, every year we grow our own. They are a straightforward crop, needing very little attention after planting, apart from weeding, and they always produce in bulk and without pests or problems. Given the frequency with which I use them, every meal time provides a sense of satisfaction and proof of a successful growing season.
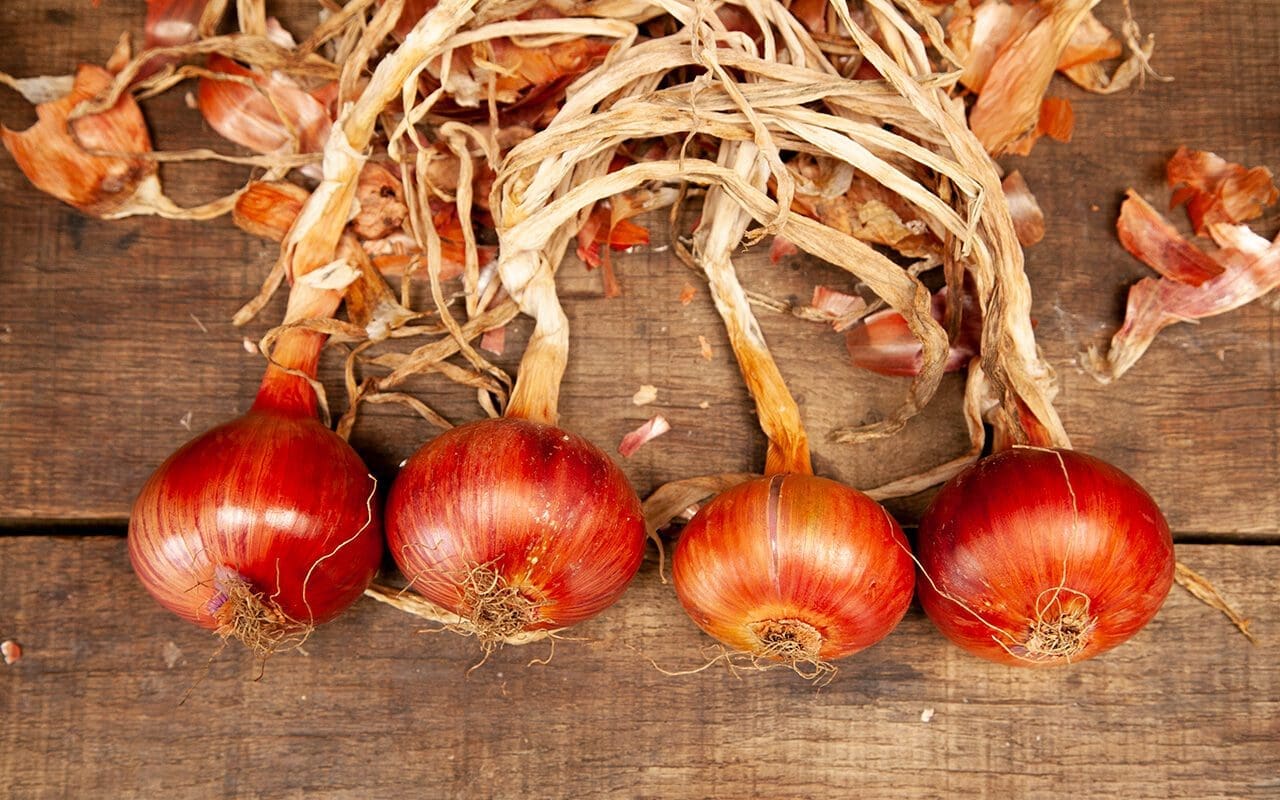
We grow a number of onion and shallot varieties, and have settled on our favourites over the years; ‘Sturon’, a large white onion for everyday cooking, which has an RHS Award of Garden Merit due to its reliability and storage quality, ‘Red Baron’, a red onion, also with an RHS AGM, which is another good keeper and with a stronger flavour than most red onions and ‘Keravel Pink’, also known as ‘Rose de Roscoff’, a pretty pale pink onion with coppery skin, which is said to have the best flavour of all, sweet enough to eat raw and deliciously fruity when cooked. An old variety from Brittany this is the variety that my mother remembered beret-wearing Frenchmen – Onion Johnnies – selling from their bicycles on the streets when she was a child in Wales.
Over the years we have learned that onions do best in the sunniest beds of the kitchen garden, unshaded by other crops, do not like growing in beds that have been recently manured, benefit from heavy watering as they approach maturity and that, contrary to traditional growing advice to bend the tops over when the bulbs are fully grown and before lifting, that this is not good practice in reality, since it damages the base of the leaf shaft, which results in the bulbs being more susceptible to rot.
We grew only one variety of shallot this year, ‘Longor’, a large, yellow banana type shallot, which produces reliably high yields. We usually also grow ‘Red Sun’, but these had sold out last year before we could place our orders. All of our onions and shallots come from The Organic Gardening Catalogue as sets – small onions ready to be planted out in spring for a midsummer harvest – but I am tempted this year to try growing some from seed, as this is a lot cheaper and reportedly very easy. Unlike onions shallot sets can b e planted in autumn to produce an earlier crop, and I have recently received an order of ‘Échalote Grise’, an old variety, the gourmet French shallot also known as the ‘true shallot’, which I will plant before teh end of November. Every year we harvest around 100 mature, large onions and 10kg of shallots which, after they have been left out in the sun to ripen and dry out, are plaited together by Dan who is a dab hand, having done it for many years as a child with his mother.
Although the majority of our onions end up invisibly in soups, stews, casseroles, dhals and curries, sometimes you really want to taste the flavour of a home-grown onion, and this recipe makes them the focus of a meal. Many stuffed onion recipes have a lot of ingredients which compete with the subtle sweetness of the vegetable itself. Here onions’ well-known partner, sage, and just a little bread, nut and cheese ensure that the onion is what you really taste.

4 medium onions – around 250g each
1 stalk of celery– about 50g
40g butter
50g walnuts
40g white breadcrumbs
50g cheddar cheese, finely grated, plus extra for garnish
12 tender, young sage leaves, finely chopped
Nutmeg, freshly grated
4 cloves of garlic, finely chopped
Serves 4
Set the oven to 180°C and bring a large pan of water to the boil.
Remove any loose papery skins from the onions, retaining one complete layer of dried skin. Remove the root with a sharp knife being careful not to cut through the skin, then cut through the top of the onion to remove about 1cm, so that you all of the layers are visible.
Simmer the onions in the pan of hot water with a lid on for about 30 minutes until soft to the point of a knife. Remove with a slotted spoon and allow to drain and cool in a colander.
When cool enough to handle carefully remove the centre of each onion with a teaspoon, leaving a shell 2 to 3 layers thick. Put the onion shells into a buttered ovenproof dish.
Toast the walnuts in the oven for about 3 minutes until lightly coloured and fragrant. Chop finely.
Finely chop the celery and garlic and the centres from the onions. Melt the butter in a small pan over a high heat until foaming and smelling toasty. Turn the heat down and sauté the celery and garlic for about 3 minutes until translucent. Then add the onion and cook over a low heat for 10 minutes until the flavours have combined.
Remove from the heat and add the chopped walnuts, sage, the grated cheddar cheese and breadcrumbs. Season generously with salt, black pepper and grated nutmeg. Stir well and then spoon the mixture into the onion shells. Press the stuffing down well so that there are no air pockets and mound it up on the top so as to use all of the mixture.
Grate a little more cheese over the top of each onion and then put into the oven for 30-40 minutes until brown and bubbling.
Serve as a main course with a green salad and boiled potatoes or as a side vegetable with other dishes.
These can be made in advance and then, before roasting, kept covered in the fridge for up to three days until needed or wrapped in foil and frozen. Once defrosted you should add 10 to 15 minutes to the cooking time from cold.
Recipe & photographs: Huw Morgan
Published 16 October 2021
August is the month when every meal comes straight out of the kitchen garden. Our local village greengrocer, who is also a market gardener, is now used to my prolonged summer absences, and when I do eventually visit we compare notes on what has done well for us this year and what hasn’t. He knows that I will only buy those things that I can’t or don’t grow myself; plump Italian aubergines, lemons, limes and oranges, root ginger, flat peaches and British strawberries. We used to grow our own, but strawberry virus is rife in our valley and we had a mass crop failure two years ago and so it is the only soft fruit that we now buy. My eyes pass over everything else like so much convenience food, knowing that I am returning to a well-stocked garden of courgettes, summer squash, French beans, peppers, runner beans, cucumbers, salad greens, beetroot, carrots, turnips and sweetcorn.
Such choice and variety can make menu-planning a challenge, as the demands of those things that need to be harvested fight the desires of our mouths and bellies. We don’t fancy runner beans this evening, but they threaten to break the tripods if left unpicked. A tiny courgette left on the plant this evening is sure to be a marrow requiring coring and stuffing two days’ hence. And do I have time to dig, wash, roast and peel beetroot, when a tomato salad will take just moments to prepare?
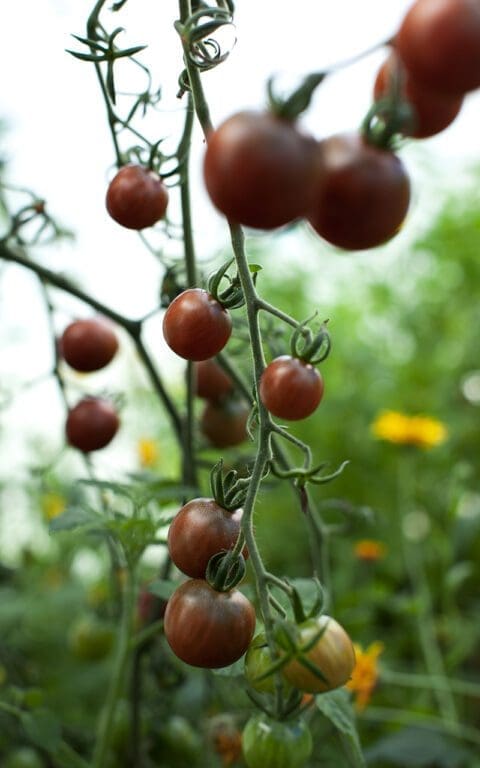
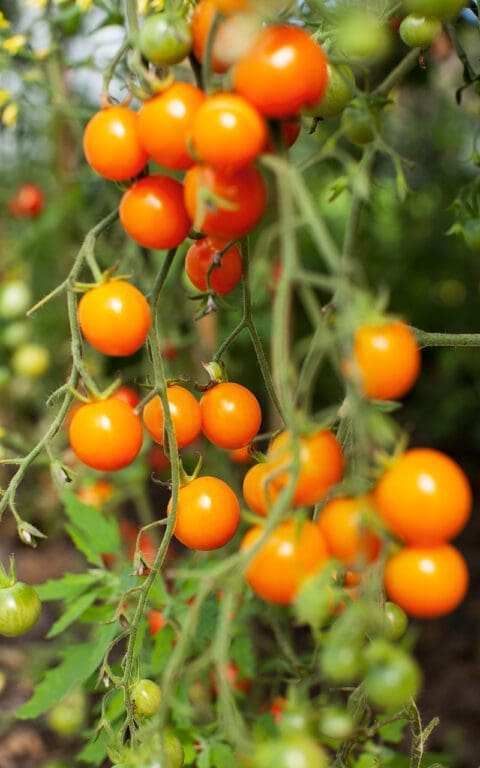
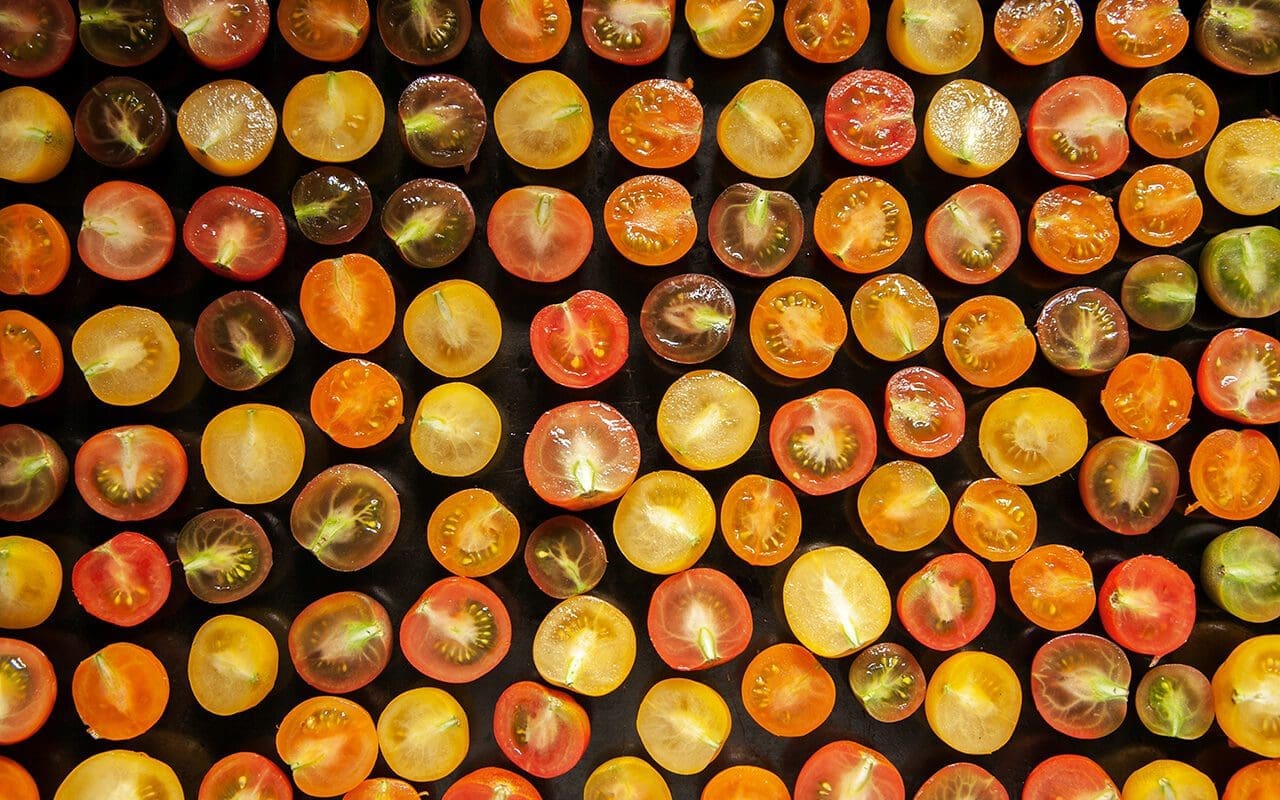
And have we eaten tomato salads in the past few weeks. Almost every day for days and days. Nothing fancy, just thickly sliced tomatoes – beefy ‘Feo de Rio Gordo’ and ‘Black Russian’, striped ‘Red Zebra’ and ‘Green Zebra’ and pale yellow ‘Lotos’ – simply dressed with olive oil, homemade vinegar and sea salt, a scattering of fresh basil or oregano and perhaps some finely sliced shallots. The most productive of all are the cherry tomatoes which, when they’re not just popped whole into your mouth like sweeties, have gone into pans of braised vegetables – courgettes and beans – sauces and soups, or I have slow cooked them in the oven before bottling them in jars for the pantry. This is a change from bottling them whole and uncooked as I did last year. As they are cooked you can pack them in and get far more tomatoes to a jar, so saving space in the pantry for other preserves. I will use their concentrated flavour to bring a taste of summer to winter dishes or delicious, unseasonal luxury to a slice of toast.
Last week I was left with half a tray of these mi-cuit (half-cooked) tomatoes, which wouldn’t fit into the jar. Pondering what to do with them, my eye caught sight of the Genovese basil in the herb bed, and so I made this quick and easy recipe for an impromptu summer lunch. If you don’t have the time or inclination to make your own pastry, this is even quicker and easier with a pack of shop bought puff pastry or some sheets of oiled filo. Replace the basil with any fresh herb that complements tomatoes like tarragon, chervil, oregano or thyme. The sharper flavour of authentic sheep milk feta and sheep curd works very well with the sweetness of the tomatoes but, if these aren’t easy to get hold of, substitute cow’s milk feta and ricotta.
270g plain flour
10g fine polenta
140g, chilled butter, cubed
1 egg, beaten
Ice cold water
Salt
250g sheep feta
125g sheep curd or ricotta
125ml double cream or mascarpone
A large handful of fresh basil leaves
2 large eggs, beaten
About 500g cherry tomatoes, halved, sprinkled with salt and slow-cooked for 2 hours at 125°C, then allowed to cool

You will need a 20 x 30 cm rectangular or 28 cm round metal tart tin.
Set the oven to 180°C.
Make the pastry by putting the flour, polenta, salt and butter into the bowl of a food processor. Process until the mixture resembles fine breadcrumbs. With the motor running slowly add the beaten egg. Then add chilled water a couple of teaspoons at a time until the dough comes together. When it does, immediately switch off the machine, remove the dough and form into a ball.
On a floured surface quickly roll out the dough and line the tart tin. Trim off the overhanging pastry, prick the base all over with a fork, line with baking parchment and baking beans and bake for 15 minutes. Remove the baking beans and parchment and return to the oven for 5-8 minutes, until golden brown and looking dry. Remove from the oven and allow to cool.
Put the feta, sheep curd and cream into the food processor and process until well combined. Add the basil and process again until the mixture is completely flecked with green. With the motor running add the beaten eggs. Pour the filling into the pastry case. Arrange the cherry tomatoes on top of the basil cream, fitting in as many as you can. Return to the oven for a further 25-30 minutes, until the tomatoes are lightly browned and the basil cream is golden in places and puffy.
Serve warm with a green salad.
Recipe & photographs: Huw Morgan
Published 28 August 2021
Twenty six years ago I bought a newly published recipe book, which was to have a major impact on the way I cooked. It was the first River Café Cookbook. Throughout my university years I had been cooking from the books of Elizabeth David, Jane Grigson, Marcella Hazan, Richard Olney, Elisabeth Luard and Claudia Roden, but there was something strikingly different about Rose Gray and Ruthie Rogers’ approach to the Mediterranean kitchen.
Looking back, it is hard to imagine that their approach felt so new, so accustomed are we now to the ideas of seasonal eating and only using the best quality produce, but their minimal approach to preparation and presentation, so artfully expressed in the clean graphic design of the book itself, was not the norm and it was this simplicity of approach and insistence on the very best produce which still sets The River Café apart.
When I worked in film in the 1990s I was lucky enough to eat at The River Café on numerous occasions, my bill charged to various people’s expense accounts. Although it was, and still is, a glamorous destination the food was so memorable that after those heady days were over Dan and I would return whenever we wanted a meal to mark a special occasion; a fortieth birthday, a special friend visiting from overseas, a pre-marriage celebration, the purchase of Hillside. In the abstract, if you look at their menu, the food certainly looks expensive, but in all the years I have eaten there I have never once felt that the food is overpriced. The attention to detail in every aspect of the experience elevates it to a level that makes total sense of restaurant eating. If anyone ever comes to London and asks which is the best restaurant we can recommend I always answer, without hesitation, ‘The River Café’.
Several years ago, faced with this very question from Midori Shintani, head gardener at Tokachi Millennium Forest and an inveterate foodie, we booked ourselves a table. As the first plates were brought out I suddenly saw in the expression on Midori’s face that, although the ingredients may have been European and unusual to her, the care taken with the food was instantly comprehensible. Their restraint and reverence for seasonality and ingredients at their best and the honesty of presentation is comparable to that of domestic and commercial kitchens the length and breadth of Japan.
A favourite recipe from that first book, and one I have lost count of the number of times I have made, is for vignole, a Roman stew of fresh spring vegetables. Also known as vignarole, the vegetables traditionally used are artichokes, broad beans and peas. However, regardless of how good a spring we have or what countless restaurant kitchens would have you believe, these could never really be considered spring vegetables in Britain, so it is a dish I normally make in early summer. The vegetable garden got off to a very slow start this year and, although we have had artichokes for several weeks, it is only now that all three primary ingredients are cropping together. Given the lateness of the season we now also have the first Florence fennel, shallots, courgettes, bush beans and new season garlic, so this dish, based on the method used for vignole, uses everything that is at its best in the vegetable garden right now.

Recipes like this are infinitely adaptable. The only thing to remember is to add the vegetables to the pan in the order of those requiring the longest cooking first. Quartered baby turnips, carrots or the tiniest new potatoes near the start of the cooking time. Earlier in the season, asparagus spears make a fine addition. Add them at the same time as the broad beans. Young chard leaves or spinach can be added at the last minute or tiny radishes. Although mint is the customary herb to use for vignole, at this point in the year I like to combine it with basil which is growing in profusion in the polytunnel, the aniseed flavour of which complements the fennel well.
Serve warm to allow full appreciation of the different flavours and textures, this can be eaten alone as a starter with grilled bruschetta, accompanied perhaps with a melting burrata or fresh mozzarella or to accompany a piece of firm white fish such as halibut.
10 small artichokes with stalks
400g of peas in their pods or a mixture of peas and mange tout – 150g shelled weight
400g broad beans in their pods – 150g shelled weight
150g fine French beans
4 banana shallots – around 300g
4 baby Florence fennel – around 125g
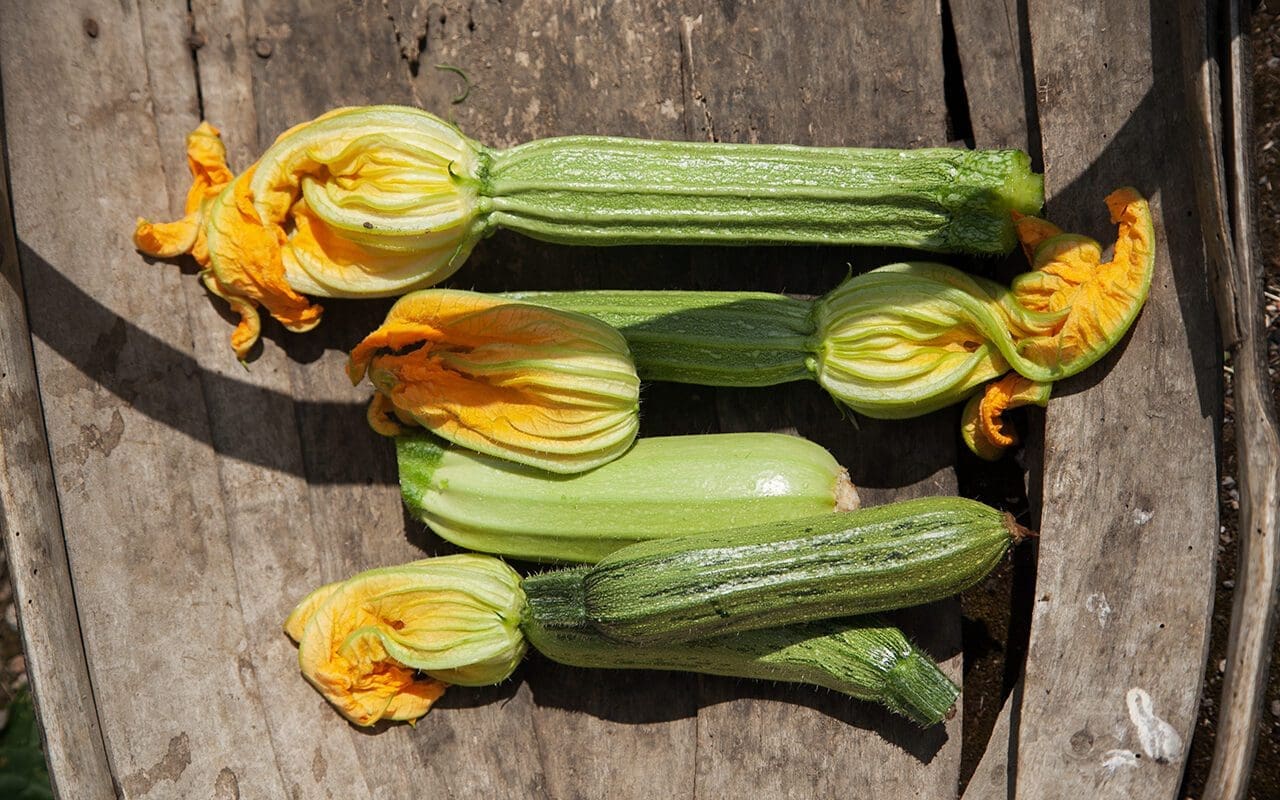
3 small courgettes with flowers – around 250g
2 Little Gem lettuces
2 fat cloves of new season garlic
A small glass of dry white wine, water or stock – about 120ml
A small bunch of Genovese basil
A small bunch of fresh garden mint
The juice of two lemons
Serves 4 to 6
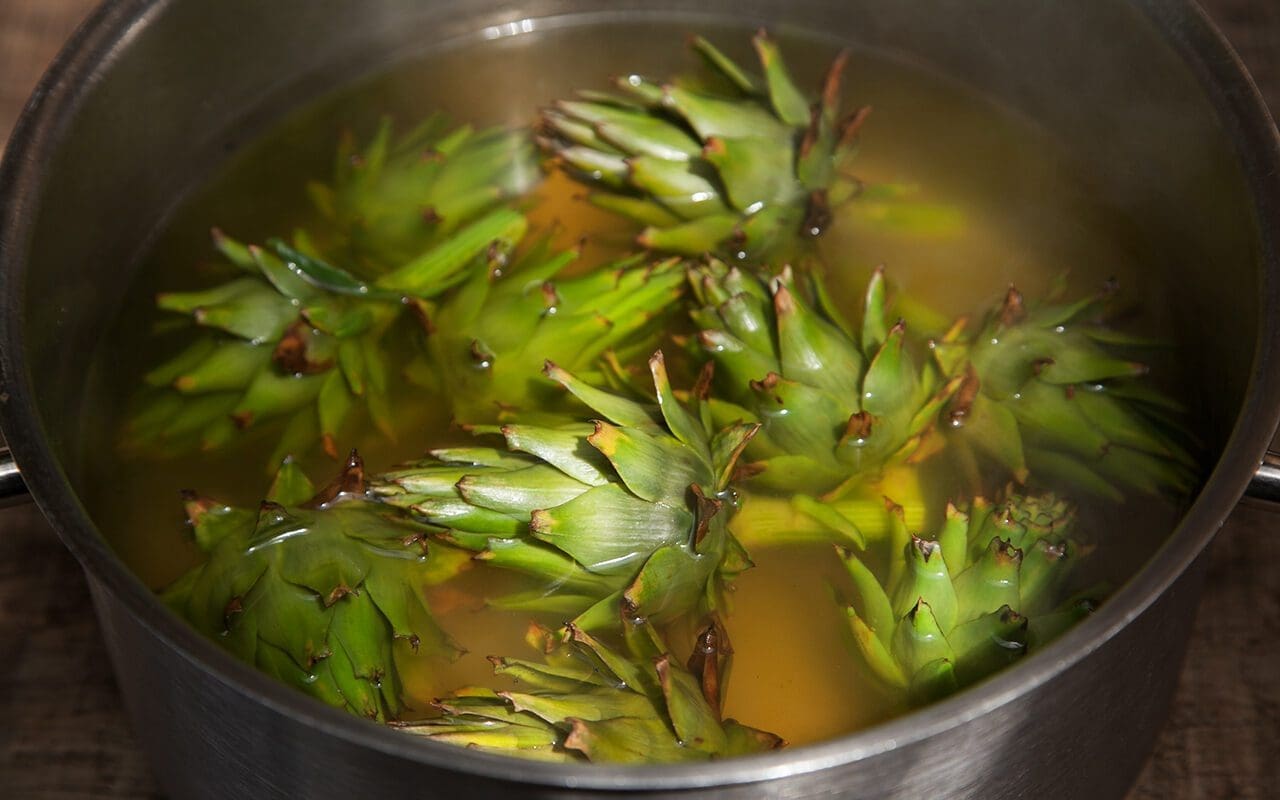
Bring a large pan of water to the boil. Cook the whole artichokes for 5 minutes. Drain and allow to cool.
Shell the peas and broad beans and put in a bowl.
Cut off the stalk ends of the French beans.
Remove the roots, outer leaves, stems and foliage from the Florence fennel. Cut lengthways into eighths.
Peel the shallots and trim off the roots, retaining enough at the base, however, to hold the pieces together when cut lengthways into eighths.
Peel and finely chop the garlic.
Remove the flowers from the courgettes and retain. Cut off the top and bottom of the courgette. With the courgette lying horizontally on the chopping board cut off a diagonal piece from left to right. Roll the courgette a quarter turn away from you and make the same diagonal cut again. Keep turning and cutting until you have wedge shaped pieces of comparable size.
Remove the outer leaves from the lettuces until you are left with the hearts. Keep the leaves for a salad. Trim off any thick stalk, then cut the hearts lengthways into eighths.
In a heavy bottomed large pan gently heat the olive oil over a low heat.
Make a cartouche from a piece of dampened greaseproof paper large enough to cover the inside of the pan.
Add the shallot and garlic to the pan. Stir to coat with the oil. Lay the cartouche over the top, tucking it in to the sides so that no steam escapes. Put the lid on the pan and leave to cook on the lowest possible heat for about 10 minutes until the shallots are translucent and lightly coloured.
Remove the cartouche. Add the fennel and stir. Replace the cartouche and lid and cook for another 3 minutes
While the shallots and fennel are cooking remove the outer leaves from the artichokes and scrape any fibres from the stalk with the edge of a knife. Cut the spiny tops from the inner leaves. Cut the artichokes in half, remove the chokes with a teaspoon and then drop the hearts into a bowl of water to which you have added the juice of one lemon. When they are all done remove them from the water with a slotted spoon and add to the pan of shallots and fennel with the courgettes and French beans. Stir gently. Pour over the glass of wine. Replace the cartouche and lid again and cook for a further 3 minutes.
Lay the lettuce hearts on top of the other vegetables, add the broad beans and peas, replace the cartouche and lid and cook for another 3 minutes.
Remove the pan from the heat and allow to stand for 10 minutes to cool slightly. Then season with salt and lemon juice to taste. You can add some more olive oil now too if you like.
Coarsely chop the basil and mint. Remove the bases from the courgette flowers and discard. Slice the flowers lengthways into thin ribbons. Add all of these to the pan and stir everything together very gently so as not to break up the vegetables.
Leave to stand for another 5 minutes for the flavours to develop before serving.
Recipe and photographs | Huw Morgan
Published 17 July 2021
I look out of the window and all I see is green. The endless rainfall of the past weeks and the last few days of warmer, sunny weather have resulted in a sudden explosion of growth that threatens to bypass spring altogether and fast forward straight to summer. Racing growth everywhere. Everywhere, that is, apart from in the vegetable garden.
By this time of year I would usually expect to have planted out almost all of the tender veg – courgettes, pumpkins, sweetcorn, and bush beans – and would hope to be eating the very first broad beans, lettuces and beetroot. This spring has been so cold that my first sowings of carrots took a month to germinate. So tardy that it was only when remaking the seed drill last weekend to resow that I discovered they were just starting to emerge from their seed cases. Kohl rabi that I started in plugs in the polytunnel and planted out in March have only just started to swell and the first peas, sown in the third week of April, are only now sending out their first climbing tendrils. So, although we were able to extend the harvest season with the polytunnel this year, there has still been a yawning hungry gap that will take a few more weeks to fill.
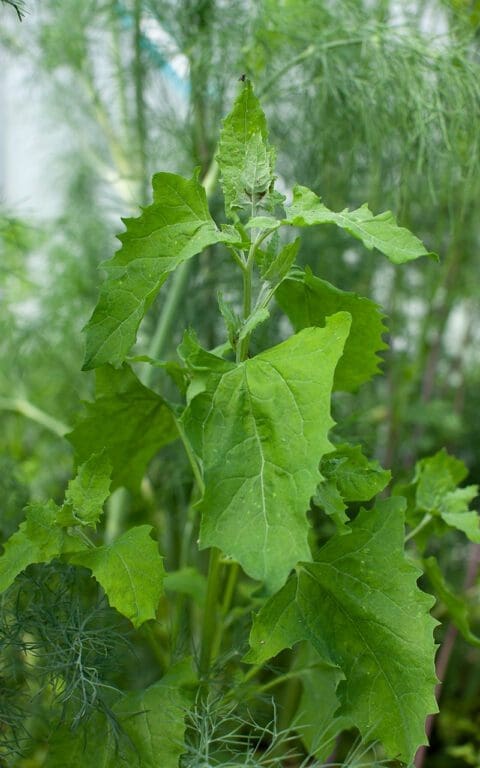
And so my eye has started wandering. I have been sizing up the broad bean tops and the kohl rabi and beet greens. The Swiss chard (which has to be the easiest, most reliable and productive green vegetable anyone can grow) has appeared in every guise imaginable – raw in a chopped salad, creamed with stewed shallots, pureed and added to ricotta for a green sformata and the stalks braised with saffron to waste not a thing. The land cress has gone to flower, but still has enough leaves to make it worth keeping and the fat hen seedlings that were missed and have matured in the polytunnel, transform from weeds into food with a simple change of perspective. As the plants of the woods and hedgerows have been burgeoning, seemingly less affected by the chill, damp weather I have been throwing garlic mustard and wild garlic into anything and everything and adding dandelion leaves, cow parsley and cleavers to salads.
Foraged wild greens would once have been a mainstay of the British kitchen at this time of year as we bridged the hungry gap without the benefit of greenhouse or polytunnel, but now they are only seen on the menus of upmarket restaurants. In Greece they are still firmly on the menus of anywhere you choose to eat and are easily found on market stalls in city and island villages the length of the country. Horta, as they are called, can comprise any foraged greens including nettle, dandelion, purslane, wild chervil, wild sorrel, sow thistle, shepherd’s purse, chicory and other wild greens that do not grow here. Most often these are served simply boiled and dressed with olive oil and lemon juice, but a favourite way to eat them is in a pie laden with fresh herbs, bought still warm from the village bakery and eaten straight from the oil-stained paper bag.

Foraging for greens doesn’t take nearly as long as you might think. The bagful I picked for this recipe took about thirty minutes, and it is an agreeable way to pass some time, providing an opportunity to slow down and look closely at plants that normally get a cursory glance or scowl. Both nettles and wild garlic are at the very end of their season now, so don’t pick the tops of nettles if they have started showing their flowers and choose the youngest, smallest garlic leaves. The older ones will be bitter.
When foraging for any wild plants remember to only take a little from each plant, do not gather from roadsides or anywhere that dogs have access and take a good wild plant identification guide. If wild greens are hard to come by they can be bulked out with chard, kale, chicory or beet tops. It can also be made with shop bought filo pastry and, divided evenly, makes 6 turnovers with a reduced cooking time of 20 to 25 minutes.
Today, eating a warm slice for lunch with a fresh chard salad in the long-awaited sunshine, we could almost feel the heat and smell the salt spray of Greece. Soon, we said, soon.
Pastry
350g plain flour
175g unsalted butter, cold from the fridge and cubed
1 whole egg, beaten
Salt
A little cold milk
Filling
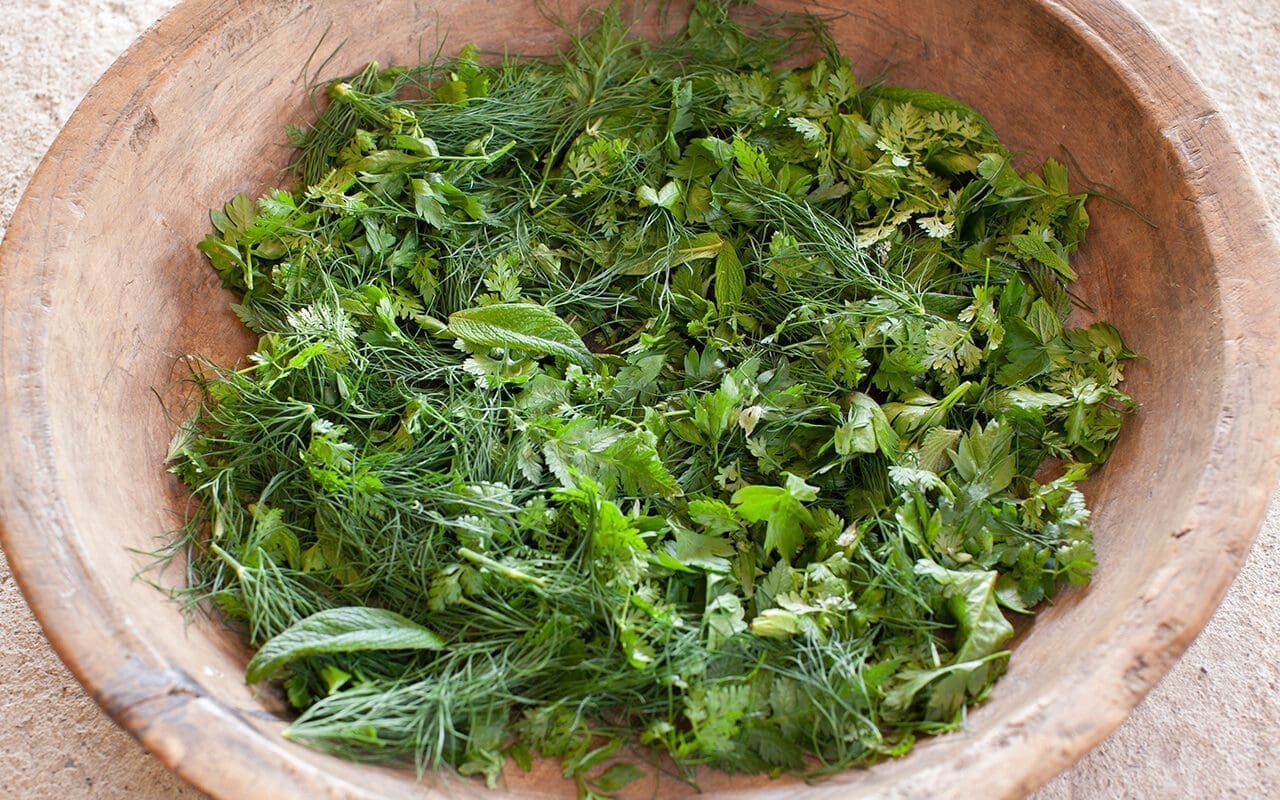
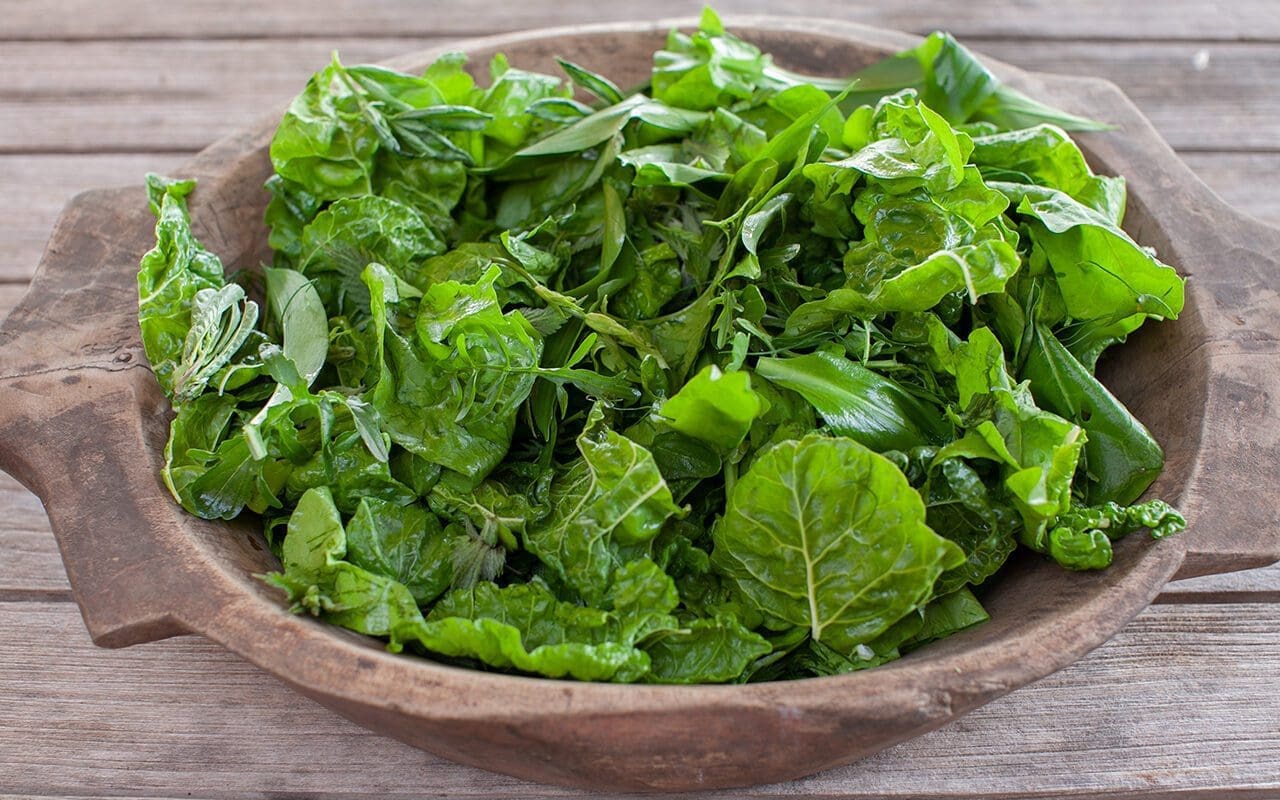
400g mixed foraged and cultivated greens – nettle tops, sorrel, dandelion, garlic mustard, wild garlic, fat hen, orache, wild chervil, wild hop shoots, broad bean tops, pea shoots, chicory, beet greens, chard, land cress, rocket
100g mixed fresh soft herbs – dill, parsley, chervil, mint, fennel, tarragon, coriander
180g shallots, leeks or spring onions, finely sliced
2 fat cloves of garlic, finely chopped
200g feta cheese
2 eggs, beaten
Olive oil
Freshly grated nutmeg
A little milk
Serves 8
Set oven to 180°C.
To make the pastry put the flour, butter and a good pinch of salt into a food processor. Process until the mixture resembles fine breadcrumbs. With the processor running, slowly add the beaten egg and enough milk to bring the dough together. Turn off the machine, tip the dough and any remaining loose mixture onto a worktop and quickly bring it together, kneading lightly, into a ball. Wrap in greaseproof paper and refrigerate for 30 minutes to an hour.
Heat a little olive oil in a saucepan over a medium heat. Add the shallots and garlic and sweat with the lid on for 15 minutes until soft and translucent. Remove from the heat and allow to cool.
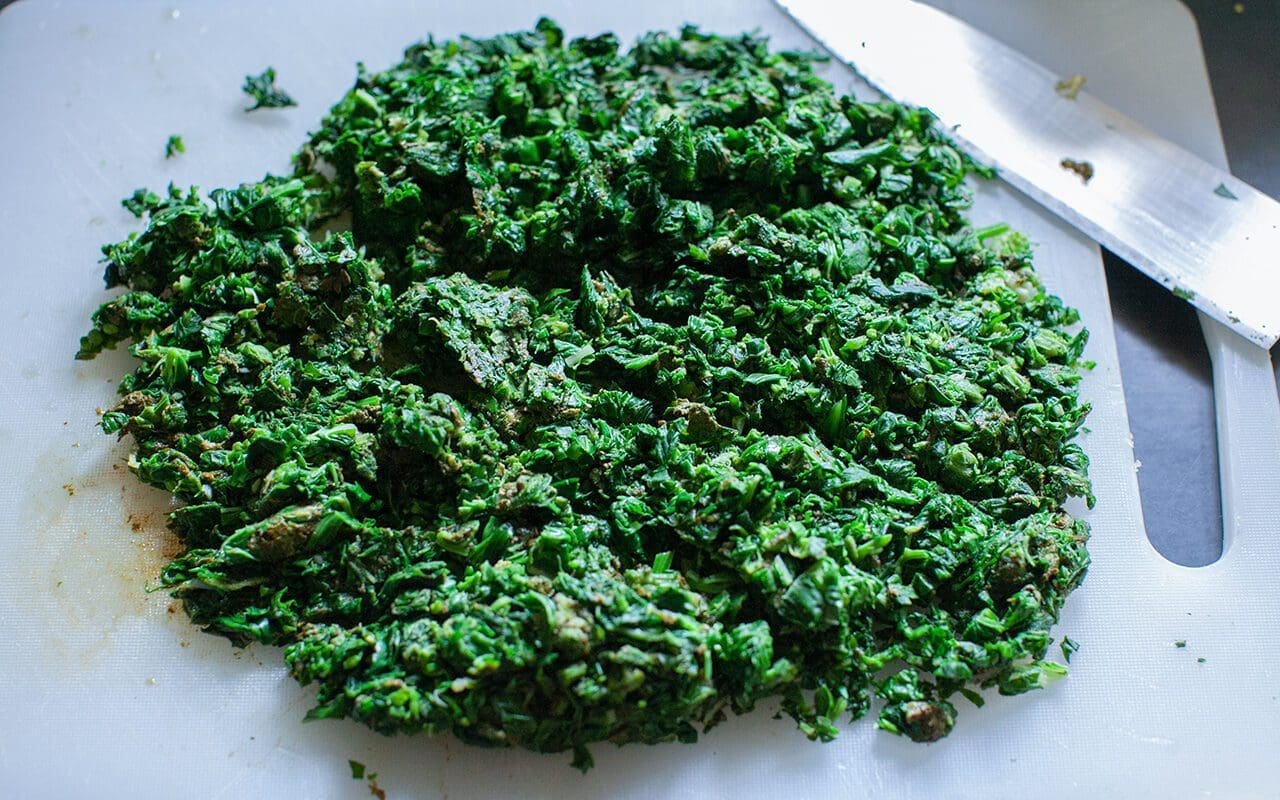
Bring a large pan of water to the boil. Blanch the greens for 1 minute, then drain and immediately refresh in cold water. Drain again and then squeeze out as much liquid as possible. Chop coarsely and put into a bowl. Chop the herbs fairly finely and add to the bowl. Add the cooled onions and garlic. Crumble the feta cheese into the bowl. Season with a little salt (the feta is salty), pepper and as much nutmeg as you like. Add the beaten eggs, reserving about a tablespoonful, then mix everything together thoroughly.
Divide the pastry into two almost equal halves. Roll out the larger half to line the bottom and sides of a 30 x 20cm rectangular metal tart tin or baking dish. Spoon in the filling and smooth out evenly ensuring that it is pressed into the corners.
Roll out the second piece of pastry to fit the top of the tart tin. Mix the reserved beaten egg with two tablespoons of milk and brush onto the edges of the pastry case. Lay the second piece of pastry on top and gently press the edges together with your fingers to seal. Trim off the excess pastry with a sharp knife.
Brush the remaining egg wash over the top of the pie. Make slashes in the top to let out steam. Put the pie onto a baking sheet and put into the oven for 30 to 40 minutes until golden brown and gently bubbling.
Serve warm.
Recipe & photographs: Huw Morgan
Published 29 May 2021
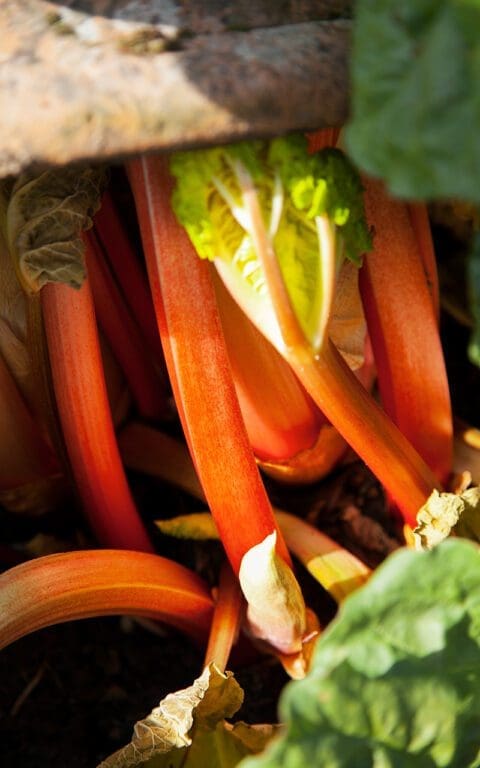
We put the terracotta forcers over the crowns of ‘Timperley Early’ at the end of January and over the variety named ‘Champagne’ at the end of March, although it probably should have been a little earlier. Despite the fact that the ‘Timperley Early’ would have been good weeks ago, there has a lot been going on in life and we just haven’t had time to pick it. The stems and emerging foliage of both have now pushed the lids off the forcers and exposure to light has been threatening to undo all of the good that forcing does for vibrancy of colour and flavour. Consequently, we have a rhubarb glut and, with plenty already cooked and in the freezer, part of my recipe challenge for this week was to answer the repeating question, ‘So, what else can you do with rhubarb?’.
When I scrolled past a mouthwatering image of Diana Henry’s Luscious Lemon Bars (thickened lemon curd on a shortcake base) on Instagram last week I thought they would adapt well to the sourness of rhubarb and so compared a number of different recipes to get a feel for proportions before alighting on one which sounded simple, foolproof and delicious. I made a couple of adjustments, substituting ground almonds for some flour in the shortbread base and replaced the flour in the custard topping with cornflour. All of the other ingredients, proportions and cooking method were as per the original recipe.

On Thursday, in between ferrying aubergines, peppers and chillis to the polytunnel, watering everything in pots, and doing anything requiring the pair of hands that we’ve been missing after Dan’s hand surgery last week, I managed to get a tray of these luscious rhubarb bars into the oven. Except that is not what came out. Through the mysterious alchemy and chemistry of cooking what emerged was something completely different. A layer of buttery, crumble topping above a firm custard with a thin layer of jammy rhubarb in the middle. Though delicious they were not what I had imagined and clearly needed more work to produce what I had in mind.
In the knowledge that cooking, photographing and writing a recipe in one day is already quite a tall order, I had to come up with another rhubarb recipe overnight. I thought, ‘Keep it simple.’ and stuck with rhubarb curd instead. No baking, just measuring and stirring.
After consulting books and websites I decided to adapt a familiar recipe I have cooked many times, substituting rhubarb juice for orange in Sam & Sam Clark’s curd recipe for Seville orange tart.
I finally settled down to cooking in the late morning and immediately the contemplative focus of cooking calmed my busy mind. The simplicity of just four ingredients and one pan. The repetition and order of cracking and separating eggs, cutting butter into cubes, weighing out sugar and measuring rhubarb juice. And then the close attention required to cook it carefully to ensure that the eggs don’t curdle.
It took over half an hour for the curd to start to thicken over the lowest heat possible and as, I stood there in the warmth of the range intently stirring, completely focussed on the activity before me, my mind went into the entranced meditative freefall that cooking shares with gardening.
Makes around 2 x 200ml jars
140g caster sugar
170ml rhubarb juice (see below)*
170g unsalted butter, cubed
4 large egg yolks
2 large eggs
*The rhubarb juice in this recipe is a by-product of rhubarb poached to go into the freezer. Around 500g of rhubarb should give you enough juice for this recipe. Cut the rhubarb into short lengths. Put them into a non-reactive pan with a tight-fitting lid and put in a medium oven (about 160°C) for around half an hour until soft. Strain off most of juice. Keep in the fridge and use in place of lemon juice or vinegar. It is particularly good in spring salad dressings.

Lightly beat the egg yolks, eggs and sugar together in a medium pan. Add the rhubarb juice and butter.
Put the pan over a very low heat and stir continuously until the butter melts and the mixture starts to emulsify and becomes glossy and thick. Do not be tempted to turn up the heat or it will curdle. Once it attains the consistency of custard pour into warm, dry, sterilised jars. Seal, leave to cool and then refrigerate. Keeps in the fridge for up to two weeks.
The flavour of rhubarb is delicate, so don’t be tempted to add other flavourings to this curd or they will overwhelm it.
Delicious on warm scones, mixed with poached rhubarb and whipped cream or as a filling for a tart base.
Recipe and photographs: Huw Morgan
Published 24 April 2021
We’ve never had much luck with cauliflowers. With a reputation for being tricky customers, sensitive as they are to inconsistency during the growing cycle, they also generally require a very long growing season, thus making inconsistencies in cultivation far more likely. As the queen of vegetable growing, Joy Larkcom, succinctly states in our kitchen garden bible, Grow Your Own Vegetables, ‘The secret of success is steady growth, with plenty of moisture both at young plant stage and when maturing. Growth checks are caused by delayed transplanting, or spells of drought, resulting in deformed and small curds.’ Having had some unexpected success with the purple-headed ‘Sicilia Violetta’ two years ago, last year I was determined to break our dissatisfactory run once and for all and grow a harvest we could be proud of.
I had picked out two varieties, both from Real Seeds, ‘All The Year Round’ and ‘Autumn Giant’. The first because it promised the ease of successional sowings, and the second since it was reportedly ‘very reliable’. Both were sown in plugs on April 12th and were ready to plant out five weeks later in the middle of May. I looked after the young plants assiduously, watering them regularly and giving them a fortnightly liquid manure feed from mid-June as the plants started to grow away in earnest. Whether the feeding initiated it or not I can not be sure, but by early July it was apparent that all eight plants of ‘All The Year Round’ were on target to produce huge and beautiful, snow-white curds that would all be ready to harvest simultaneously in a matter of days. It was equally apparent that there was no way Dan and I were going to be able to eat all of them ourselves in the time available.
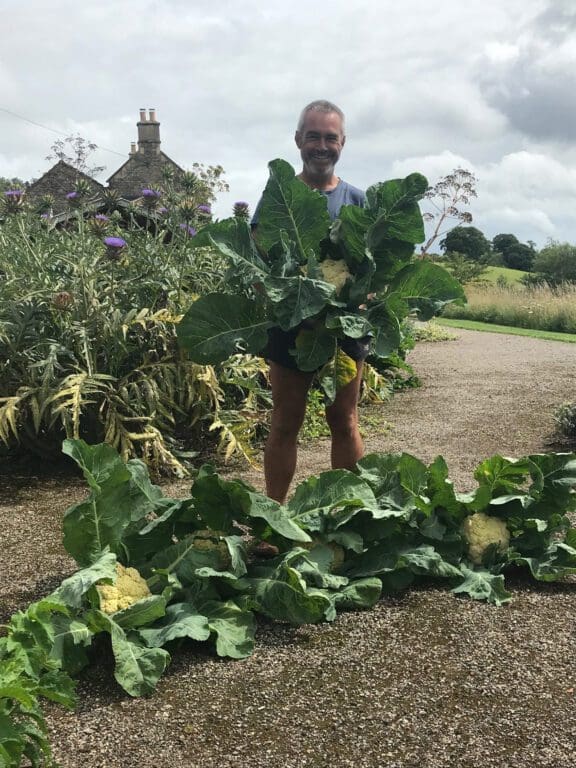
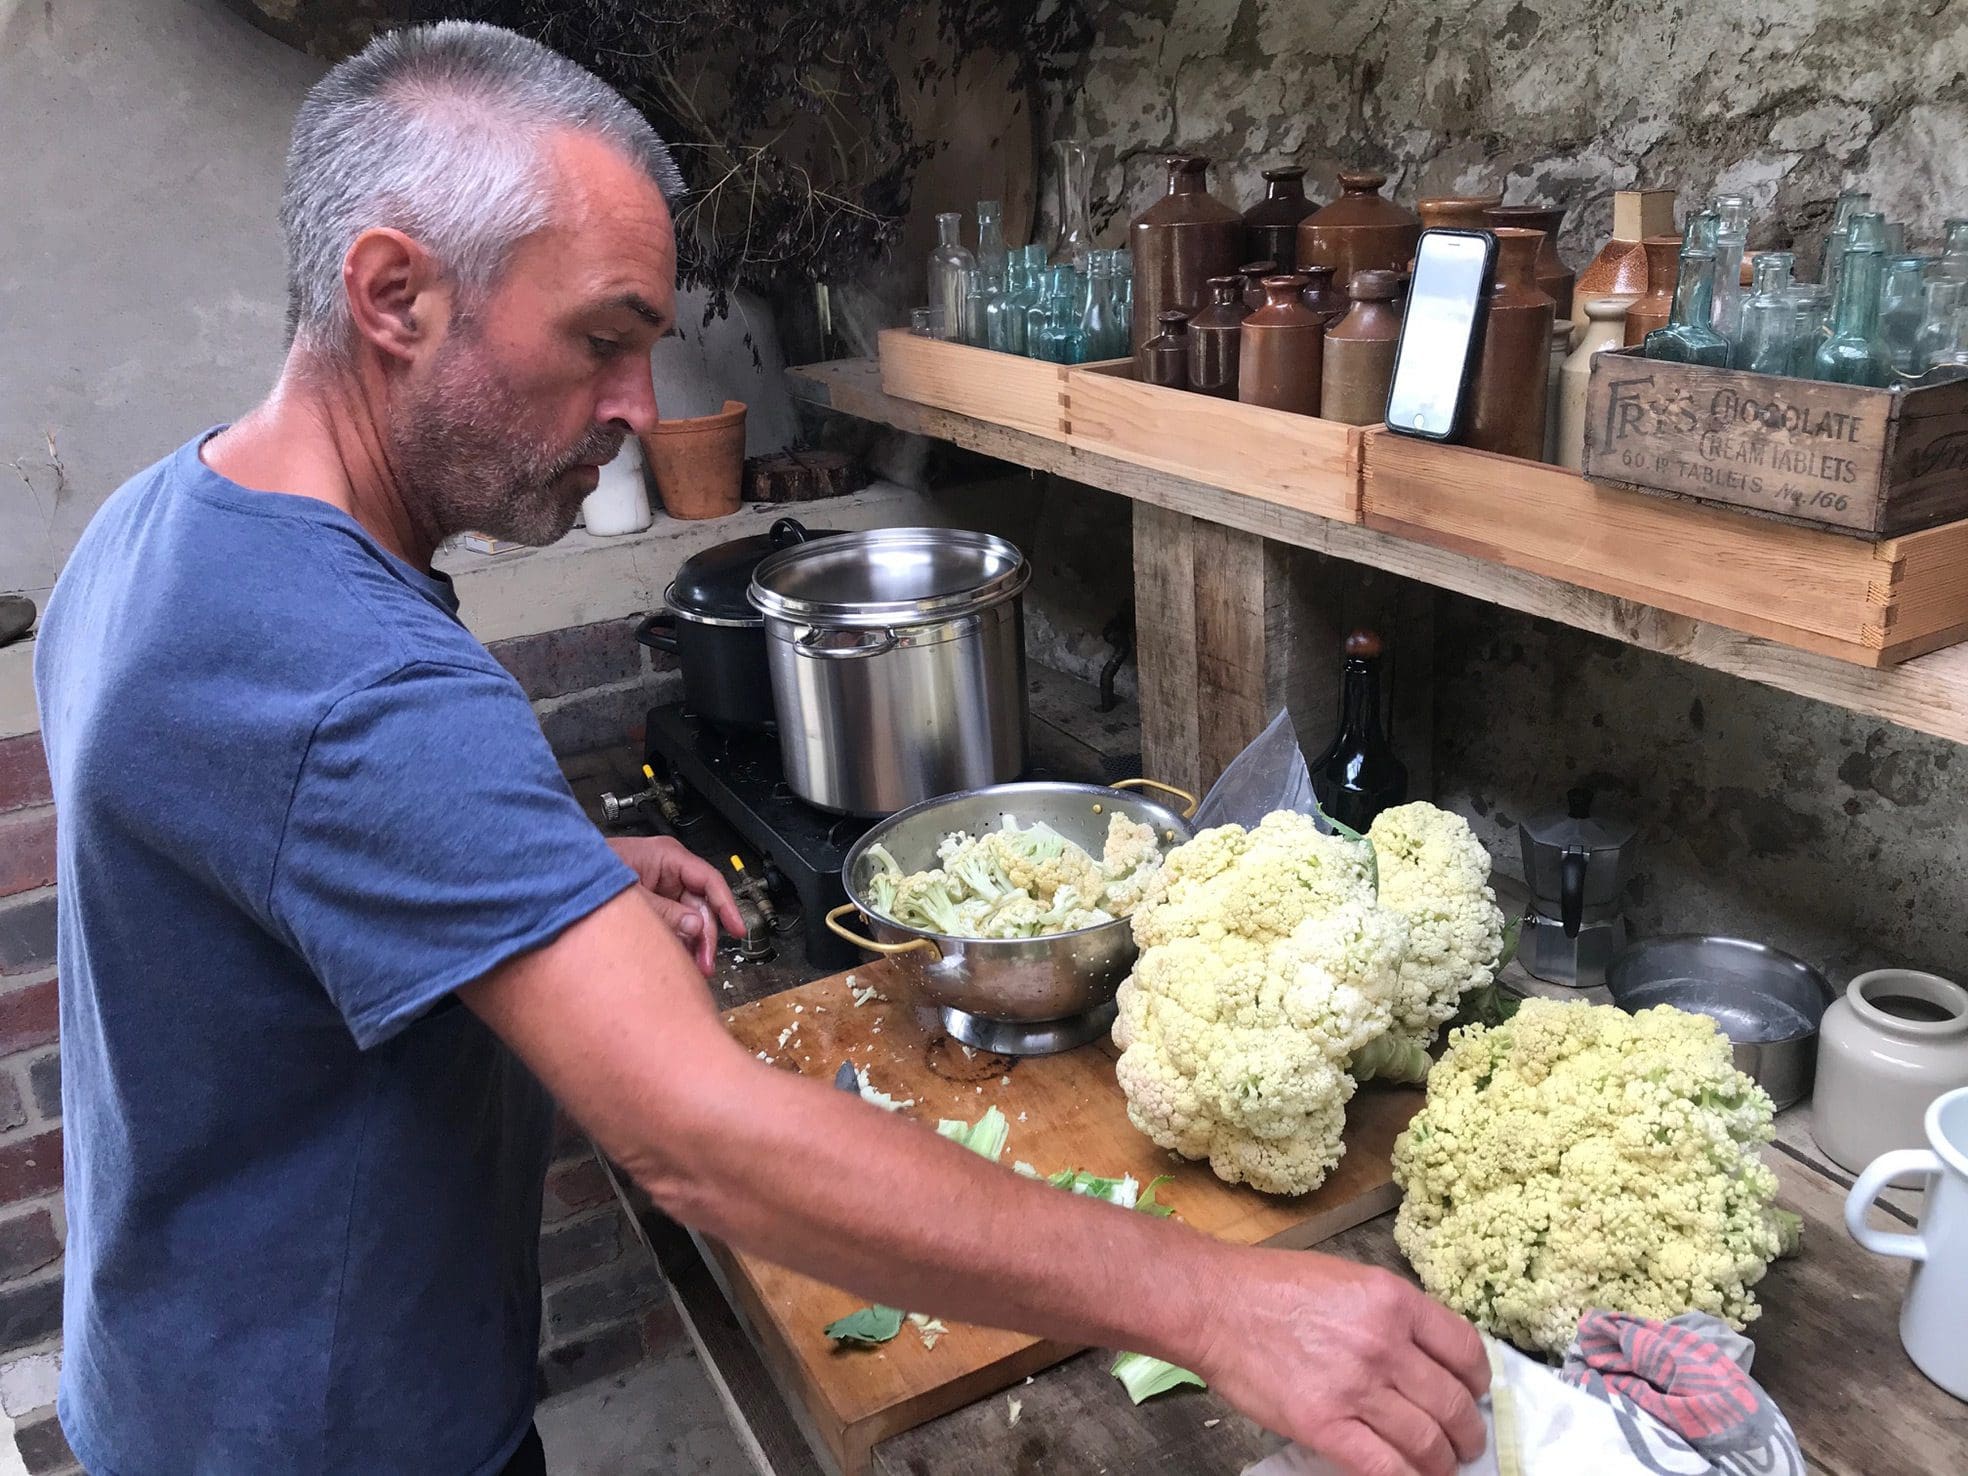
I chose my day carefully, reorganised the freezer, cleared the decks in the outside kitchen and assembled the equipment required for a mammoth batch of blanching. Cauliflower plants are huge, and it took some sawing and wrestling to take them all down, but eventually my catch was landed and Dan took my picture standing over them, inordinately proud. A large pasta pan with a colander insert makes blanching an easy affair, and as each batch went in I would set the timer for 3 minutes and return to preparing the next in line, removing the leaves and slicing each floret in two. Despite my apprehension of a neverending mountain of caulis the whole process of harvesting, preparing, blanching and bagging up seven of them for the freezer took around three hours. This really doesn’t seem a bad investment for the number of prep free meals they have provided this winter.
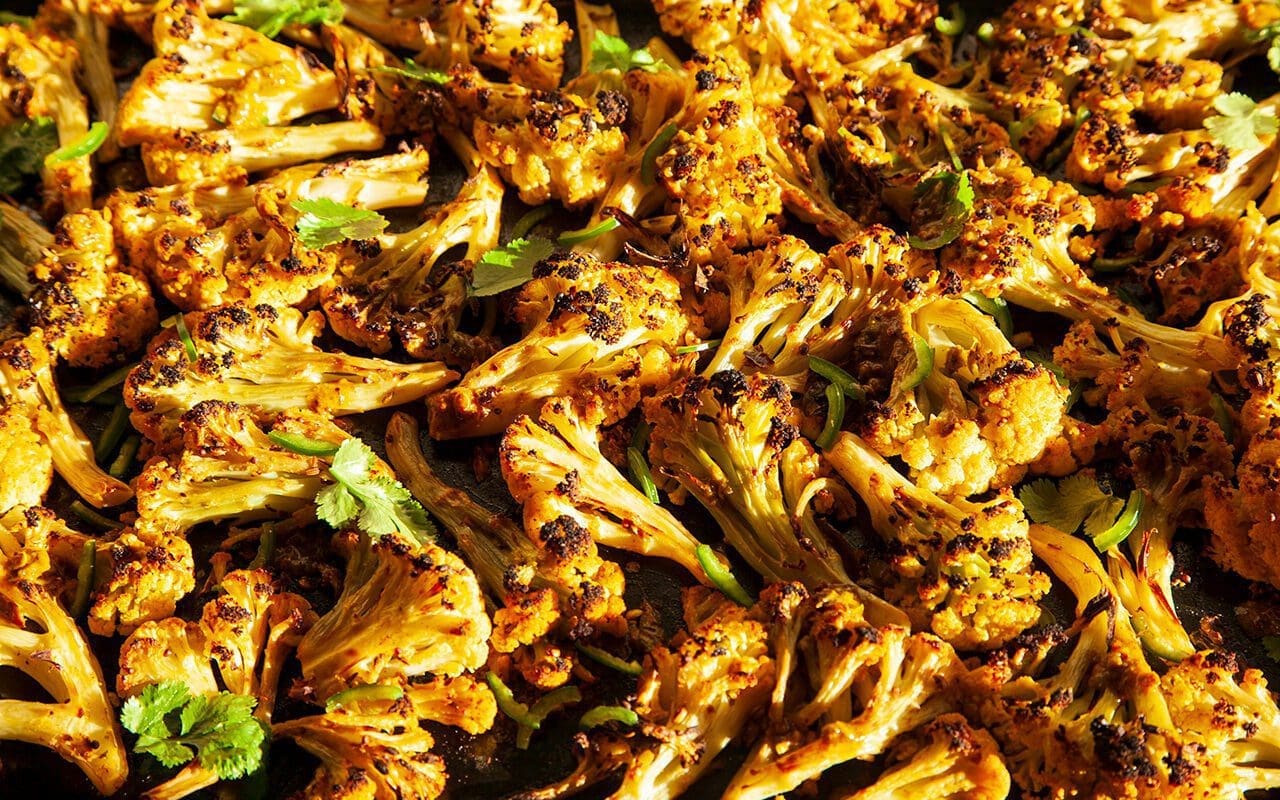
Dan posted his pictures of me on Instagram and that evening I got a message from Errol Fernandes. Errol is a Senior Gardener at Kenwood House in Hampstead and through his connection to Great Dixter we have come to know each other a little on social media, but have never met. Errol directed me to a post of his which gave his own recipe for blackened cauliflower inspired by his Goan mum’s home cooking, in the hope it might help us get through our cauliflower glut.
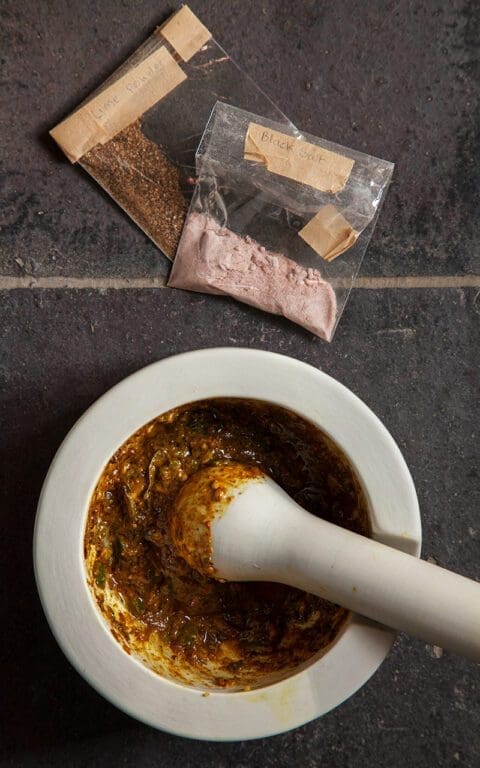
Knowing that we live in deepest, darkest Somerset Errol offered to send me some of the harder to come by ingredients – namely the back salt, powdered lime and mango powder. I have used dried lime and mango powder before, but never the black salt. Errol warned me, ‘It smells like bad eggs, but don’t be put off! It’s essential for the dish.’ When the little cellophane packets with hand-written labels arrived a few days later the distinctive sulphurous smell instantly transported me back to the Diwana Bhel Poori House on Drummond Street behind Euston station. When I was living in Camden in my mid 20’s I used to eat there on a weekly basis with my friends Simon and John Paul. The crisp-shelled poori, served with potatoes and chick peas and an appetising chutney that I now understood was flavoured with black salt.
Black salt (also known as kala namak) comes from volcanic salt mines in the Himalaya, and has been used in Ayurvedic medicine for centuries for its cleansing, detoxifying and digestive properties. Its pungent smell acts in a similar way to asafoetida, adding a deep, hard-to-pin-down umami richness which makes it incredibly more-ish. The powdered dried lime, mango powder, lime juice and turmeric combine to produce a deliciously astringent flavour which makes this a perfect dish to greet the changing season and wake up our slumbering taste buds and livers.
Each time I have made this dish I have taken the little cellophane packets of black salt and lime powder that Errol sent out of the spice cupboard and each time I have been reminded of his kindness at that time. We had just come out of the first lockdown and everyone was feeling raw, apprehensive and yet keen to connect. As Errol wrote to me when I asked him if I could share this recipe today, ‘I love sharing my food/culture, and I love learning about other people’s. Food is a wonderful way of connecting…’ So, as we look forward, hopefully, to a summer of renewed connections, it makes me happy to be able to share that connection with you.
1 cauliflower (around 1kg)
1 tablespoon coriander seed
1 teaspoon mango powder
1 teaspoon lime powder
1 teaspoon black mustard seed
1 teaspoon turmeric powder
1 teaspoon salt flakes
½ teaspoon cumin seed
¼ teaspoon garam masala
¼ teaspoon Kashmiri chilli powder
¼ teaspoon asafoetida
¼ teaspoon Himalayan black salt
½ large green chilli, coarsely chopped
1 large clove garlic, coarsely chopped
8 curry leaves
Juice of half a lime
2 teaspoons cider vinegar
2 tablespoons rapeseed or other unflavoured oil
Separate the cauliflower into florets and cut these in half or in quarters depending on size. Cut the core and stalk a little more thinly. Include the young tender leaves too. You want bite size pieces that all will cook evenly. Put it all into a glass or ceramic bowl.
Put all of the other ingredients into a mortar and crush slowly and gently to make a coarse sauce. You want the garlic and chilli to be bruised and broken, but for the whole spices to mostly retain their form.
Spoon all but one tablespoon of the marinade over the cauliflower and mix thoroughly. I find it is quickest and most thorough to do this with your hands, but wear gloves if you don’t want the turmeric to turn your hands yellow! Cover and leave to marinade for at least an hour.
Pre-heat an overhead grill to hot. Arrange the cauliflower pieces in a single layer on a baking sheet and put under the grill for 20 to 25 minutes. Turn the pieces every now and then until all are cooked and charred in places.
Spoon the remaining marinade over the cauliflower with a squeeze more lime juice. Garnish with fresh coriander and more finely sliced green chilli and eat piping hot.
Serves 4 as a main side dish or 6 as part of a mixed plate meal.
Recipe: Errol Fernandes | Words & photographs: Huw Morgan
Published 27 February 2021
Once upon a time I had a very sweet tooth. Each Christmas Eve, close to midnight, as my overexcited brother and I lay feigning sleep in our bunk beds, dad would come and lay something heavy at our feet. We knew exactly what it was, and it called on all our reserves of self-control and superstition to prevent ourselves from peeking until it started to get light. When we did – and my younger brother was always the first to crack – we would haul the stockings (actually dad’s nylon football socks) up the bed and start to unpack them. Always alongside this stocking was another made of net. A Cadbury’s Christmas selection pack containing the usual suspects – Mars Bars, Twix, Milky Way, Marathon. We would slowly eat our way through these on Christmas morning and still somehow have room for lunch.
As a child I was always more interested in what was for ‘afters’ than the main event and my favourites usually involved chocolate, whether it was Bird’s Angel Delight, mini rolls, steamed chocolate pudding, Viennetta ice cream or choc ices. At around the age of 9 I started baking my way through the Marguerite Patten recipe cards mum had collected and which sat in a specially made plastic box on top of the fridge freezer. Once I had become proficient with scones, jam tarts and sponges, I quickly moved on to Devil’s Food Cake, chocolate Swiss Roll, Black Forest Gateau and, eventually, eclairs and profiteroles. My pièce de résistance, however, was Marguerite’s Pots au Chocolat, which to me looked impossibly chic in the photo on the front of the card. The dark, velvet mousse in simple, white porcelain pots, decorated with elegant quills of dark chocolate. It made me feel very grown up the first time I served them. Looking back for that recipe now I find that they contained melted marshmallows. Certainly not the purist’s idea of this classic French dessert, but one that, as a child, I was more than happy to accommodate.
As the years passed my palate became more refined. I graduated from Cadbury’s Dairy Milk to Bournville, from milk to dark chocolate Bounty bars and got a taste for Fry’s Chocolate Creams from my dad. (Mint, since you ask.) At university, I discovered Swiss and Belgian chocolate before, in my mid ‘20’s, experiencing a revelation. I had moved into a house on Bonnington Square in Vauxhall and, unbeknownst to me, my new landlady was about to change my view of chocolate forever. She was Chantal Coady who, in 1983, had opened Rococo Chocolates on the King’s Road. There were four of us renting rooms there and every month Chantal would bring home a box of ‘bin ends’, broken bars and trial new products from the shop and invite us for a chocolate tasting.
This may conjure images of a craven orgy of chocolate bingeing, but quite the contrary. The room was candle lit, a fine cloth on the dining table and a small selection of wines and spirits were available to be sipped in recommended partnerships with some of the ‘sweets’. Chantal would break small pieces of chocolate onto plates and pass them round. We were instructed to place the chocolate on our tongues and to allow it to melt slowly – no chewing! – and to describe the flavours we were tasting. Chantal explained how fake vanilla, hydrogenated oils and sugar destroyed the true nature of chocolate and would get us to compare my childhood Dairy Milk to a high cocoa content milk chocolate to understand what she meant. She taught us to appreciate it like fine wine and I have never looked back.
Christmas always calls for chocolate, but as I have aged my taste for sweet things has tempered and I have decreased the amount of refined sugar I eat. I rarely order pudding in restaurants these days unless I am prepared both for the initial sugar rush and the almost immediate headachy comedown. At home, dessert usually takes the form of stewed fruit or a handful of figs or dates, rather than anything sweeter. But it’s Christmas and I want chocolate, so I worked on this dessert recipe without refined sugar.
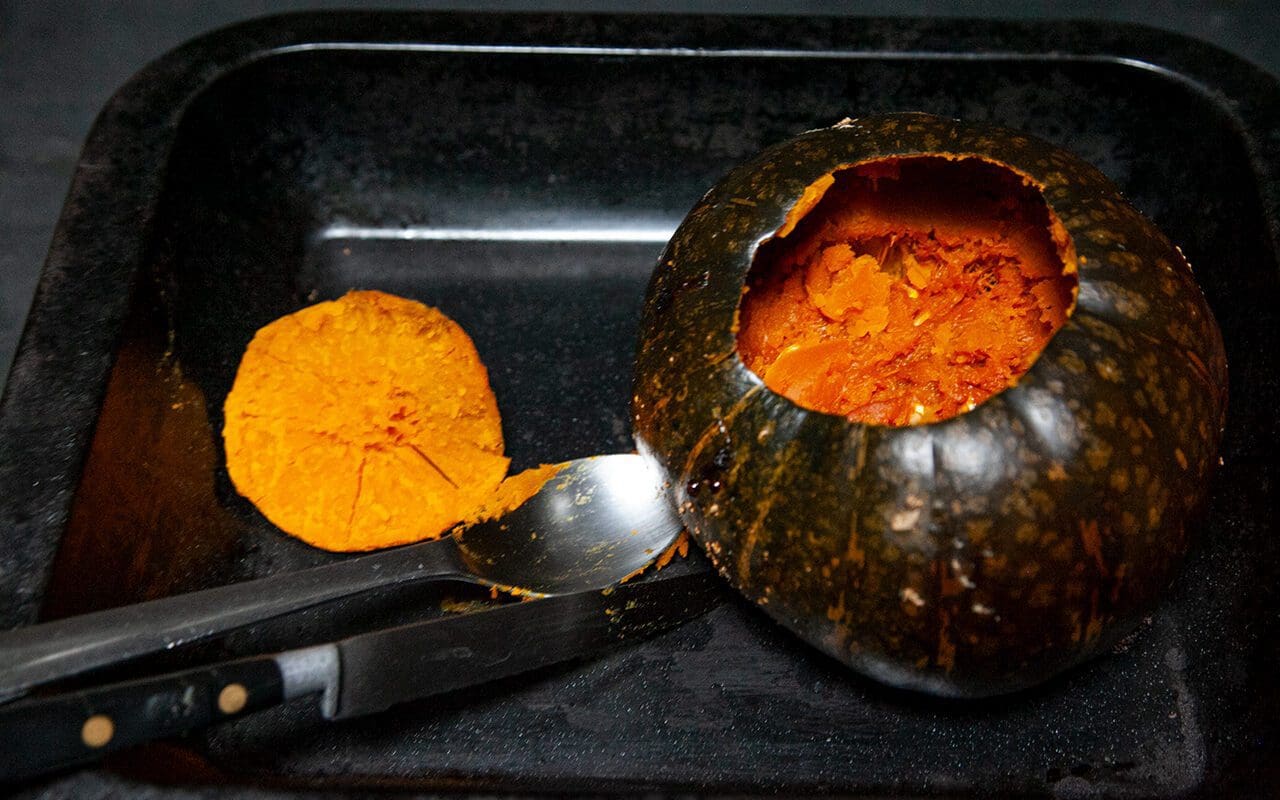
The combination of pumpkin and dates in the filling means that it needs no further sweetening, although if using chocolate with more than 82% cocoa solids you might want to and add honey or another sweetener to taste. If possible, use a drier-fleshed variety of pumpkin, otherwise you may need to drain the flesh before using as you don’t want the filling to be too wet. The Kabocha pumpkin I use has the texture and flavour of chestnuts, which makes it particularly truffle-like.
Chantal was also a pioneer in the use of unexpected flavourings and this tart is also the perfect foil for your favourites. To my knowledge, she was the first to make cardamom flavoured chocolate, to which she introduced me and which is my habitual choice. However, you can infuse the milk and cream with any winter spice or herb you like. Bay is very good (a couple of leaves), or try a sprig or two of rosemary or thyme, a spoonful of ground fennel seeds or even some crushed juniper berries. A teaspoon of finely ground espresso coffee heightens the bitterness. Half a teaspoon of chilli powder warms the mouth and accentuates the flavour of the chocolate, while a few drops of rose or rose geranium oil add a different level of perfumed refinement. The addition of a couple of tablespoons of alcohol – rum, for instance – makes it definitely adults only. Although we have been eating it plain this week, for a truly festive plate this would be particularly good with brandy-soaked prunes or figs or pears poached in white wine. Definitely a chocolate dessert for grown-ups, not children.
Serves 12
Pastry
75g hazelnuts
150g plain flour
1.5 tablespoons honey or maple syrup
75g cold butter
1 large egg, beaten
A pinch of salt
Filling
200g cooked pumpkin
100g dates, chopped
100ml milk
250ml double cream
3 large eggs
200g dark chocolate (minimum 70% cocoa solids)
Seeds from 3 cardamom pods, finely ground or other chosen flavouring
You will need a 23cm round, fluted tart tin with a removable base.
Set the oven to 180C.
Put the hazelnuts into a small baking pan and put into the oven for 10 minutes until lightly toasted and fragrant. Remove and allow to cool, then put into a food processor and process into a medium-fine flour. Do not over process or you will end up with nut butter.
Add the flour to the hazelnuts and pulse mix. Cut the cold butter into 1cm cubes and add to the flour and nuts. Pulse again until the mixture resembles breadcrumbs. With the motor running slowly add the beaten egg and honey until the dough comes together. Stop the machine immediately and quickly remove the dough. It will be very soft. Form into a ball, wrap and put into the fridge for 30 minutes.
When the pastry has chilled, roll it out carefully on a floured surface until large enough to line the tart tin. The pastry is very short, so work quickly and carefully. However, if it falls apart just fit the pieces to the tin and press together gently to join. Trim the excess pastry from the rim allowing a little extra for shrinkage, line with greaseproof paper and fill with baking beans. Bake blind for 20 minutes. Remove the baking beans and greaseproof paper and return to the oven for a further 5 minutes until it looks dry. Remove from the oven and allow to cool.
To make the filling heat the milk and cream in a small pan. Grind the cardamom seeds to a fine powder in a mortar and pestle and add to the milk. As soon as the milk comes to the boil remove from the heat, add the dates put a lid on the pan and leave to stand until cool.
Chop the chocolate coarsely and put into a heatproof bowl. Put into the oven for about 10 minutes until almost melted. Remove from the oven and then beat with a fork to ensure that all of the chocolate is melted.
Put the cooled dates and cream, eggs and pumpkin into the food processor and process until smooth. Add the chocolate and mix until fully combined. Pour the mixture into the prepared pastry case and bake for 30-40 minutes until the mixture just starts to crack at the edges, but still has a little wobble in the centre.
Leave to stand for 20 minutes before removing from the tin and transferring to a serving plate. Decorate with sieved icing sugar as you wish.
Serve warm.
This reheats and freezes well.
This can easily be made suitable for vegans, using coconut oil and sugar in the pastry. For the filling substitute the milk with vegetable milk, the cream with an equal weight of silken tofu (although do not heat this with the milk). Substitute the eggs in both pastry and filling with chia ‘eggs’ (1 tablespoon ground chia seed mixed with 3 tablespoons cold water for each egg).

Recipe & photographs: Huw Morgan
Published 19 December 2020
As if in sympathy with the sicknesses, both physical and political, which have dominated the world since the beginning of the year, the kitchen garden got off to a half-hearted start this spring. The broad beans and peas were ravaged by mice, chard and brassicas were mildewed and slug-devoured and far too many of my first sowings germinated badly. The most concerning of these was the celeriac, which is a staple for us in the winter. We habitually plant 20 plants and eat them all.
Celeriac seed is small and notoriously erratic as it needs light and early warmth to germinate. It also has a long growing season and so needs to be started off in early spring indoors, under glass or in a heated propagator. We waited more than three weeks for ours to appear on a bright windowsill, before finally admitting that they probably weren’t going to. And so, in the knowledge that we simply couldn’t survive a winter without, I resorted to ordering some young plants from an online supplier. We hardly ever do this, but I am always grateful that they exist as you are effectively able to buy time and plug any gaps in the garden that might have appeared through misfortune or mismanagement.
However, what you do not have from mail order suppliers is control over the varieties, and I was obliged to buy ‘Giant Prague’, when our proven variety of choice for many years now has been ‘Prinz’. We have never had a problem with ‘Prinz’, which has been easy to grow and a reliably heavy cropper, with roots of a kilo or more being standard. So I have been keeping an eye on the newcomers this summer to see how they compared. I quickly noticed their different growth habit, as they are much taller, more upright and leafier and so have shaded the plants behind more than the lower growing ‘Prinz’. In late summer I also became aware that the roots were not bulking up as noticeably, despite the heavy watering that they like and regular feeding.
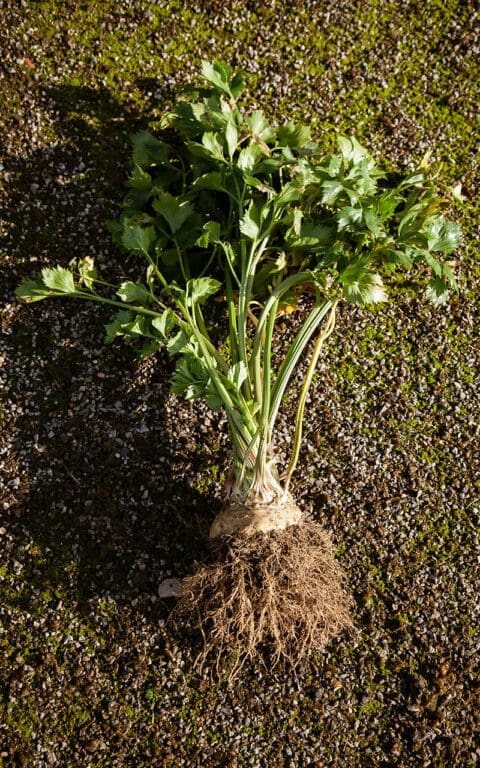
When I went to dig the first of the celeriac for this recipe this morning I was not impressed to find that several of the plants are bolting, and so have useless withered roots, and that the plants in the back row, in the deepest shade, have also failed to swell. Immediately the number of meals we have counted on them to provide is probably halved. Somewhat disheartening after all the effort and the ground given up for a disappointing crop of something we have taken for granted. At least it was good to know that I would be making the roots go further with the addition of chestnuts and windfall apples.
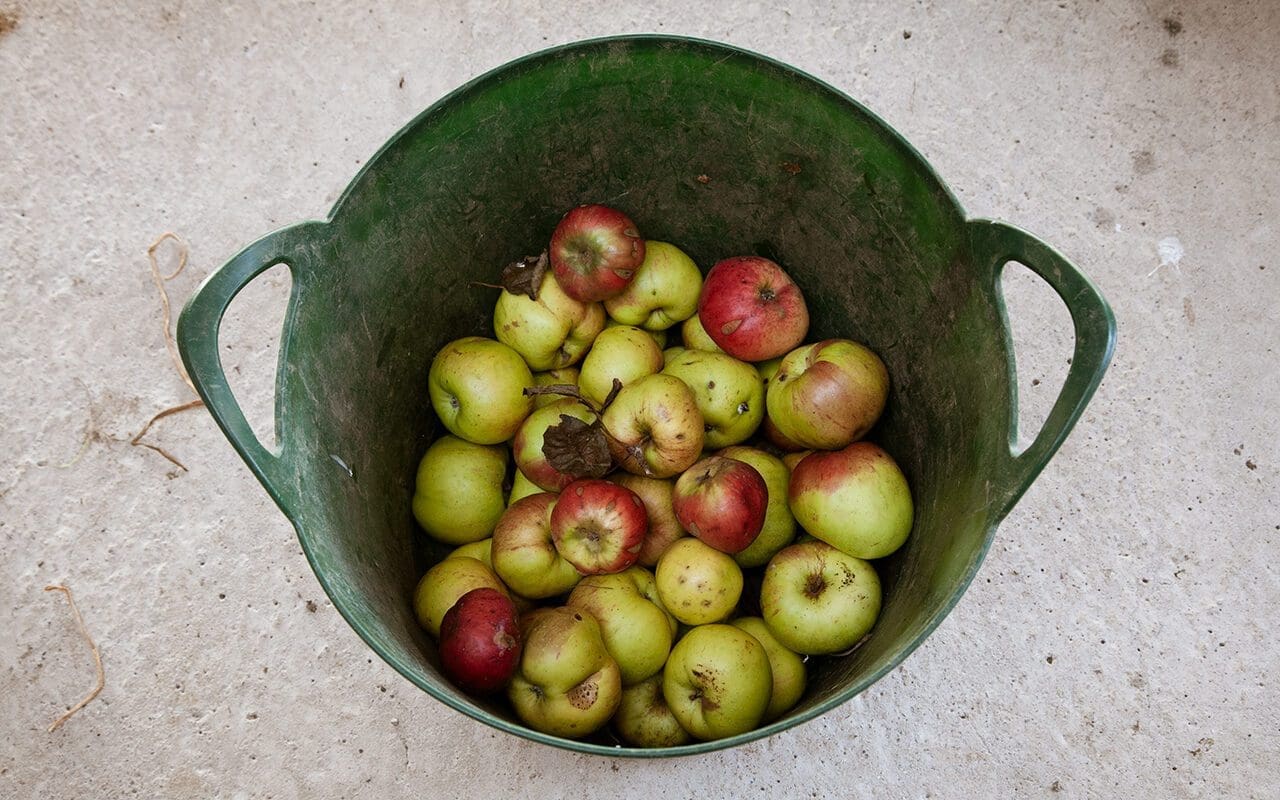
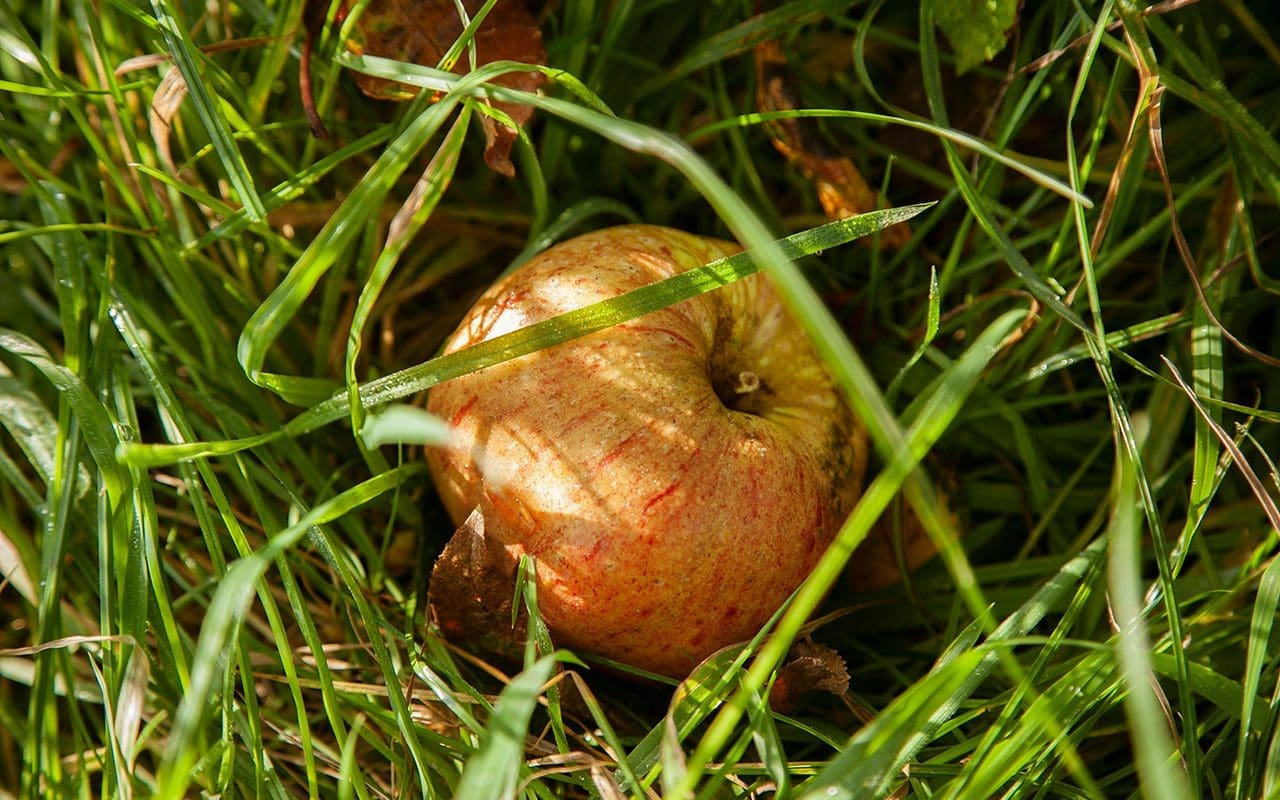
In the orchard the apple ‘Peter Lock’ has held onto its fruits the longest of all. This West Country variety has a long season of ripening, and so there are still apples on the branches that won’t fall no matter how vigorously you shake. The ripe windfalls are cushioned by the long grass of the pasture in which they grow and so, if you can get them before the mice, jackdaws and wasps do, they are seldom badly bruised or damaged. ‘Peter Lock’ is a dual-purpose eating and cooking apple with creamy white flesh. It is tart, yet sweet, and makes the most delicious golden apple puree which we always have a container of in the fridge, both for breakfast or evening dessert with yogurt or cream respectively. The large fruits also store well into the new year.

Our late spring frost on May 12th means we are without chestnuts this year, but the tree that Dan planted in memory of his dad has thrown out some good growth without the energy going into fruit so we hope, frost permitting, for a crop next year. Celeriac has an affinity with many nuts, particularly walnuts, hazelnuts and pecans. Here seasonal chestnuts enrich and thicken the soup. Wild mushrooms would be an appropriate addition. Rustic shards of bread fried in olive oil would provide textural contrast. The addition of cooked pearl barley would make it more substantial and go further. It would take well to the addition or substitution of other warming herbs and spices including rosemary, thyme, sage, winter savory, nutmeg and mace.
750g celeriac, after peeling, coarsely cubed
1 medium onion, peeled and coarsely chopped, about 200g
350g cooking or eating apple, peeled and cored and coarsely chopped
300g cooked chestnuts
2 bay leaves
8 juniper berries, crushed
2 cloves garlic, finely chopped
A 2cm length of fresh ginger, peeled and finely grated
50g butter
1 litre hot vegetable or chicken stock
Heat the butter in a large, heavy-bottomed saucepan until foaming. Add the onion and stir to coat thoroughly. Put on the lid and leave on a low heat to sweat. Stir from time to time and cook until translucent and golden.
Add the celeriac, garlic, juniper, ginger and bay leaves to the pan, stir everything together, and return to a low heat with the lid on. Stir from time to time and cook for around 15 minutes, when all should smell fragrant and the celeriac is starting to become translucent at the edges.
Add the hot stock and chestnuts, stir and return the lidded pan to the heat. Cook very gently for about 40 minutes until the celeriac is soft.
Add the apple and cook for another 10 to 15 minutes until it starts to break down.
Remove from the heat and use a potato masher to roughly smash the mixture into a course soup. Season generously with salt and black pepper.
Recipe & photographs: Huw Morgan
Published 7 November 2020
We are sorry but the page you are looking for does not exist. You could return to the homepage