The beds in the vegetable garden are bare. Although the garlic and onions are making their presence felt, after the long, cold spring our winter sown broad beans have only just started flowering and the first spring crops of beetroots, carrots and peas have a long way to go before we get to taste them. We still have a good supply of winter lettuce, sown last September and planted out on our return from holiday in October, and a somewhat meagre asparagus harvest has provided for a couple of meals so far, but otherwise – and as usual in the hungry gap – home grown produce is pretty thin on the ground.
Until, that is, you enter the polytunnel, where a green tidal wave of kale threatens to engulf all around it. These too were sown in September in plugs and planted out in early October once the tomatoes and peppers were cleared. The variety – ‘Hungry Gap’ – is extremely well named, as they bided their time over the winter, slowly gathering energy to provide for us right now, when most needed. Due to the failure of some other brassicas intended for the polytunnel I ended up planting out twelve plants of this kale, and they have been producing an almost endless supply of leaves since early March.
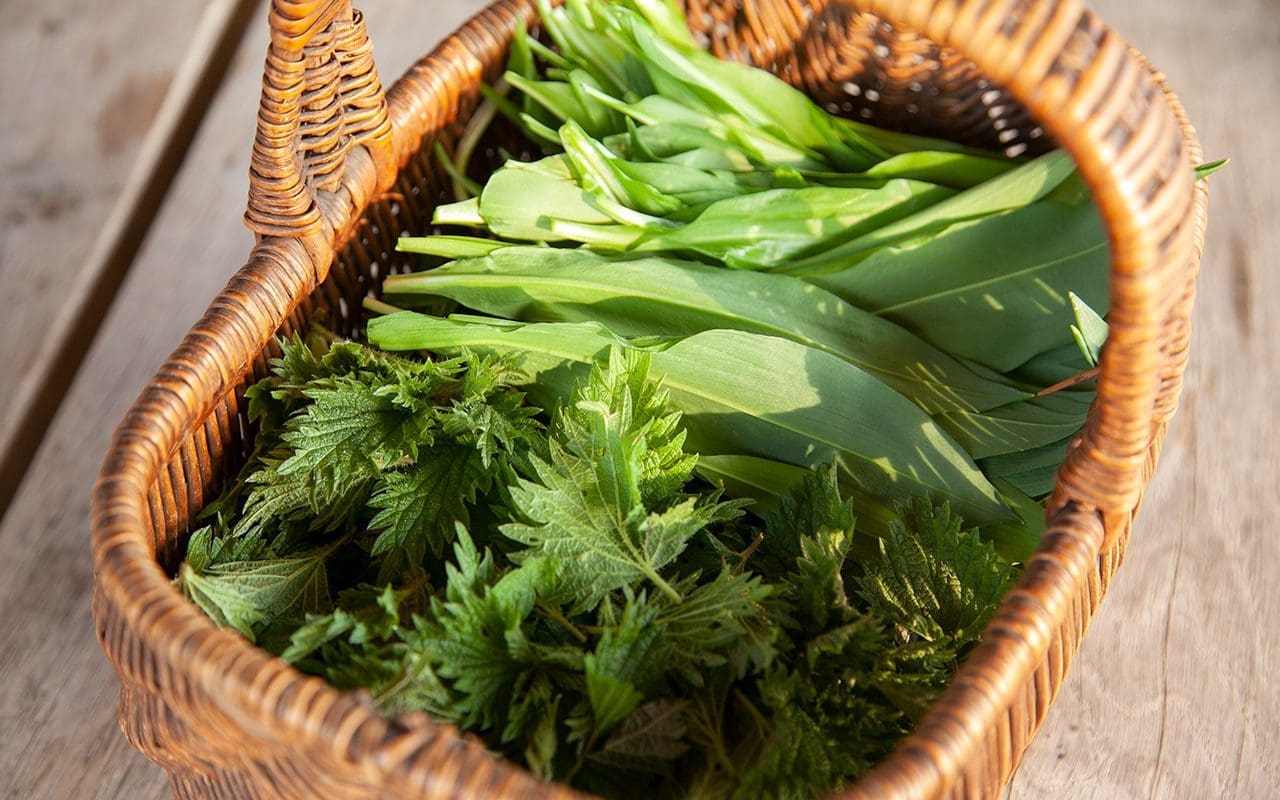
Down by the stream at the bottom of the hill the wild garlic has appeared. It has been visible for a couple of weeks, but more ground than leaf, so that it took some time and judgement to find enough to pick for a meal. This week, after the equinox and in common with the first trees that are breaking bud and the sheets of daffodils and primroses which have suddenly eclipsed the snowdrops, the leafmouldy woodland floor has disappeared under a green, allium blanket.
This first spring flush is magical. A resurrection and clarion call for the coming wave of growth. A signifier of ancient woodland the wild garlic also connects us to the past inhabitants of this site. Imagining the people who have lived here before us, seeking sustenance from the woods and hedgerows, you feel reconnected to their longstanding and hard-earned accrued knowledge. What is good, what can heal and even what can kill.
These are store cupboard and pantry days in the kitchen. Meals assembled from the toughest veg standing out in the garden, combined with those brought in to dry storage last autumn together with our own preserves and frozen supplies put away during the last growing season. With soft herbs, oriental greens and winter lettuce in the polytunnel, a variety of lentils, beans and grains in the pantry, a well-stocked spice cupboard and those ingredients that add depth and savour – think anchovies, capers, parmesan, olives, tahini, miso – there is little need to venture to the shops. And so, over the past couple of chilly weeks, we have hunkered down and eaten simply and mostly our own.
In the vegetable garden a continuation of last year’s blighted season saw all our early purple sprouting broccoli, many of the kales and even the red cabbages succumbing to the brutal freeze in early December. On one night it got down to minus 10ºC and many of the potatoes stored in paper sacks in the uninsulated barn were also frosted beyond use. ‘blue Danube’ was. the exception, retaining it’s firm, pure white flesh, so I’ve just placed an order for tubers to grow again this year. Adding insult to injury, after I had carefully nursed them through the heatwaves last summer, all but five of the sixteen celeriac were reduced to balls of slime. And the chard, usually our most dependable, productive and frostproof winter crop, have been eaten repeatedly by deer. So, although we are eating mostly our own, this year it has been a more limited diet than usual of beetroot, cabbage, pumpkin and potatoes.
Leave the house during daylight hours at the moment and everywhere there is a hectic flurry of birds. The air filled with the flapping of wings and the chattering of warning calls. The robins and wrens that are slowly pecking their way through the stacked trays of apples we keep under cover in the outside kitchen. The hordes of blackbirds and mistle thrushes combing the turf beneath the crab apples. The jackdaws, crows, pigeons and jays feasting on the remaining cooking apples rotting where they fell in the orchard. While, at the entrance to the garden, dunnocks, tits, wrens and finches compete with mice and voles for the last of the medlars that are still falling to ground. The medlars don’t start start dropping until the leaves have all fallen, which this year was in mid-November. Then the race is on to harvest what we need before the critters get them, although we always leave enough that they can eat their fill.
Similar to quince, both in the timing of their harvest and in the fact that they are also too hard and astringent to be eaten raw, while quince can be cooked straight off the tree, medlars must be bletted to become edible. Bletting is the process of allowing the fruit to start the process of decomposition, so that the hard white flesh becomes a soft, cinnamon brown paste. This happens naturally when there is a frost or prolonged cold weather, and we are lucky to have the space to leave ours outside under cover in perforated plastic trays. However, this process can be replicated and hastened by putting the medlars in bags in the freezer.
We’ve been clearing the beds in the vegetable garden over the past few weekends, with the aim of getting as many of them manured this side of Christmas as possible. The withered climbing beans have been slipped from their hazel supports, the last dried beans in their parchment pods saved for sowing next year. The spiny skeletons of courgettes pulled from the ground with gloved hands, their almost non-existent root systems making me wonder how on earth they get so huge and produce such an endless succession of water-swollen fruits. And the ghostly grove of rustling sweetcorn, which was left standing for as long as possible, because its coarse whisper brought such a strong Halloween atmosphere to the fading kitchen garden, was finally felled. All were thrown onto the compost heap to complete their life cycles. No longer providing food for us, but now offering shelter and sustenance to a slew of other creatures, both visible and invisible. In the coming year the resulting compost will be spread on the beds to improve and feed the soil producing next season’s harvest and so it will feed us once more in another chain of the cycle.
Along with the spent crops there have also been roots to lift and store. Primarily beetroots and carrots, although most years we also have turnips. We lift these now and store them in the barn in paper sacks alongside the potatoes. If left in the ground we have found that the beets are damaged by slugs which then invites rot, while the carrots are prey to wireworm, which renders them inedible.
Another summer of tomato growing brings another summer of learning. Now three years in to growing tomatoes under cover I have learnt from my previous mistakes. Having started to feed the plants very late in the first year, I now have a firm grip on watering and feeding regimes. After overcrowding the polytunnel with too many plants last year and risking blight, I reduced the number of plants and increased the spacing, which has resulted in much better air flow and more light reaching the fruits. Perhaps feeling a little smug I was preparing myself for our biggest harvest yet. However, this year’s impediment to a bumper crop has been largely out of my control.
When the first heatwave came in July we covered the polytunnel with two spare lengths of bird netting from the fruit cages to create enough light shade to keep the temperature down somewhat. Yet, on the hottest day, when it reached 37 degrees here, the temperature inside the polytunnel was 46, despite having both doors open and regularly hosing down the floor (which rapidly reduced the temperature by 4 or 5 degrees). About a week later it became apparent that the last fruits on the first trusses and nearly all of the second trusses had aborted due to stress. So I kept up the watering and feeding and trusted that there was still all of August for them to produce plenty more fruit.
Although it’s just two weeks since my last recipe, Dan has been away for most of this week and so it falls to me to provide for you all again. And, as the harvest season begins in earnest, the kitchen garden has been much on my mind.
Just before Dan left we dug out the last of the broad beans and peas, laden with full pods we have not had time to pick in the last few weeks. It was a hot evening and we threw the plants into barrows and wheeled them to the shade of the covered area next to the house, where we sat down with cold drinks and removed the pods.
At the end of my childhood garden, beyond the old Nissan hut, was a wasteland which still appears in my dreams. Once it had been the site of allotments, which I imagine saw good service during the war years, but which had been deserted long before my parents moved there. When I was young it was a seemingly endless tangle of brambles and nettles, colonised by seedling ash and sycamore. Compared to our suburban garden, where dad mowed stripes into the lawn on Saturdays and the shrubs were regimented in beds to either side and pruned regularly to keep them in check, the ‘Plot’, as we called it, was a feral place rich with shadows and the possibility of adventure. It was also the home of the ogres, witches, wolves and murderers that haunt childhood imaginations. It was a place where I could conjure Middle-earth or Narnia on my own back door step.
There were two long derelict glasshouses, which we had been forbidden to enter, but of course did, our hearts racing a little at the danger of such disobedience. Broken glass crunched underfoot and sometimes a pane would crash to the ground and splinter sending us running for the doorway, our arms clasped over our heads. An old whitewashed beehive still stood in a clearing and buzzed to bursting in summer with the wild colony that had taken it over. Once they swarmed into our garden and dad called a man to come and take them away in a box. The beehive stood near an impenetrable thicket of bushes, which made a great hiding place during games of Hide and Seek, unless you happened to push yourself into the thorns of the gooseberries and raspberries, since these were the mature and unkempt remains of somebody’s wartime fruit garden where, alongside the berries, were red and blackcurrants.
The hungry gap has been shorter than usual this year, but we are still in the slim pickings phase of the new round of harvesting. The spring cabbages are over. The remainder of last season’s kales have all gone to flower, as have the beetroot, their gargantuan roots now tough and woody. We have eaten our fill and fill of chard. And so we have been watching very closely to see when the first of the real spring vegetables will appear.
From the Instagram feeds of restaurants and foodies you would think that late spring began in late February, since that was when the posts of asparagus, broad beans, peas, artichokes and even courgettes started appearing. At that time of year I just know that most of those vegetables will have come from the polytunnels of Spain, perhaps southern Italy or even further afield, and I always feel rather duped by the promise of early summer they make when in reality it is only now that those vegetables are starting to make an appearance in British gardens and farmer’s markets.
Today’s is a very short piece, as events at home and work have allowed me very little time. I have been wanting to share this recipe for several weeks though and not doing so just wasn’t an option.
The recipe isn’t mine. It is by the London-based Ukrainian cook and food writer, Olia Hercules. Her family are in Ukraine and it has primarily been through following her impassioned and emotive Instagram feed that I owe my awareness and understanding of the events of the past month.
My admiration for her is unbounded. She has campaigned relentlessly. Spoken and written in the press. Raised funds personally and through her activism and doubtless been responsible for educating a huge number of people about the realities of the Russian invasion of Ukraine. All this while being profoundly concerned about the wellbeing of her extended family, friends and fellow Ukrainians.
One of the ways in which she has been raising funds is through the Cook For Ukraine initiative, which she started with Russian food writer, Alissa Timoshkina. Funds raised through supper clubs, bake sales and pop ups are going to Unicef to help families and children affected by the conflict. To date they have raised nearly £325,000.
By cooking and sharing Ukrainian and Eastern European recipes the campaign aims to increase awareness of the humanitarian crisis and bring people together over a shared love of food and Ukrainian culture.
This recipe is incredibly timely. Nettles, wild sorrel and wild garlic are all now growing in profusion in the fields and woods around us. Foraging the amount required for this recipe is the work of a half hour or so and a great activity to do with friends or family. The root vegetables and alliums are all still in store after the winter, while the fresh green herbs are growing plentifully in our polytunnel.
In however small a way, foraging in the fields for the wild herbs in the quiet of the morning to the sound of birdsong and cooking the recipe to the letter of Olia’s instructions definitely brought me closer to an appreciation of the Ukrainian way life of that is currently being threatened so critically. It is through understanding this common humanity that we appreciate our own freedoms and understand how important it is to speak out when others are at risk of losing theirs.
Nettle tops and wild garlic
INGREDIENTS
2 tbsp rapeseed or olive oil 1 onion, peeled and cut into 1cm dice 2 carrots, scrubbed and cut into 1cm dice 1 small celeriac, peeled and cut into 1cm dice 3 celery sticks, cut into 1cm dice 1 leek, white part only, trimmed and cut into 1cm dice 3 big garlic cloves, peeled 1 bay leaf Salt and black pepper 6 baby potatoes 100g sorrel, sliced 75g young nettle tops (the top few leaves on each stem) 50g wild garlic leaves, sliced (flowers kept for garnish) 3 spring onions, thinly sliced A handful of chopped dill A handful of chopped parsley Creme fraiche, to serve (optional)
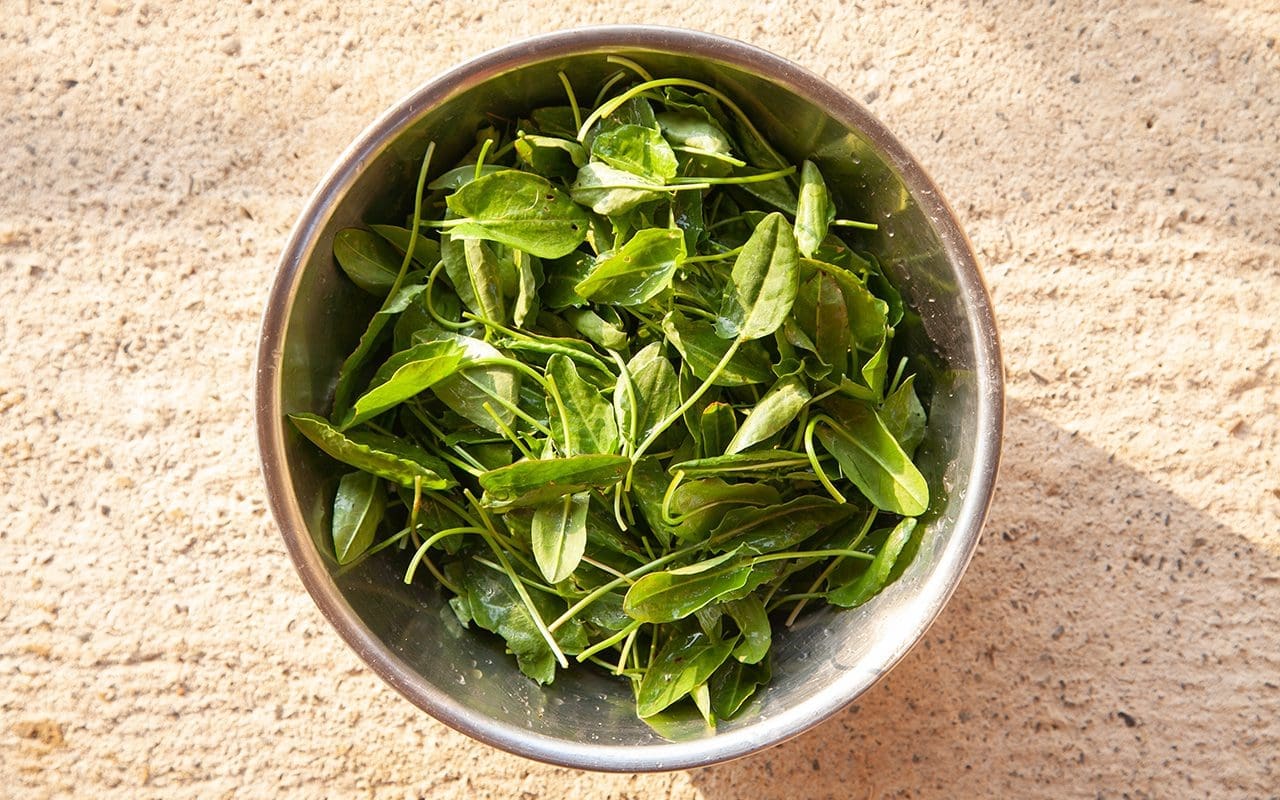
Wild sorrel
METHOD
Pour the oil into a cast-iron casserole set over a medium-high heat. Once the oil is sizzling, add the onion, carrots, celeriac, celery and leek, and saute, stirring from time to time, for about five minutes: you want them to become caramelised in parts, but not scorched. (If the pan feels too crowded, fry the vegetables in batches.) Add the garlic and cook, still stirring, for about two minutes, until fragrant and starting to colour.
Add two and a half litres of cold water and the bay leaf, season lightly with salt and bring to a boil. Turn down to a simmer and cook, partially covered, for about 40 minutes.
Add the potatoes whole and cook for 10 minutes, or until they are soft, then add the sorrel, nettles and wild garlic and take off the heat. Taste the soup and add more salt if needed.
Put a potato in each soup bowl and lightly crush it with a spoon. Ladle over the broth,then sprinkle with the wild garlic flowers (if using), spring onions and herbs. Serve with a dollop of creme fraiche, if you like, and a good grinding of pepper.
Words: Huw Morgan | Recipe: Olia Hercules from Summer Kitchens | Photographs: Huw Morgan
Published 26 March 2022
We are sorry but the page you are looking
for does not exist.
You could return to the homepage