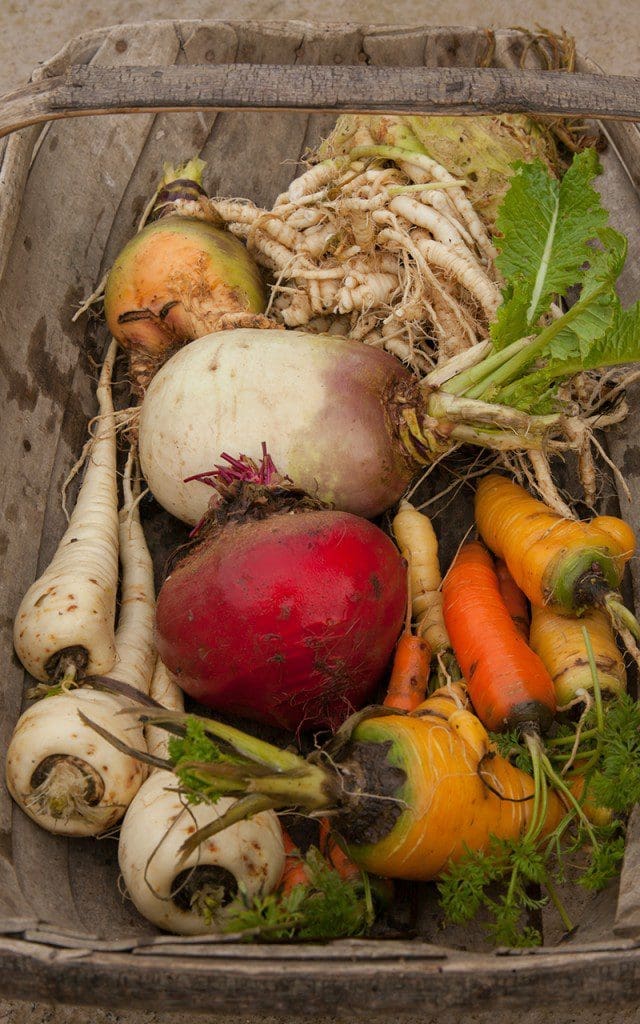
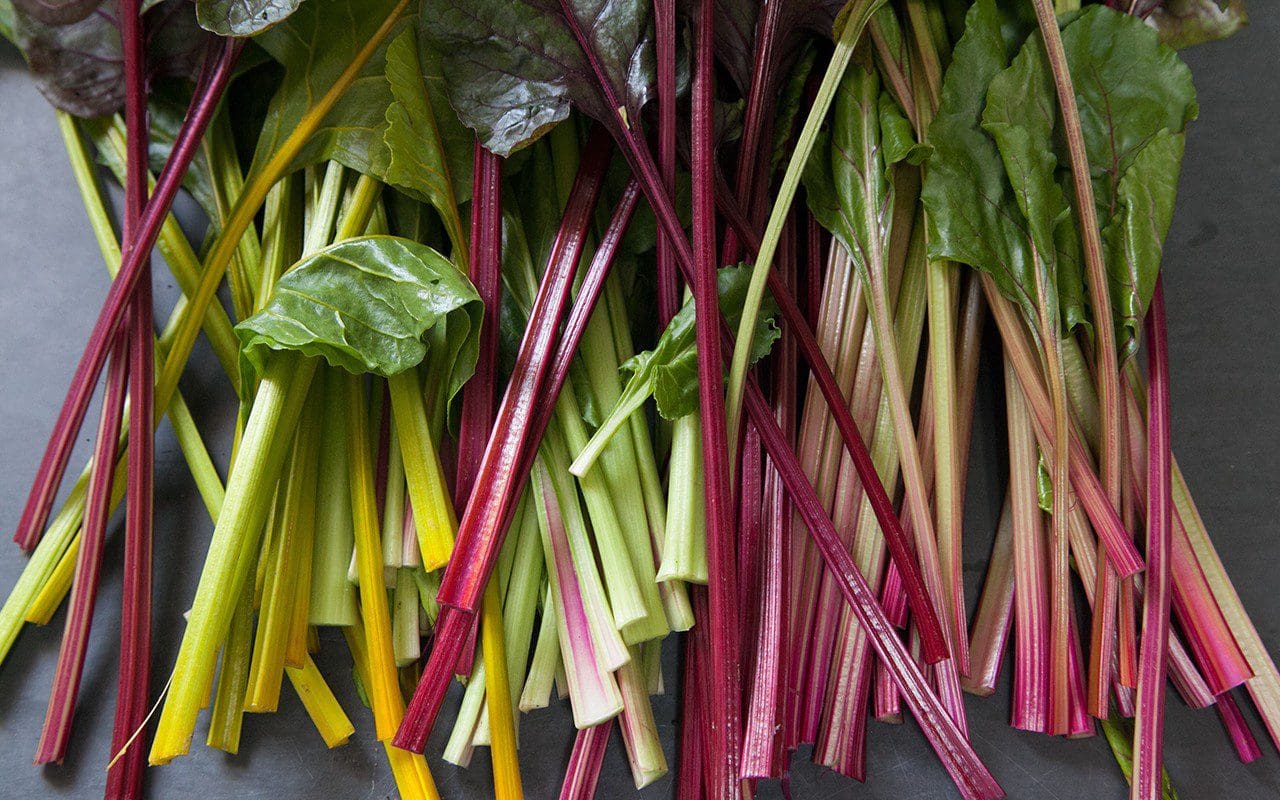
At the height of summer, when all you want to be eating are salad, peas, broad beans and cucumbers, it is easy to resent the space taken up by the winter vegetables. But the time spent sowing, weeding, hoeing and watering them through the hot months is amply repaid come this time of year. We have been eating beetroot, parsnips, turnips, swedes, celeriac and carrots for several months now and, together with our stored potatoes and onions and a wide assortment of brassicas, we have been almost self-sufficient for vegetables. The greengrocer only sees me if I need lemons, oranges or some of the more exotic fruits available at this time of year like pomegranates, persimmons or Seville oranges.
The brassicas and roots are our winter bounty but, although we have enjoyed the hearty roast vegetables and mash, there comes a point when we pine for a crunch and for fresh, clean flavours. Without a polytunnel or greenhouse winter salad hasn’t been possible here yet, and I refuse to buy tasteless bags of salad so we rely upon the radicchio and chicory that were sown last spring, eaten in the summer and then left in the ground. We always miss the chance to sow them for a winter harvest, but these rogues from the summer are hearting up now, and add to this salad of raw winter roots.
The freckled leaves of ‘Castelfranco’ make a pretty addition to the plate, but any of the more common dark red forms would provide a dramatic contrast. The wider a variety of shape and colour you can get in your selection of vegetables the more attractive the salad will look. Here I have used the striped beetroot ‘Chioggia’ and orange ‘Burpee’s Golden’. The varied colours of heritage carrots also add to an appealing mix.
The balance of sweet, savoury, earthy, bitter and peppery flavours provided by the vegetables selected here makes for a varied eating experience, but the salad could be made with any combination of three of the roots if you do not have access to them all. Thinly sliced fennel would also be a good addition and, although the frost has ravaged our winter crop of bulbs, the remaining foliage is still delicious for its aniseed flavour and addition of green. Radish, mooli or kohlrabi could also be substituted.
Seville oranges are just coming to the end of their season. When unavailable replace with a 50/50 mix of lemon and orange.
This salad is particularly good with roast chicken, roast pork, sliced ham or a cold chicken and ham pie.
Ingredients
SALAD
Juice of 1 lemon
2 medium carrots – different colours if possible
1 small parsnip
2 small beetroot – different colours if possible
½ small turnip
½ small swede
1 Cox’s apple
¼ medium celeriac
1 small head radicchio
2 tbsp finely chopped parsley
2 tbsp fresh fennel or dill herb fronds
DRESSING
50ml soured cream
1 egg yolk
2 tsp honey
1 tsp finely grated horseradish or English mustard
25ml rapeseed or other light oil
Juice of 1 Seville orange
Very finely grated zest ½ Seville orange
Salt
Some reserved fennel fronds
3 tbsp tablespoons pomegranate seeds
3 tbsp broken walnuts
Serves 6
Method
First prepare two bowls of iced water. Add the lemon juice to one of them.
Trim and peel the carrots and parsnip, then shave thin ribbons off the length of each with a vegetable peeler. Put them all into the bowl of plain iced water. If you are using dark red or purple carrots put them in a separate bowl of iced water.
Trim and peel the beetroot. Using a mandolin or very sharp knife slice as thinly as possible into rounds. Striped or pale coloured beetroot (orange, yellow or white) can be added to the water bowl containing the carrots and parsnip. Purple beetroot will need a separate bowl of iced water or can be added to that containing the purple or red carrots.
Peel the turnip and swede and grate coarsely.
Slice the apple as thinly as possible and put into the bowl of acidulated water.
Peel the celeriac. Cut into slices about a centimetre thick. Using a mandolin or very sharp knife slice as thinly as possible. Add to the bowl of acidulated water.
Remove the leaves from the radicchio and tear the soft part of the leaves away from the coarse ribs, which aren’t used. Tear the leaves into pieces roughly 4cm square.
To make the dressing put the egg yolk in a bowl, whisk with a fork, then add all of the other ingredients and whisk again until well combined. Taste for seasoning. You may need to add more honey, salt or horseradish to taste. The dressing needs to be fairly strongly seasoned as the flavour is diluted once mixed with the salad. Finally stir in the finely chopped parsley.
Heat a small heavy frying pan. Add the walnuts and allow to scorch on one side. Remove from the pan and allow to cool.
Drain the vegetables and apple and pat dry on a clean tea towel. Put in a large bowl. Keep the dark roots to one side. Add the radicchio and fennel fronds to the bowl. Using your hands toss the salad very gently to distribute the different vegetables evenly. Pour over two thirds of the dressing and use your hands again to gently mix the salad ensuring everything is well coated. Add more dressing if required, however the vegetables should just be lightly coated, not swimming. Now add the dark beetroot and carrots and toss the salad again very quickly to avoid turning the whole salad pink.
Transfer the salad to a serving plate or divide between individual plates. Spoon on a little more dressing then scatter over the pomegranate seeds, scorched walnuts and reserved fennel fronds.
Recipe & Photographs: Huw Morgan
As Dan wrote recently, at this time of year we often find that some of our pumpkins have started to deteriorate in storage. These are usually the varieties that contain more water. Unless damaged or frosted, those higher in dry matter generally have a longer storage life.
Last year, and due to a lack of storage space while our building works were taking place, we were faced with a depressingly large number which were fast heading in only one direction. The compost heap. Determined not to lose such a good harvest I resolved to find a way of preserving them. However, there is only so much soup and puree that the freezer can take. Or that you want to eat.
I had had success the previous year developing a recipe for brown sauce, which had been initiated by a similar desire to make the most of the windfall apples from the old orchard in our top fields. Traditional brown sauce recipes are based on tomato, but I thought that both the sweetness and texture of apples could stand in for them, particularly when brown sauce is primarily a vehicle for full-flavoured spices. And so came the idea of a making a spiced ketchup where the sweetness and texture of tomato are replaced with those of pumpkin.
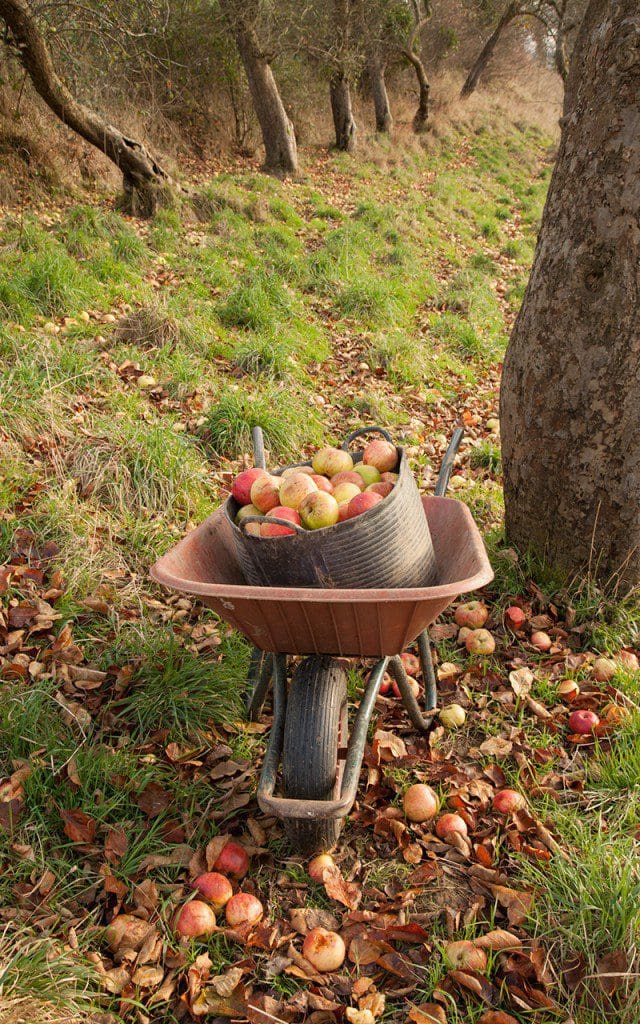 Windfall apples in the old orchard
Historically ketchups were developed from fermented fish-based sauces from the Far East which were brought to the west by the British. In 18th century England they started as dark, savoury table sauces made with mushrooms, anchovies and even walnuts. The development of tomato ketchup took place in America in the early 19th century and this is when recipes for the sauce that we recognise as ketchup today first appeared. Traditional flavourings for tomato ketchup included allspice, mace, ginger, nutmeg and coriander seed. Since all of these, and more, feature in the Moroccan spice mix Ras el Hanout, I decided to use this as the basis of the spicing for this ketchup.
I enjoy the process of making my own spice mixes with a mortar and pestle. The gradual change of texture as the whole seeds and ground spices combine into a fragrant powder is a gratifying experience. You can also balance the proportions of the spices to suit your own tastes rather than relying on a pre-made spice mix which may be a little stale, too heavy on the cloves or cinnamon or lacking the pricier components like mace.
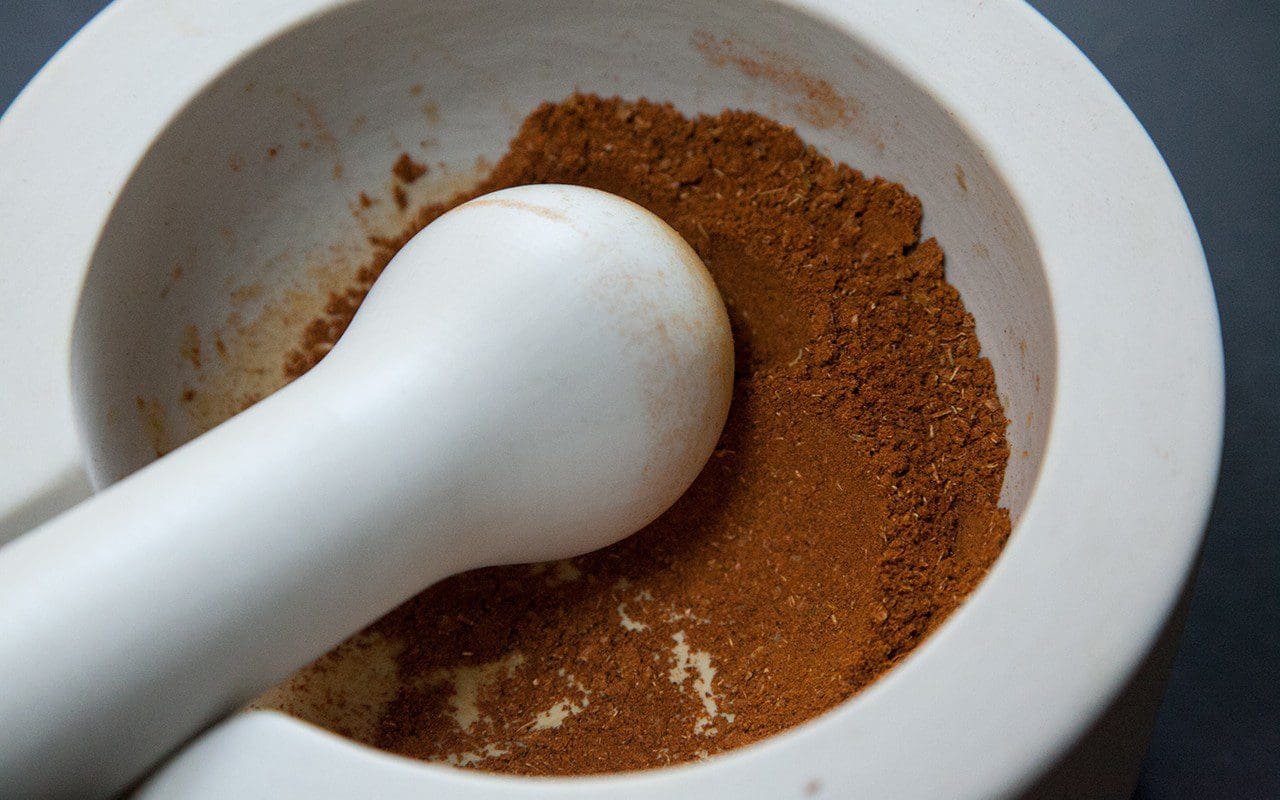 Ras el Hanout
To counteract the sweetness this ketchup needs a good kick of heat. Last year, in keeping with the Moroccan flavourings, I used a combination of harissa and smoked paprika, adding the harissa separately from the spice mix. Earlier this year I was given a large bag of fresh chipotle chilli powder by a friend who had been to Mexico and, since both pumpkin and chilli are native to this part of North America, they seemed a natural pairing. If using ready made Ras el Hanout check that it contains chilli, as some varieties don’t. If so you will need to add the chilli separately.
As with all preserves containing vinegar this ketchup needs to mature before use. However, since the amount used is relatively low in proportion to the other ingredients, it can be used within 2-3 weeks, so there is still time to make a batch for Christmas presents. The flavour improves and develops the longer it is kept.
Use as you would tomato ketchup or brown sauce with fry ups, burgers and sausages, as a marinade for chicken, lamb and pork, or as a seasoning for soups and stews.
Ingredients
1.5kg pumpkin
500g cooking or eating apples
500g onion
1 head of garlic or 7 large cloves
Zest of 1 lemon
3 teaspoons salt
250ml apple cider vinegar
250 g soft brown sugar
Water
RAS EL HANOUT
1/2 teaspoon fennel seed
1/2 teaspoon cumin seed
1/2 teaspoon ground ginger
1/2 teaspoon coriander seed
1/2 teaspoon ground allspice
1/2 teaspoon ground turmeric
1/2 teaspoon ground cinnamon
1/2 teaspoon freshly grated nutmeg
1/2 teaspoon ground mace – 3 blades
1/4 teaspoon ground cloves – about 10 cloves
1/4 teaspoon cardamon seed – contents of about 5 pods
2 teaspoons chilli flakes, smoked paprika, chipotle chilli or harissa
OR
6 teaspoons of ready made Ras el Hanout
Method
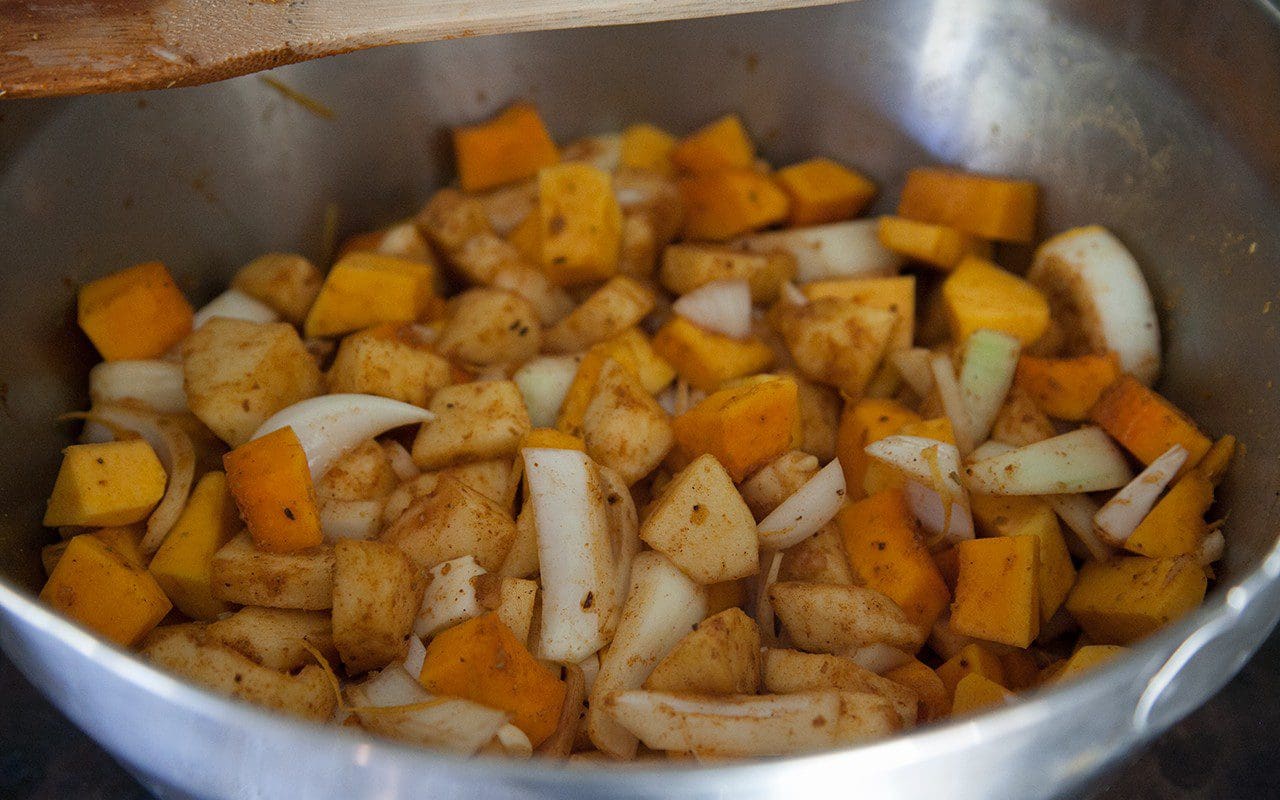
Cut the pumpkins in half. Scoop out the seeds and peel, removing any parts that are soft. Chop into pieces and put into a large preserving pan with the peeled, cored and chopped apples, coarsely chopped onion and peeled, trimmed garlic cloves.
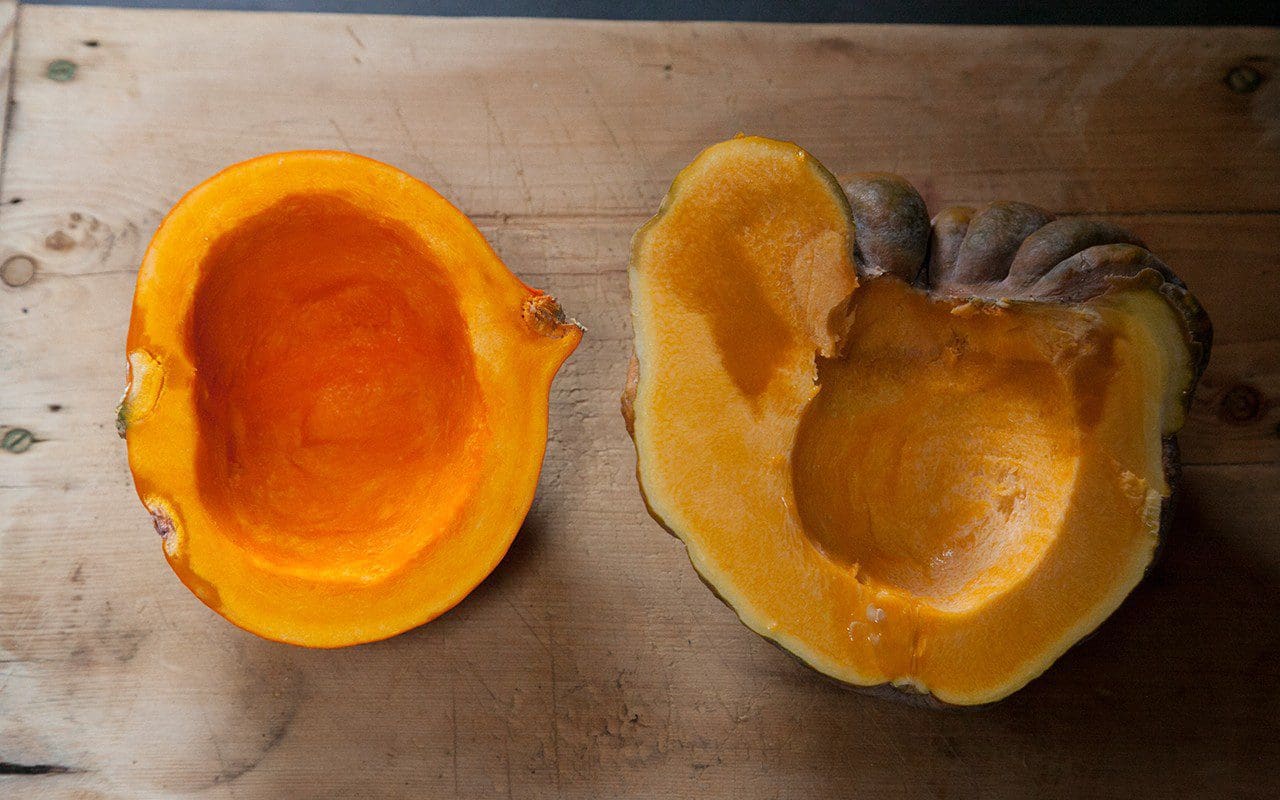 Any parts of the pumpkin that are soft or starting to rot are removed
Lightly toast the fennel, cumin, coriander and cardamom seeds in a small frying pan. Put with the remaining spices into a mortar and pestle or spice mill and grind to a fine powder. Add to the pan with all of the remaining ingredients, apart from the vinegar and sugar. Pour in just enough water to initially prevent the vegetables from catching. They will produce plenty of liquid as they start to cook.
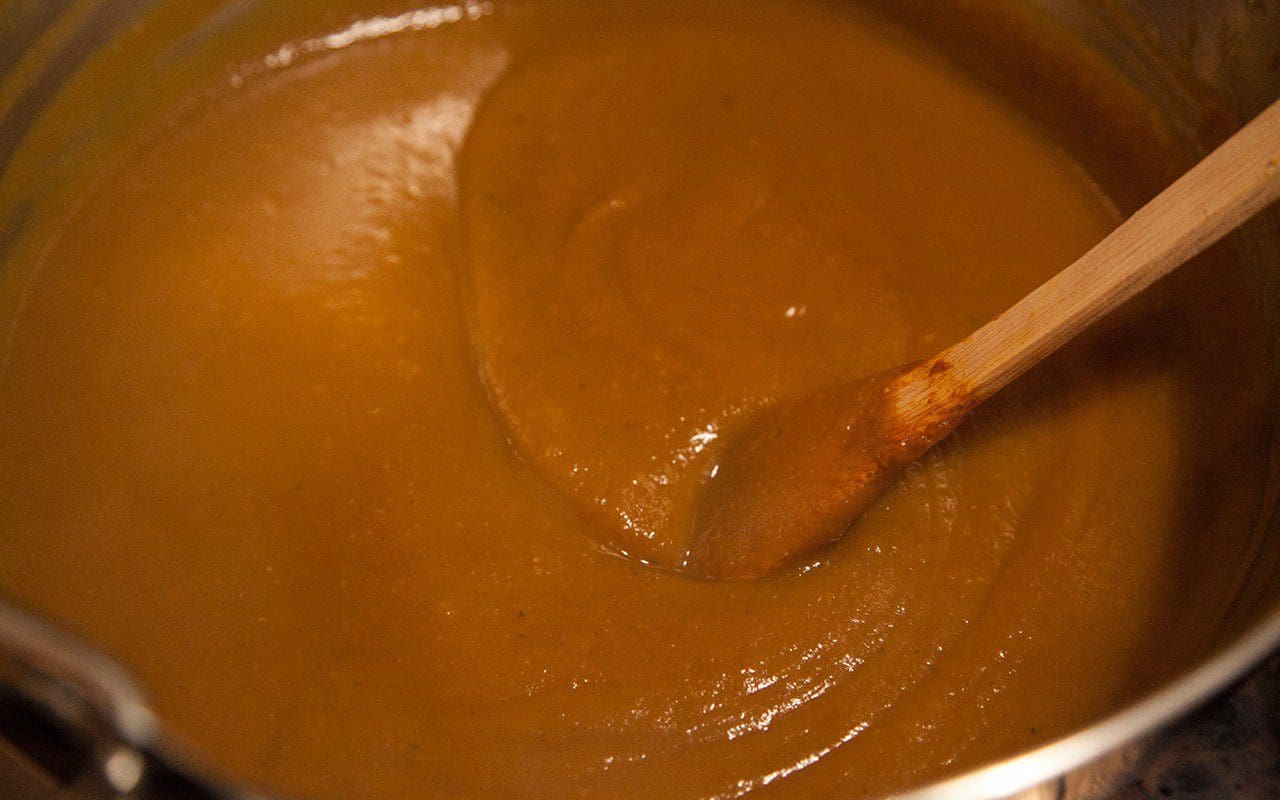
Put the pan over a moderate heat. Cover and cook gently, stirring from time to time, until the vegetables are soft and broken up. Pass the cooked vegetables through a food mill, or process to a smooth puree with a stick blender.
Add the sugar and vinegar and return the pan to a high heat. Cook, stirring continuously, until the mixture thickens. The sauce has a tendency to splutter, so it is advisable to use an oven glove or wrap your hand in a tea towel while stirring. The type of pumpkin you use will determine how much water is given up during cooking. You want to boil it until you have a homogenous sauce with no liquid separated from the solids. The consistency should be a little looser than you want it on the plate, as it continues to thicken as it cools after bottling.
Using a funnel pour into sterilised, heated glass bottles or jars with rubber seals and vinegar-proof lids. Close immediately.
Once cold label and store in a cool, dark place. It will keep for a year or longer.
Makes about four 500ml bottles.
Recipe & photographs: Huw Morgan
At this time of year there is always more fruit than it is possible to process and preserve. This has been a small torture in previous years but, gradually, we are coming to terms with the necessary waste and, whenever possible, we give fruit away to neighbours or bring baskets of windfalls back to the office in London. As the orchard grows in stature we plan to offer the pickings that we can’t use to local restaurants, and start juicing on a more regular basis.
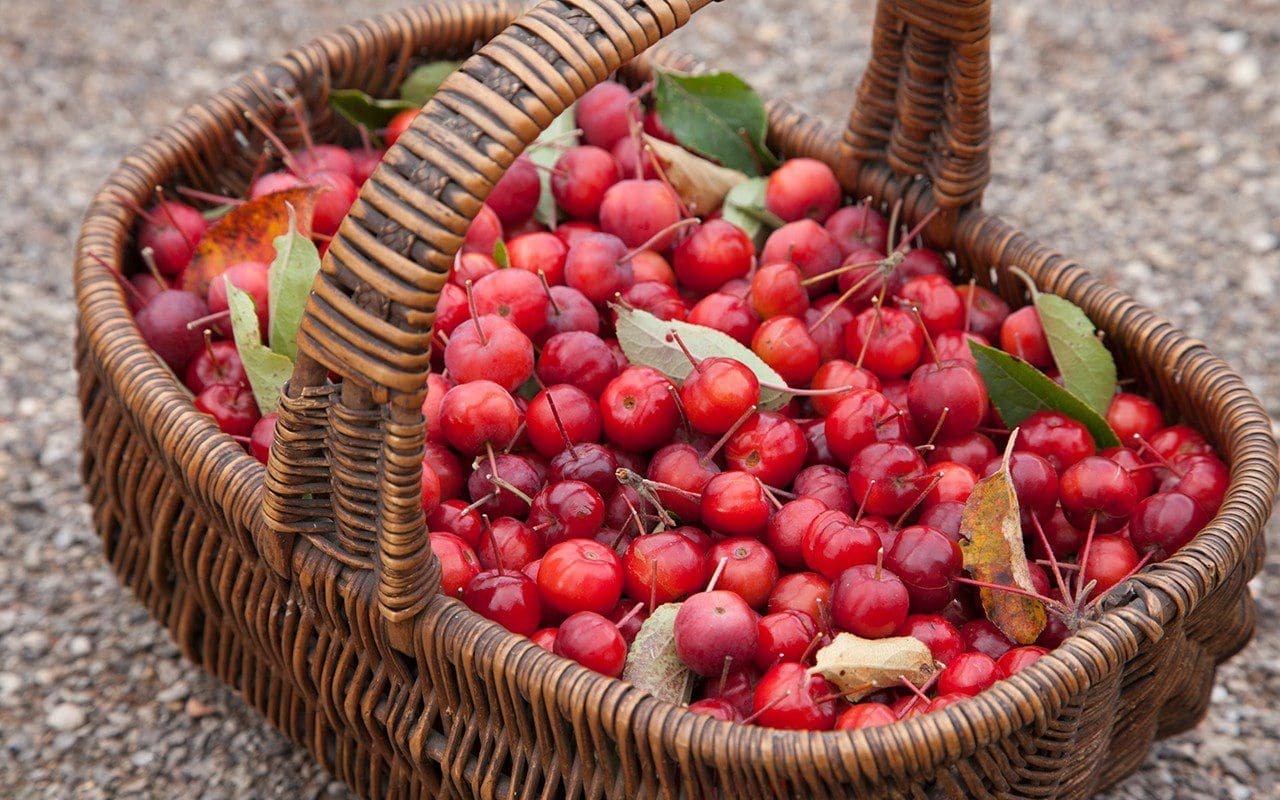
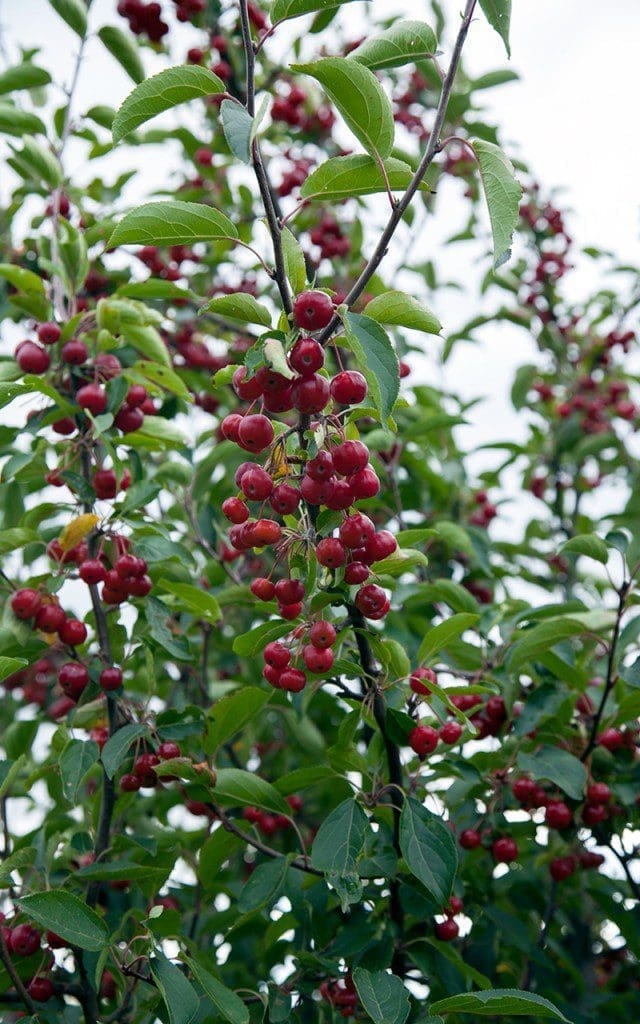
Every autumn I make a number of preserves, both to stock the winter pantry and to provide Christmas presents for friends and neighbours. Last year it was bottles of pumpkin ketchup and jars of wild apple and rosemary jelly, the year before damson cheese and homemade crème de cassis and crème de mûres. This year the crabapples have been their most productive since they were planted 6 years ago, groaning under the weight of bright red fruits, and I couldn’t countenance leaving them all for the birds. I have always been a little daunted by the prospect of harvesting crabapples and it does take longer to harvest enough compared to regular apples. However, with a sharp pair of secateurs to hand, it only took me 30 minutes to collect 3 kilos, which is plenty for a good batch of jelly, producing plenty to give away.
It is difficult to give exact quantities for jellies, as the amount of sugar required is completely dependent on the amount of juice you can extract. The 3 kilos of fruit I collected produced about 6 kilos of jelly. Due to their high pectin content crabapples (and wild apples) make the best base fruit for other types of foraged jellies, as long as crabapples make up no less than half the combined weight of your fruit. You can mix them with brambles, haws, sorbs, sloes, rosehips and elderberries to make a mixed hedgerow jelly, or with any of these other fruits alone to produce a jelly that tastes more purely of the partner ingredient. I used the fruit of Malus hupehensis, which produces a vibrant red jelly. Less strongly coloured fruit, such as the yellow Malus ‘Evereste’, produce an amber jelly.
Adding spice in some form allows this jelly to cross over from a topping for bread or toast to an accompaniment to game, cold meats and cheeses. Bay and a little clove make this a good partner to cold ham, although rosemary and juniper would make it a good pairing with game. Add a few spoonfuls to the gravy from a braised pheasant or partridge before serving
Ingredients
Crabapples
Granulated sugar
Water
Bay leaves
Cloves
Method
Wash the fruit and chop coarsely. This can be done in a food processor. Put into a preserving pan and just cover with water. Add one bay leaf and 3 cloves per kilo of fruit.
Put on a low heat and slowly bring to a simmer. Cook gently until the fruit is soft and pulpy.
Allow the fruit pulp to cool slightly before pouring into a scalded muslin jelly bag. Allow to strain for at least 6 hours, or overnight. Do not squeeze the pulp or the jelly will be cloudy.
Measure the juice and put into a clean preserving pan and heat gently. Once the juice is hot add 450g of sugar for every 600ml of juice. Stir until the sugar is dissolved, then bring to the boil, skimming off the scum that appears on the surface. Allow to boil for 10 minutes without stirring.
While this is happening put a small plate into the freezer. After 10 minutes of boiling test the jelly for setting by dropping a little of it onto the cold plate and returning to the fridge for a minute. The jelly is set when the surface wrinkles when pushed with a finger. If it isn’t set after 10 minutes then return to the boil and re-test every 3-5 minutes.
Once setting point has been reached allow the jelly to settle off the heat for a couple of minutes. Reskim again to remove all scum from the surface before pouring the jelly into hot, sterilised jam jars. Cover with waxed paper and seal with clean lids.
Recipe & photography: Huw Morgan
My childhood interest in cooking was first encouraged by my maternal grandmother. When I was about 7 she taught me how to make scrambled eggs on toast. Then, during our summer holidays on the Gower, she followed this with instruction in the cakes from her pantheon of Welsh standards – Bara Brith, Welsh Cakes and pikelets – and, from Marguerite Patten’s ubiquitous wartime cookbooks, she introduced me to the classics – scones, jam tarts, rock cakes and Victoria sponge cake.
When we started to travel further afield to Brittany for our holidays I was always drawn to sample the baked goods; proper butter croissants and pains au chocolat at the ferry port, quite unlike the frozen Pilsbury Dough ones I had eaten at home, palmiers, millefeuilles and éclairs from the patisserie near the camp site, and from the markets we would buy buttery Gateau Breton, custardy apple cake and indulgent kouign-amann. Brought up on Cadbury’s Mini Rolls and Mr. Kipling’s Fondant Fancies these cakes were so exotic to me that I would return home wanting to try and make them.
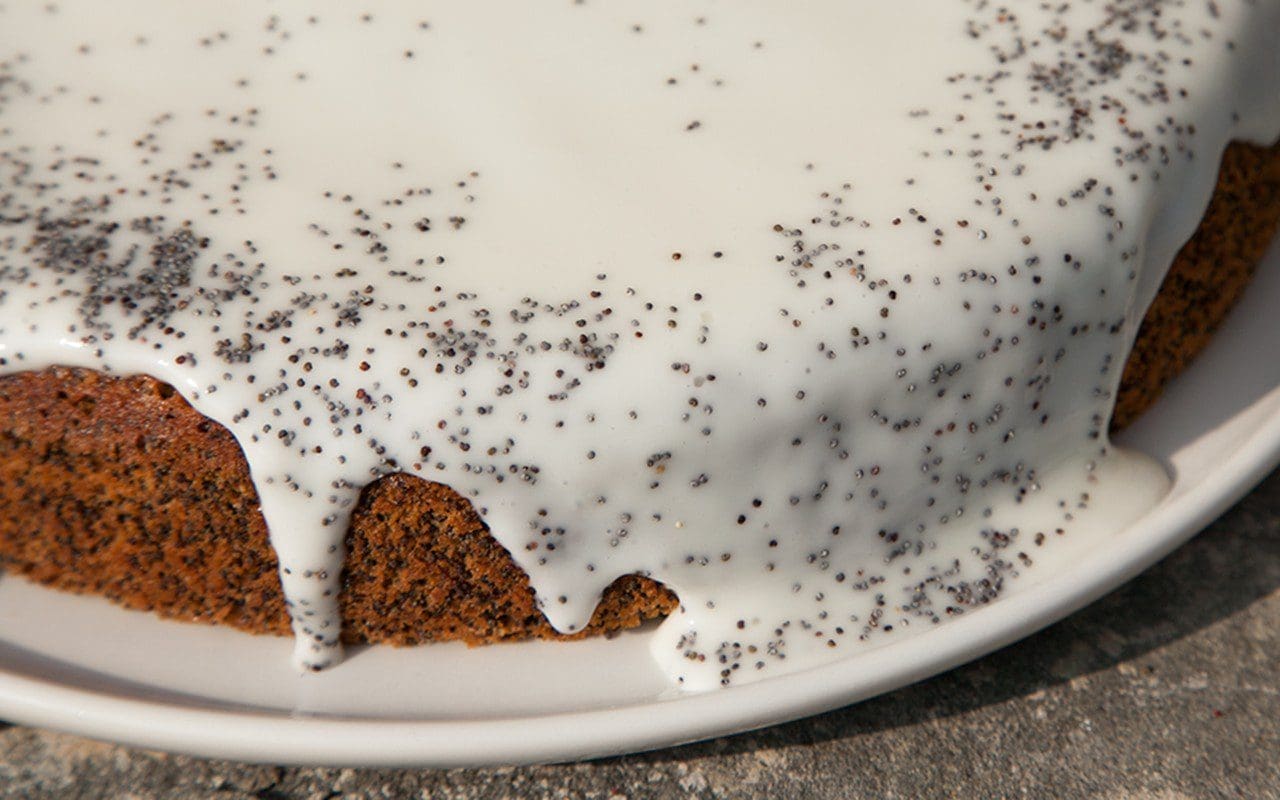
At 17 I went to Austria on a student exchange and here I discovered a whole other world of cake; Sacher Torte, Linzer Torte, Apfelstrudel, Marillenknödel and Zwetschgenknödel (potato dumplings stuffed with whole apricots or plums respectively) and my first proper baked cheesecake studded with juicy raisins, which was a far cry from the chalky refrigerated ones with their gelatinous fruit toppings that I was familiar with. However, the cake that lodges most firmly in my memory is the Mohnkuchen I ordered in a Café-Konditorei in Salzburg.
When I saw it on the menu I asked my host family what Mohn was. When they explained that they were poppy seeds this seemed to me so sophisticated and unusual an ingredient for a cake that, with my awkward teenage desire to appear sophisticated and unusual, I ordered it. When it arrived at the table my suspicions were confirmed by its rather austere appearance, and its minimal crust of translucent water icing. It was the early ‘80’s and I thought my grey cake was unutterably chic and I was (perhaps rather too) pleased with myself for having ordered it. My palate was then educated by the discovery that this cake was primarily a textural experience; the somewhat challenging gritty feeling in the mouth and the ephemeral bitterness of the seeds making me sure that this was a cake for grown-ups, not children. An acquired taste.
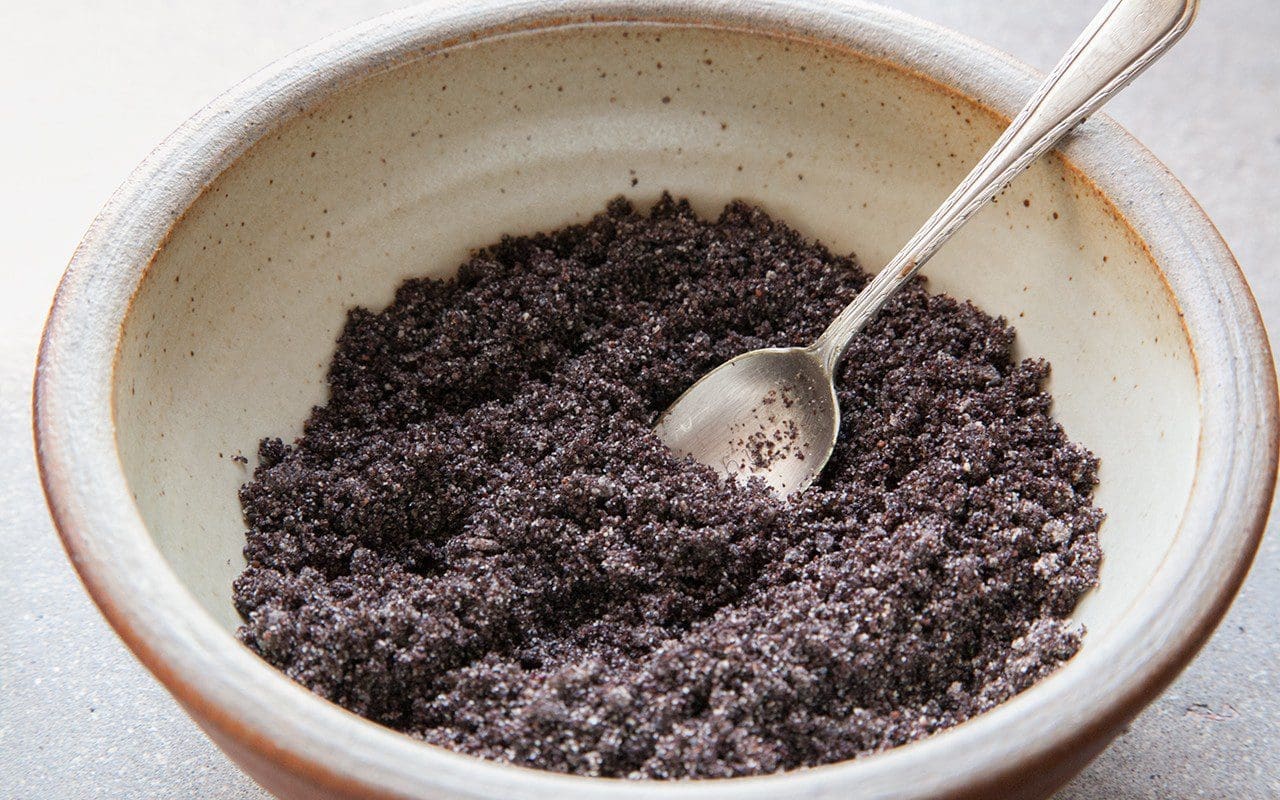
The recipe below is an amalgamation of several recipes I have tried in an attempt to reproduce that first piece of Mohnkuchen. The flavouring should be subtle, not too heavy with either vanilla or lemon, so that the delicate flavour of the poppy seeds comes through. It is essential to grind the seeds in either a mortar and pestle or a clean coffee or spice grinder as, from experience, the blade of an electric food mixer is not up to the job. You will need to grind the amount of seed required for this cake in batches. You want to achieve the texture of wet sand, with a good balance of ground and whole seeds. When we have a good opium poppy harvest I take pleasure in using our own seed but, with the amounts called for, you need to have quite a poppy patch to produce enough.
I use a richer yogurt icing here, which makes this more of a special occasion cake, but it is still very good with the traditional light water icing which, in Austria, is sometimes flavoured with rum for a truly grown-up cake.
 Ground poppy seeds
Serves 12
Ingredients
CAKE
150g unsalted butter
150g caster sugar
5 large eggs, separated
75g plain flour, preferably Italian 00
75g ground almonds
180g poppy seeds, ground
120ml plain yogurt
1 teaspoon vanilla extract
Zest of half a small lemon, finely grated
ICING
6 tablespoons natural yogurt
Juice of half a lemon
100g icing sugar
Method
Preheat the oven to 180°C.
Butter a 22cm round cake tin and line with baking parchment.
Beat the butter with the sugar and vanilla extract until pale and fluffy. Add the egg yolks one at a time. Beat well to incorporate fully before adding the next one. If the batter shows any sign of curdling add a teaspoon of the flour and beat until smooth.
Stir in the yogurt until well combined. Then fold in the flour, ground almonds, poppy seeds and lemon zest.
Beat the egg whites into soft peaks. Gently fold these into the cake batter a little at a time until fully incorporated.
Pour the batter into the prepared cake tin and bake for 40-45 minutes, until a skewer inserted comes out with just a few crumbs attached.
Allow to cool in the tin for 20 minutes, then remove from the tin, take off the baking parchment and put on a cooling rack until cold.
To make the icing, in a small bowl stir together the yogurt, lemon juice and icing sugar until smooth. Pour onto the cake and spread out with a palette knife, encouraging it to flow over the edges. Decorate with poppy seeds.
Recipe & photographs: Huw Morgan
In two weeks we are off to Greece on holiday. The island we have been going to for the past few years is small and secluded with only a passing tourist trade, so the few restaurants are used mainly by locals, or holidaying Athenians and Greek expatriots from America and Australia. Alongside the ubiquitous Greek salad there are a number of traditional vegetable dishes served by all the establishments and one of our favourites is the inspiration for this recipe.
The first time we ordered this a large plate of simply dressed beetroot came to the table, piled on top of the wilted leaves and covered in rich garlicky Greek yogurt. It was so simple, and so delicious, we couldn’t believe that we had never thought to eat beetroot greens before. They had always ended up on the compost. We get through a lot of chard and spinach and we now often eat the beetroot leaves alone like these two crops, wilted in olive oil with garlic and dressed with lemon juice. They have the earthy flavour of beets, and the stalks have something of the succulence of chard, but with a distinctive sweetness. It is important to use the leaves of young beetroot and discard the oldest leaves as the stalks of these are stringy.
For variety we grow a number of different coloured beets and the appearance of this dish is lifted by the mix of colours. However, it is just as good with plain purple beets.
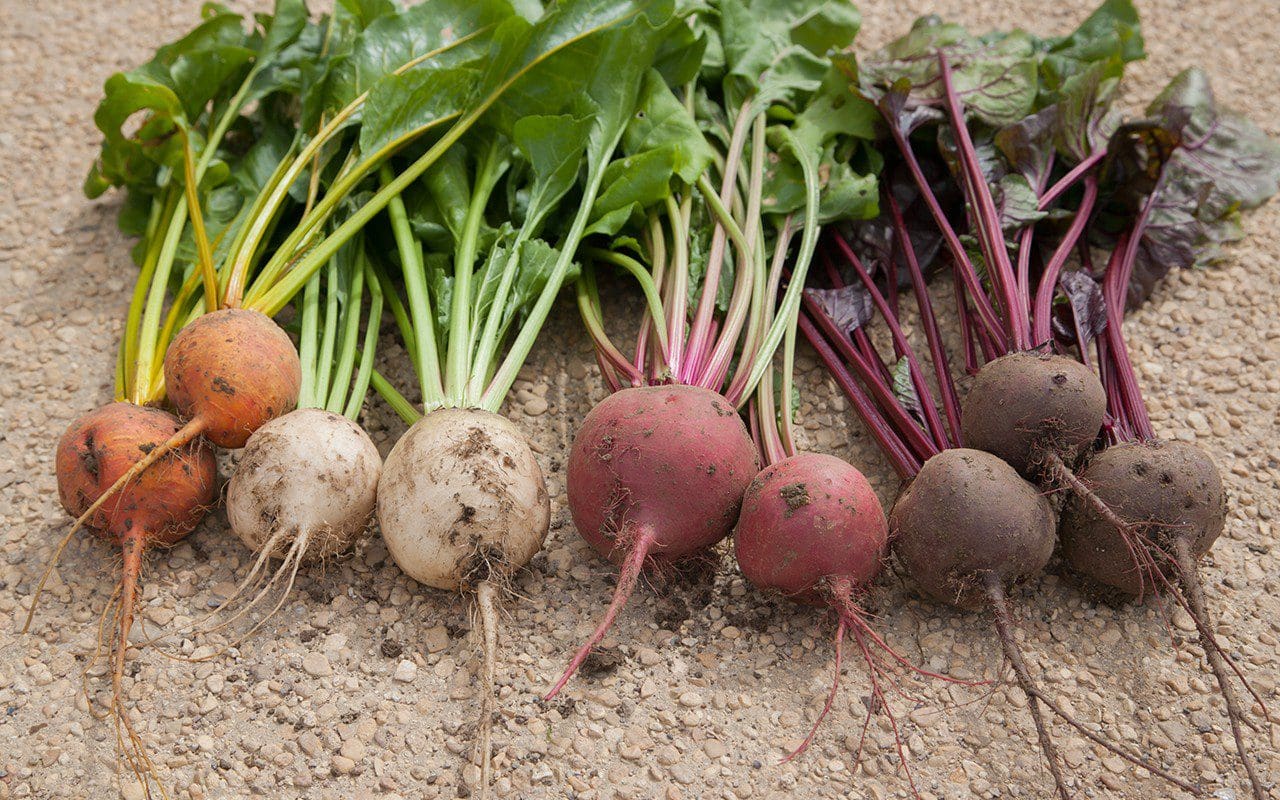
From left to right: Beetroot ‘Burpees Golden’, ‘Snowball’, ‘Tonda di Chioggia’ and ‘Egitto Migliorata’
Walnuts and dill are natural companions to beetroot. The earthiness of the nuts complements that of roots and the dill adds a fresh, sweet note that prevents the dish from feeling too heavy. Fennel, parsley or mint could be used instead.
Given the limited number of ingredients this dish is surprisingly rich and a little goes a long way. It can be served as part of a table of meze, with hummus, fried halloumi, meatballs and spanakopita, or as a side dish to accompany grilled white fish or chicken.
Serves 6
Ingredients
1kg beetroot with leaves intact
2 cloves garlic
100g walnut pieces
Juice of one lemon
Extra virgin olive oil
200g Greek yogurt
Dill leaves and flowers
Sea salt
Method
Preheat the oven to 200°C.
Remove the leaves from the beetroot and discard the oldest ones.
Scrub the beetroots well and wrap individually in tin foil. Put into a baking tin and, depending on their size, cook for 40 – 60 minutes until you can pierce them easily with a sharp knife. Remove from the oven and allow the beetroot to cool for 20 minutes in their foil jackets. Before turning off the oven spread the walnut pieces out on a baking sheet and toast in the oven for about 3 minutes until lightly coloured and fragrant.
Remove the foil from the beetroot and rub the skins off under a cold running tap or in a bowl of cold water. Slice from top to bottom into eighths to produce slim wedges. Put into a bowl and dress with lemon juice, olive oil and a little salt. If using mixed colours of beetroot you will need to use separate bowls for each variety to prevent the colours from bleeding into each other.
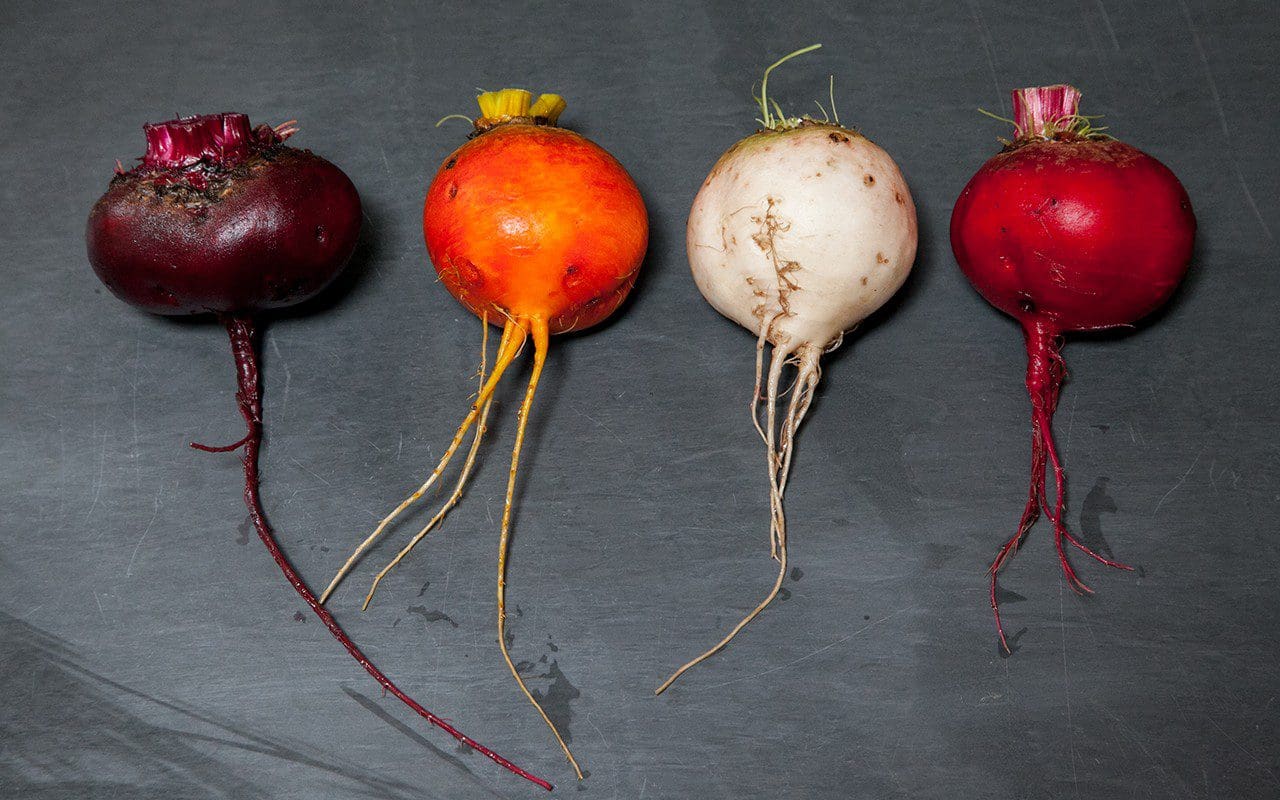 From left to right: Beetroot ‘Egitto Migliorata’, ‘Burpees Golden’, ‘Snowball’ and ‘Tonda di Chioggia’
Put a large lidded pan on a high heat. Wash the reserved beetroot leaves and immediately put into the pan with as much water as possible still clinging to them. Put the lid on tight. From time to time shake the pan and check to see that there is enough water in the pan to create steam. You may need to add an egg-cupful of water if looks like it is getting dry. They are done when you can pierce the stalks with a sharp knife. Remove from the heat, take the lid off the pan and immediately dress the leaves with lemon juice and olive oil until well coated. Season with salt and allow to cool.
To make the yogurt dressing grate the garlic cloves into a bowl large enough to hold the yogurt. Add the yogurt, salt and 4 tablespoons of olive oil. Stir vigorously until well combined.
To serve arrange the wilted leaves on a plate, place the beetroot wedges on top, then spoon on the yogurt dressing and scatter over the walnuts. Decorate with dill leaves and flowers and a final drizzle of olive oil.
Recipe and photographs: Huw Morgan
Artichokes are one of the pre-eminent Italian ingredients and so it makes sense to look to Italy for ways in which to prepare them. This recipe is from the River Café Cook Book Green which, alongside Jane Grigson’s Vegetable Book, is the cook book I turn to most frequently when looking for inspiration for good simple vegetable recipes.
Recipes for artichoke are legion, but they usually follow one of a number of tried and tested treatments; boiled and eaten with vinaigrette or another sauce such as bagna cauda, braised with herbs in stock or oil (sometimes with a stuffing), deep-fried, roasted or chargrilled or, more unusually, sliced very thinly and eaten raw as a salad vegetable.

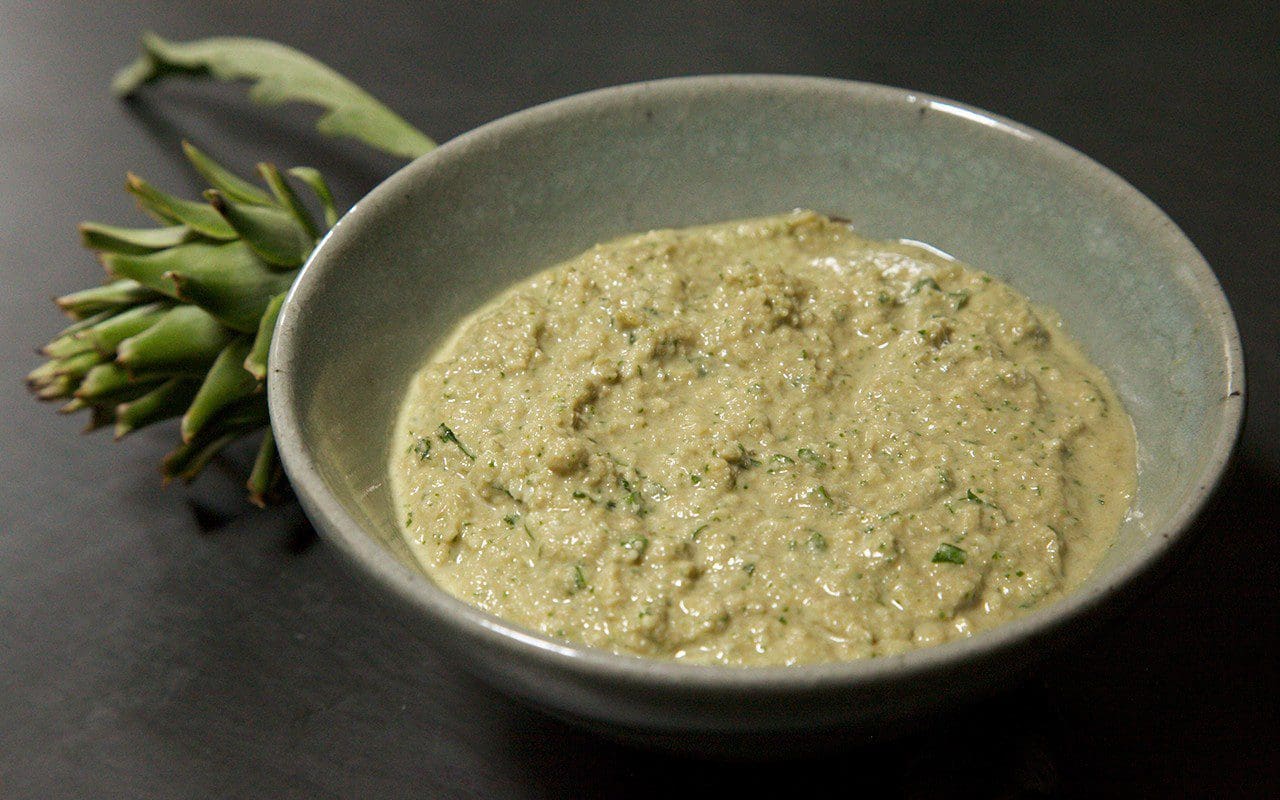
This recipe attracted my attention as the artichoke hearts are used raw to make a pesto-like sauce for pasta. The pesto itself is a pale beige colour and so this is not necessarily the most photogenic of platefuls, but it is the delicate flavour of the artichokes that is so readily captured; their slightly resinous and nutty flavour foregrounded by this simple treatment. The sauce is deliciously creamy and rich, yet it has a completely vegetal freshness. I have halved the number of garlic cloves called for in the original recipe as, to my taste, they overwhelm the subtlety of the artichokes.
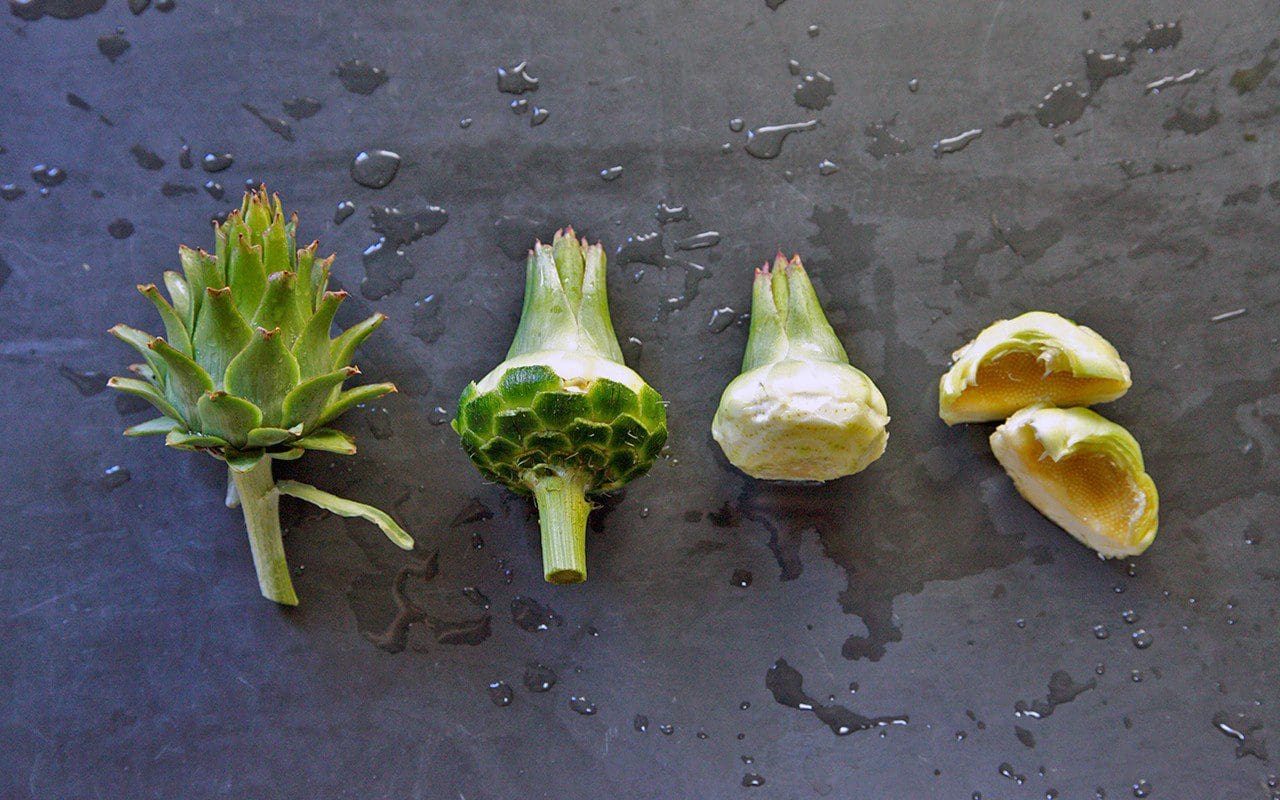
At this time of the year I trim the stalks and bases from all the artichokes, even the smallest, as these parts become increasingly fibrous towards the end of the season. If you make this earlier in the season with young artichokes it is possible to use the first 5cm of the stalk too, once the fibrous outer layer has been peeled away.
The pesto can also be used like a tapenade on bruschetta or crostini topped with some shaved Parmesan or Pecorino, or a slice of Parma or San Daniele ham. To use it in this way prepare as for the sauce below, but allow the pesto to cool after adding the butter.
Serves 6
Ingredients
400g spaghetti Sea salt and freshly ground black pepper Freshly grated Parmesan
ARTICHOKE PESTO 6 small globe artichokes 2 lemons 100g pine kernels or blanched almonds 2 cloves garlic 250ml milk 2 handfuls flat leaf parsley 150g Parmesan, freshly grated 150ml olive oil 75g unsalted butter
Method
First prepare the artichokes. Squeeze one of the lemons and put the juice and the quartered lemon hull into a bowl containing enough cold water in which to submerge the prepared artichokes. Slice the second lemon in half and keep close by.
Carefully pull the tough leaves away from the base of the artichokes, proceeding in concentric circles until you reach the softer cream leaves towards the heart. With a small, very sharp knife carefully remove the stalk and trim any dark green remnants of the leaves from the base. Immediately rub all cut surfaces with one of the lemon halves.
Cut off the green and spiny tops of the leaves and discard. Cut each artichoke heart in half and remove the hairy choke in the centre with a small teaspoon. Rub all surfaces with one of the lemon halves again and put the artichokes into the acidulated water. Continue until they are all done. You should have around 200g of artichoke hearts.
Drain and dry the artichoke hearts and put into a food processor with the garlic and pine kernels or almonds. Process quickly until coarsely chopped. Add the milk, parsley leaves and Parmesan and process quickly again. With the food processor running at a slow speed gradually add the olive oil. You should have a fairly wet cream, but it will thicken as it stands. Season with salt and put into a small saucepan.
Cook the spaghetti in boiling salted water until al dente. Drain and return the spaghetti to the pan with a ladleful of the cooking water. While the pasta is cooking add the butter to the pesto and put over a low heat. Stir frequently until the butter has melted and is well incorporated and the sauce has heated through. Add the sauce to the pasta and stir well to coat. If it seems a little thick add some more of the pasta water until a coating consistency is achieved. The sauce should be quite wet.
Serve with freshly grated Parmesan and a sprinkling of coarsely chopped flat leaf parsley.
Words & photographs: Huw Morgan
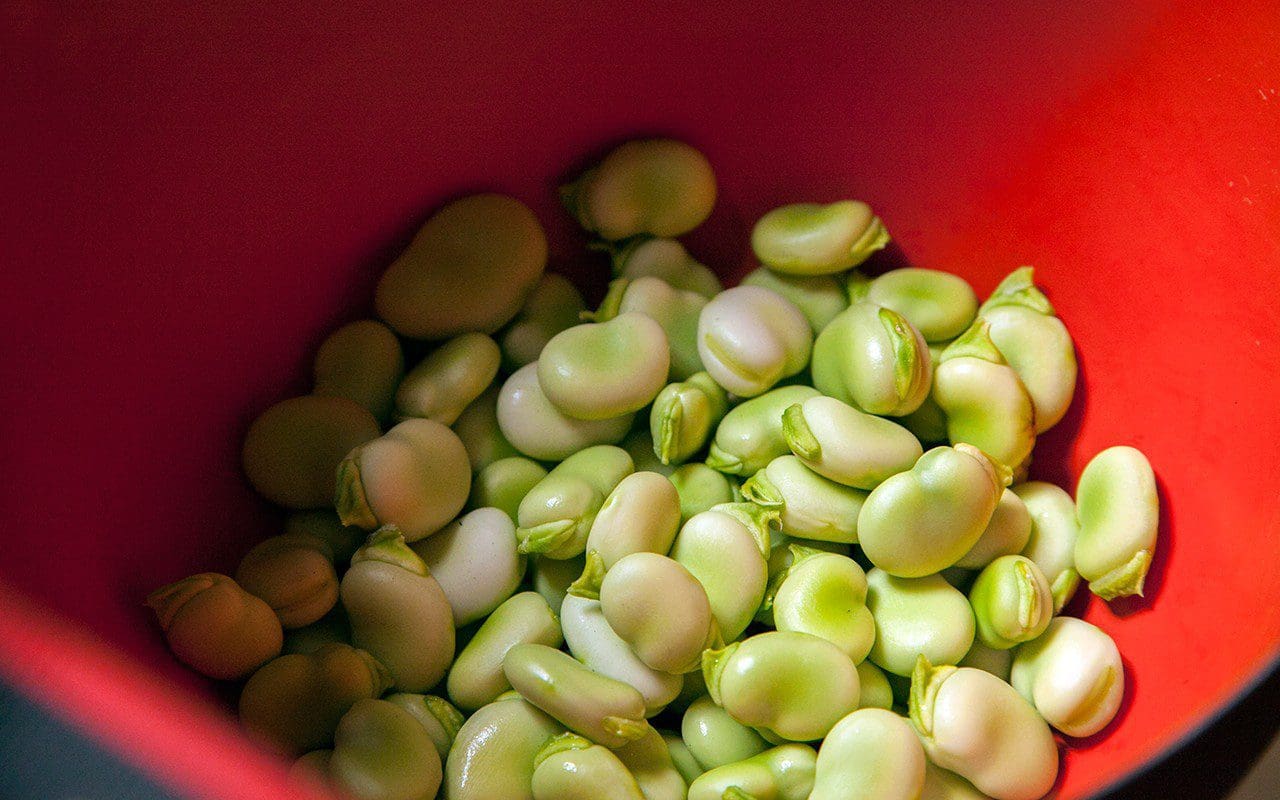
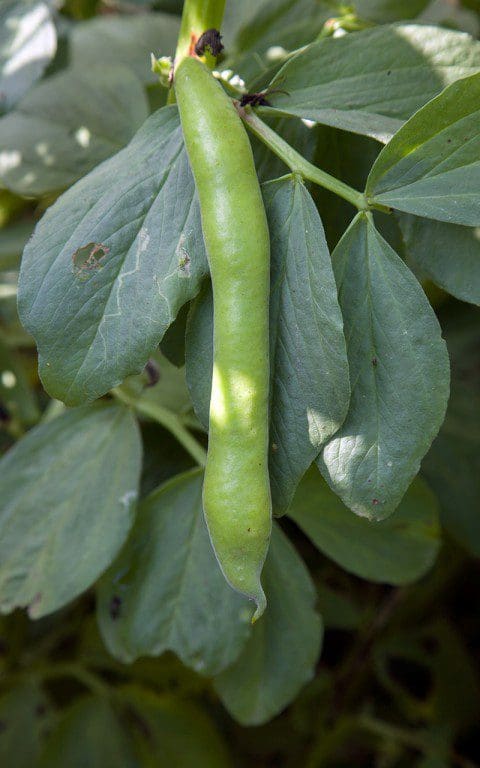
Broad beans (Vicia faba) are a kitchen garden staple for us and, gratifyingly, one of the easiest crops to grow. Every year we make an autumn sowing from October to early November, depending on the weather. If sown early in a warm autumn they can grow too large before winter and are then susceptible to wind rock, frost or snow. If sown too late in a cold, wet autumn there is not be enough time for them to get away before winter descends. Autumn sown beans are less prone to black-fly, produce stockier plants and an earlier crop of beans. In a warm spring this is sometimes as early as mid-May.
Our first harvest this year was in early June, but we also made a spring sowing of beans in 9cm pots in early March, which were brought on in the cold frame and planted out in April. These plants are starting to crop now, just as we have taken the last of the beans from the winter sown plants. In a good year this means that we can have beans from mid-May until mid-July.
In our experience spring sown plants tend to be leggier and less productive, so it is worth choosing shorter-growing varieties as the taller ones will need staking. We habitually sow Super Aquadulce in winter and Hangdown Green in spring. As soon as the beans are finished you should cut off the growth above ground, but leave the roots in the soil as they fix nitrogen. Replant with later summer leaf vegetables which thrive on the nitrogen, such as salad or chard.
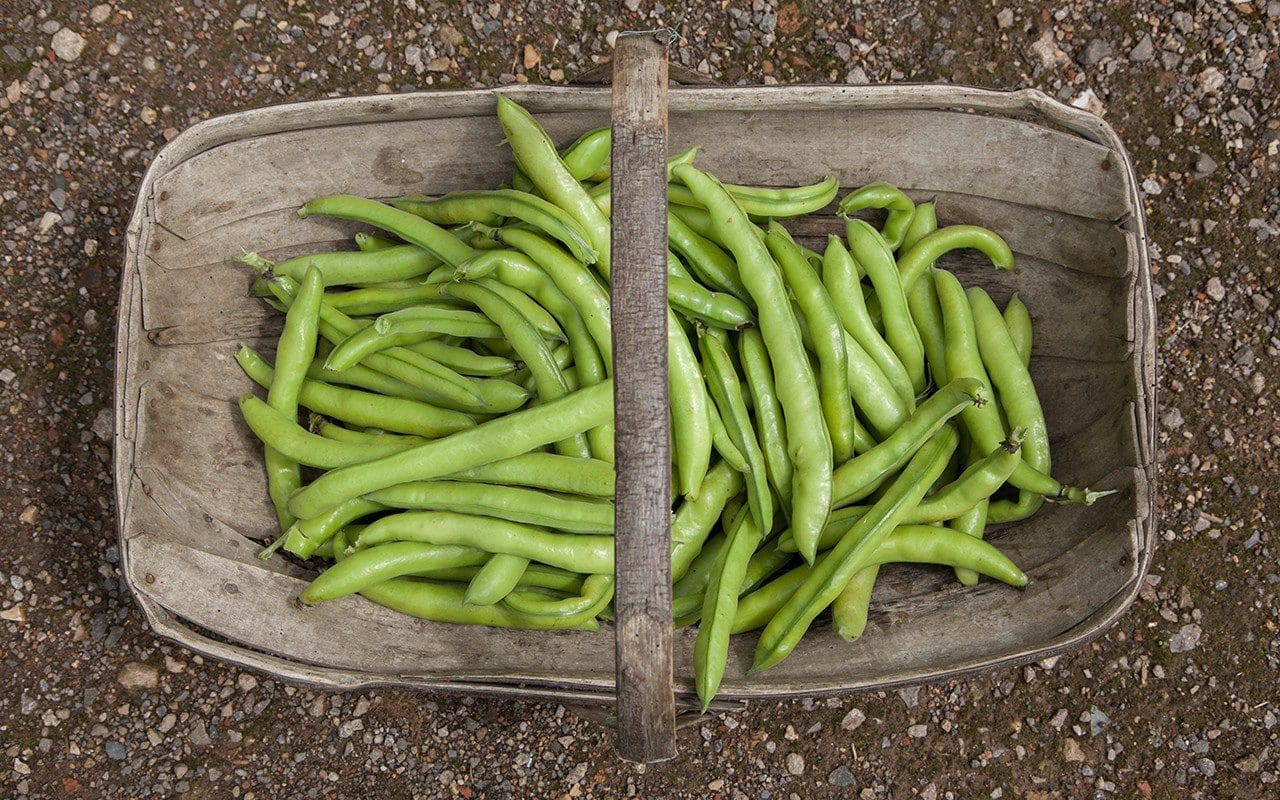
At this crossover point from the winter to spring sown beans we often end up with a mixed harvest of large and medium sized beans, with their tougher, more bitter skins, and very small, sweet beans which can be eaten straight from the pod. If so I will cook them in two batches, cooking the larger beans for 3 minutes and just blanching the smaller ones for a minute.
This is such a simple recipe and one I return to every year in some shape or form. Who doesn’t like fresh garden vegetables on toast ? It is extremely adaptable and, as the season progresses the broad beans can be replaced with peas, chargrilled courgettes, roasted young beetroot or carrots, wilted chard, chargrilled chicory or blanched french beans. The herb can be substituted with others as available and appropriate – dill, fennel, chervil, basil or parsley. If you can’t find ricotta substitute with goat or sheep’s curd, or a soft young goat’s cheese.
Serves 2
Ingredients
150g podded broad beans
200g ricotta
2 thick slices of sourdough bread
Extra virgin olive oil
A clove of garlic
Zest and juice of 1/2 a large lemon
A handful of mint leaves, coarsely chopped, a few reserved to finish
Salt and ground black pepper
Method
Bring a pan of water to the boil. Cook the beans in batches for 1 – 3 minutes, depending on size. Drain and put into a bowl of cold water to refresh. Drain again.
Remove the large and medium beans from their skins – the very smallest can be left with their skins on – and put into a bowl with the mint, half the lemon zest, the lemon juice and two tablespoons of olive oil. Season to taste and stir.
Season the ricotta with salt and pepper to taste.
Drizzle or brush olive oil onto both sides of the sourdough bread. Grill each side until well browned with some light charring. Alternatively bake in a hot oven (200°C) for 8 to 10 minutes, turning them over at the half way point. When done and while still hot, rub the upper side of each slice of toast with the clove of garlic.
Spread half of the ricotta on each slice of toast. Spoon on the broad beans. Finish with the reserved mint leaves, the remaining lemon zest and a drizzle of olive oil.
Serve immediately.
Recipe & photographs: Huw Morgan
The green sauce in this recipe is not the well known mediterranean salsa verde, but Grüne Sosse, a speciality of Frankfurt introduced to me by our friend Ariane, a native of the city, and a neighbour in Bonnington Square for many years. It is traditionally served with asparagus of the forced white variety, which is particularly prized in Germany, where Spargelfesten are held in its honour every spring. Although green sauce made from a variety of herbs can be found in German restaurants all year round, it is only in early spring that the truly authentic sauce can be made, when the herbs required are coming into their prime and the paper packages of them required to make it are found in farmer’s markets, together with the white asparagus which it traditionally accompanies.
Genuine Grüne Sosse requires seven specific herbs; sorrel, chervil, chives, parsley, salad burnet, cress and borage. However, it is seldom that any of us have access to all of these herbs, and so substitutions can be made. The crucial thing is to ensure a good balance of flavours, with the requisite amount of sourness, freshness, bitterness and spice. There is no hard and fast rule about how much of each herb to use, but a rule of thumb is that no one herb should make up more than 30% of the bulk. When possible I try to get a fairly even balance between all of them, but you should adjust to taste and to what is available.
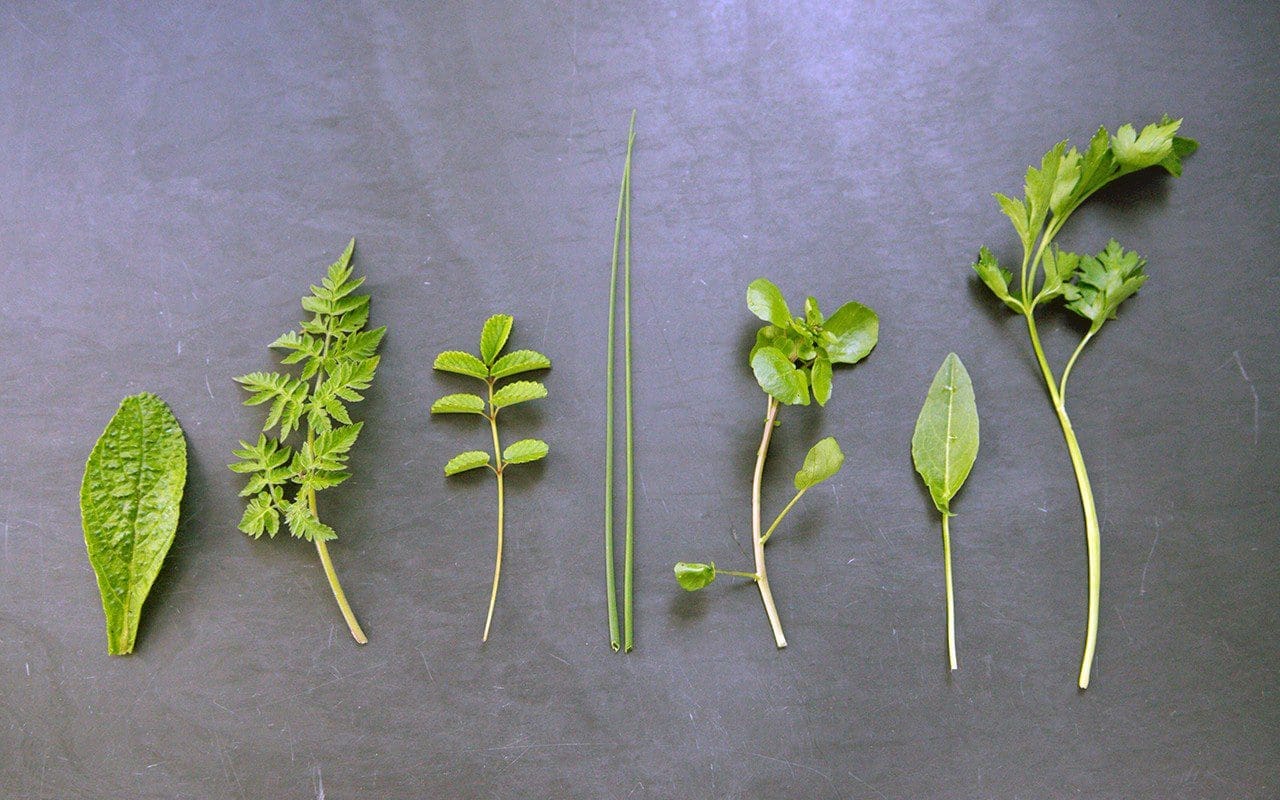
From left to right: borage, wild chervil or cow parsley, salad burnet, wild onion, watercress, sorrel, parsley
Since it is so plentiful in our fields I use wild sorrel (Rumex acetosa), which I suspect is what the authentic recipe calls for, however you can replace this with the more usually grown French or garden sorrel (Rumex scutatus). If neither of these are available you could use young chard or spinach leaves and an extra squeeze or two of lemon juice.
When it is available I use wild chervil instead of cultivated. Otherwise known as cow parsley (Anthriscus sylvestris), it is perfect to pick right now, and can be substituted for garden chervil (Anthriscus cerefolium) in salads or sauces for chicken and fish. If you are an inexperienced forager you must be extremely careful not to mistake poisonous hemlock for cow parsley. Use a good field identification guide (Miles Irving’s The Forager Handbook and Roger Phillips’ Wild Food are invaluable) and, if in doubt, do not pick it.
In place of chives I use wild onion (Allium vineale) from the fields, being careful to pick only the youngest quills, as the older ones are tough. The cress can be replaced with watercress, rocket or even nasturtium leaves, to provide the peppery note. And, from the hedgerows, I have also used the leaves of garlic mustard (Alliaria petiolata), young dandelion leaves and even nettle tops, when the other herbs are hard to come by.
The salad burnet and borage both impart a distinctive cucumber flavour which it is not possible to replicate with other herbs and which is particular to this sauce. When unavailable I have used peeled and finely grated cucumber in their place. Salt it and squeeze the juice from it before incorporating, to prevent it diluting or curdling the sauce.
It is also possible to make up the quantities with more easily available herbs such as dill, fennel, tarragon or mint but, with their pronounced flavours, these should all be used in moderation or they will overwhelm the flavour.
This sauce is also traditionally served with boiled new potatoes and halved hard boiled eggs, or as an accompaniment to boiled beef or poached fish.
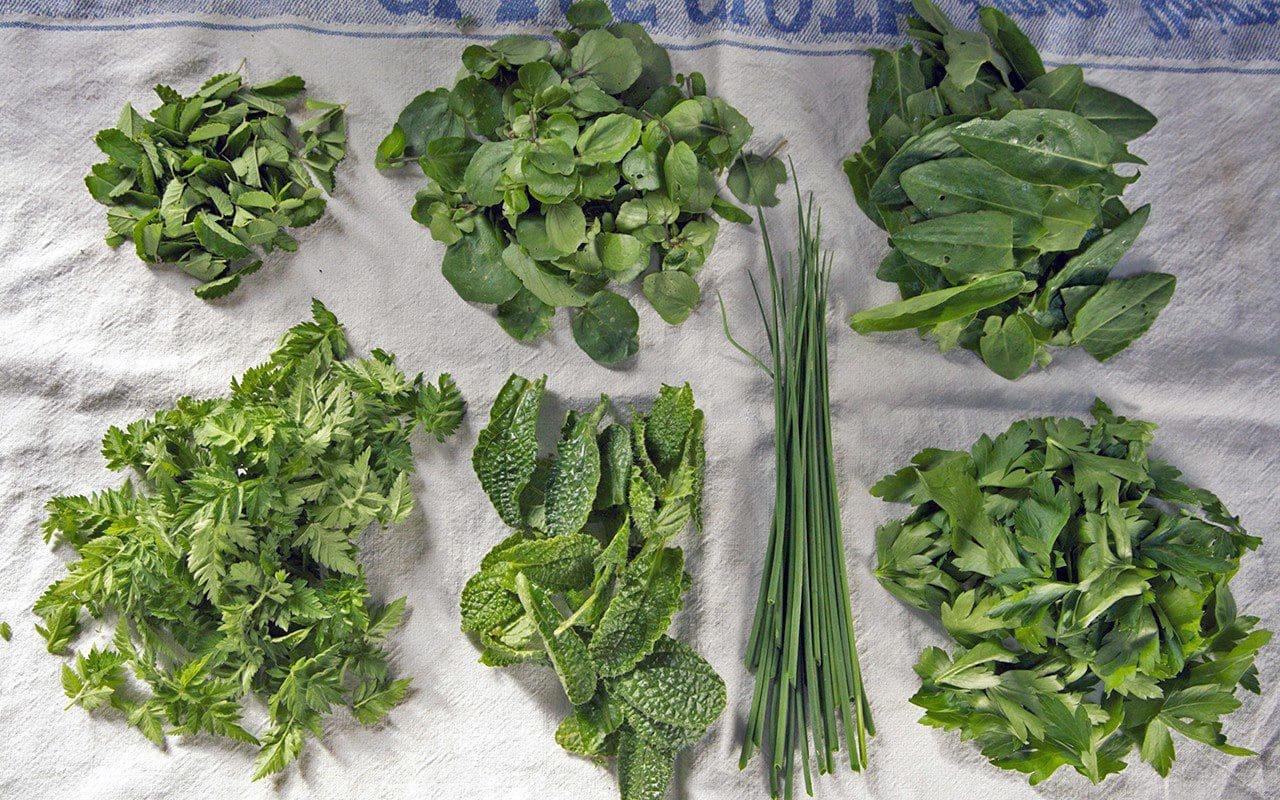
Clockwise from top left: salad burnet, watercress, sorrel, parsley, wild onion, borage, wild chervil
Ingredients
150g mixed green herbs
250g sour cream or quark
125g yogurt
2 hard-boiled eggs
3 tablespoons lemon juice
sea salt
7-8 spears of asparagus per person
Serves 4
Method
Wash the herbs. Put them in a salad spinner and then dry on a tea towel or paper towel.
Remove the leaves from the stems.
Discard the stems.
Peel the eggs and put the yolks in a mixing bowl. Coarsely chop the whites and reserve. To the egg yolks add the lemon juice, 2/3 of the herbs, 1/4 teaspoon salt and the yogurt . Liquidise using a hand blender.
Stir the sour cream into the mixture. Add the coarsely chopped egg white. Finally add the remaining finely chopped herbs.
Season with more salt and lemon juice to taste.
If possible allow the sauce to rest in the fridge for an hour or so for the flavours to combine. Allow to come back to room temperature before using.
Gently bend the asparagus spears until they snap. Trim the broken ends. If necessary finely peel the lower sections of the stalks of the outer fibrous layer.
Put water to a depth of 2cm into a lidded sauté pan that is wide enough to take the asparagus in a more or less single layer. Bring to the boil. Put in the asparagus and simmer until tender. For thicker or older spears this may take as long as 5-6 minutes. Fine spears and those just picked will take far less, 2-3 minutes at most. Take the asparagus from the water and spread out on a paper towel on a plate to drain and cool quickly.
Arrange the warm asparagus on plates. Spoon over some of the sauce. Decorate with reserved herb leaves. Eat with fingers.
Recipe and photographs: Huw Morgan
ALREADY A PAID SUBSCRIBER? SIGN IN
ALREADY A PAID SUBSCRIBER? SIGN IN
