Once again it’s that time of the year when the vegetable garden is providing slim pickings. The purple sprouting and kales are over, and the last of the stored potatoes have gone soft and started to sprout. While we wait for the broad beans, peas and lettuces to start producing we are left with the last of the gnarly roots – which were dug and stored in the barn three weeks ago – and a handful of leeks that were lifted to make way for another crop and are now standing in a trench in a neighbouring bed, looking rather lonely. When the vegetable beds look this barren the plants that are performing well are thrown into sharp relief, and guide us to what we should be eating.
The herbs appear first, many of them starting in earnest while it was still cold in early April. The parsley woke from its winter slumber to throw out lush branches of new leaf, while alongside it the chervil followed suit. This delicate umbellifer has a gentle aniseed flavour, similar to yet less pronounced than tarragon. I use it generously in salads, with new potatoes or to flavour a simple herb omelette. Like tarragon it works well with chicken and fish. However, its mild flavour is impaired by cooking, so it should always be added at the last moment to hot food. I keep us in regular supply by successional sowing every three weeks through the summer, always sowing more seed than needed since, like parsley, it can be shy to germinate. In the hedgerows its wild cousin, cow parsley (Anthriscus sylvestris), is also just coming up to flower. The flavour of wild chervil is slightly coarser, but makes a good foraged substitute. However, as with all foraged umbellifers you must be absolutely sure you are collecting the correct species, as many of them are highly toxic. Use a good field guide if you lack the confidence of a positive identification.
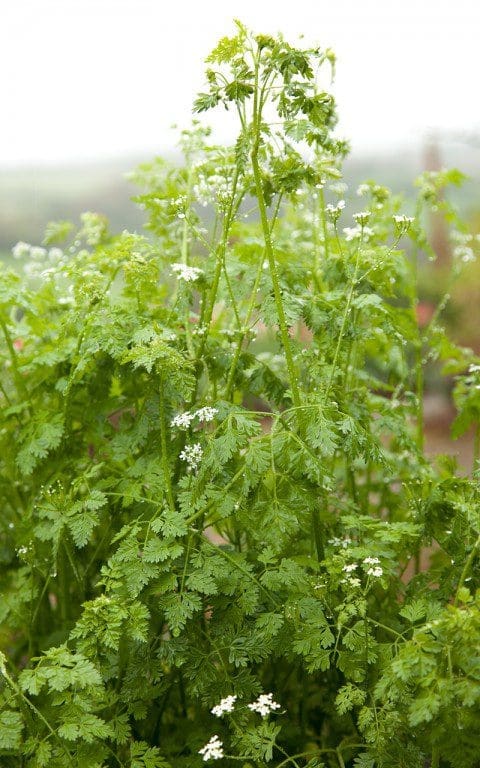 Chervil (Anthriscus cerefolium)
At the same time as the common sorrel (Rumex acetosa) appeared in the fields around us, the sorrel in the herb garden started shooting in earnest and is now producing far more than we can eat in salad alone. Garden sorrel is a cultivated form of the wild plant selected for larger, softer leaves and its sharp, lemon freshness is good with so many things at this time of the year. Like chervil it also works well with chicken, fish and eggs while, on its own it makes a clean, refreshing soup to awaken the winter palate. Sorrel is a hardy perennial and easy to grow from seed, but it also seeds prolifically, so when harvesting you should cut out the flowering stems or, if you have more than one plant as we do, cut them to the ground on rotation. They come back remarkably quickly.
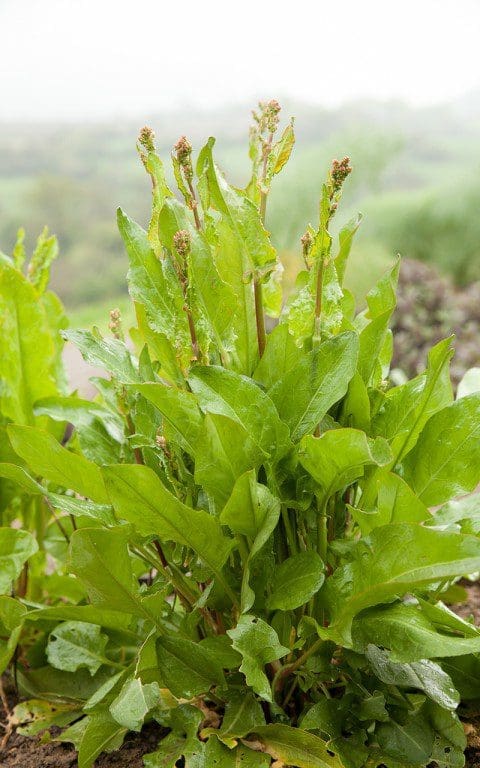 Sorrel (Rumex acetosa)
Stracciatella is a traditional Roman soup served at the start of festive meals, particularly at Easter. When I was first working in London on a graduate’s wages I would eat bowlfuls of it at Pollo Bar, one of the many great Italian restaurants that Soho used to boast. Despite being nothing more than a bowl of stock with added egg, it was hot and filling and felt like it was good for you for the price. The proverbial meal in a bowl.
Although normally made with meat stock – chicken, pork, beef and veal are all used in Italy – I wanted to make a vegetable stock with our surfeit of root vegetables and leeks. Since the success of stracciatella is entirely dependent on the quality of the stock, which must be well-flavoured and complex, the vegetables were roasted before being simmered in water with fresh herbs and seasoning. Parmesan rind adds depth and savour to the vegetable broth. I keep a container of the rinds in the freezer for just this purpose.
Made from the last of the winter stores and the freshest of the new season herbs, a steaming bowl of this soup warms the soul as the heavy, cold rain falls once again outside the window.
INGREDIENTS
For the stock
100g each of:
Celeriac
Swede
Turnip
Parsnip
Carrot
1 small brown onion or a medium leek
2 large cloves garlic
1 small bay leaf
1 small sprig of thyme
1 small sprig of rosemary
2 sage leaves
A branch of parsley
A handful of chervil stalks
Olive oil
6 whole peppercorns
A pinch of chili flakes
A piece of Parmesan rind about 6cm square
2 litres cold water
Salt
For the soup
A large handful of sorrel, 8 to 10 leaves per person
A bunch of chervil, about a tablespoon of leaves per person
4 eggs
4 tablespoons finely grated Parmesan
Nutmeg, grated
Black pepper, finely ground
4 small slices of sourdough bread
Serves 4
METHOD
Set the oven to 180°C.
To make the stock scrub all of the root vegetables well. There is no need to peel them unless they are really gnarly. Remove the leaves and any damaged parts and cut into medium dice. If using onion remove the dirty outer papery skin, but leave the rest of the skin on as this adds colour to the stock. Cut into eighths. Put all of the vegetables and the unpeeled garlic clove into a shallow roasting tin and drizzle over a couple of tablespoons of olive oil. Using your hands, mix the vegetables with the oil until well coated. Put into the oven and roast for 40 to 60 minutes. Stir the vegetables from time to time and remove from the oven when lightly browned and starting to caramelise.
Put the vegetables into a lidded saucepan with the water, herbs, peppercorns, Parmesan rind and chili flakes. If you are using leek in place of onion, trim off the roots, remove the tough outer layers, chop coarsely and add to the pot. Put the lid on and place on a high heat until it comes to the boil. Turn the heat down low and simmer gently for 30 minutes. Strain through a muslin-lined sieve, then pour back into the cleaned saucepan. You should have about 1.75 litres of liquid. Top up with hot water, if necessary. Season generously with salt. Put over a low heat and bring back to a gentle simmer.
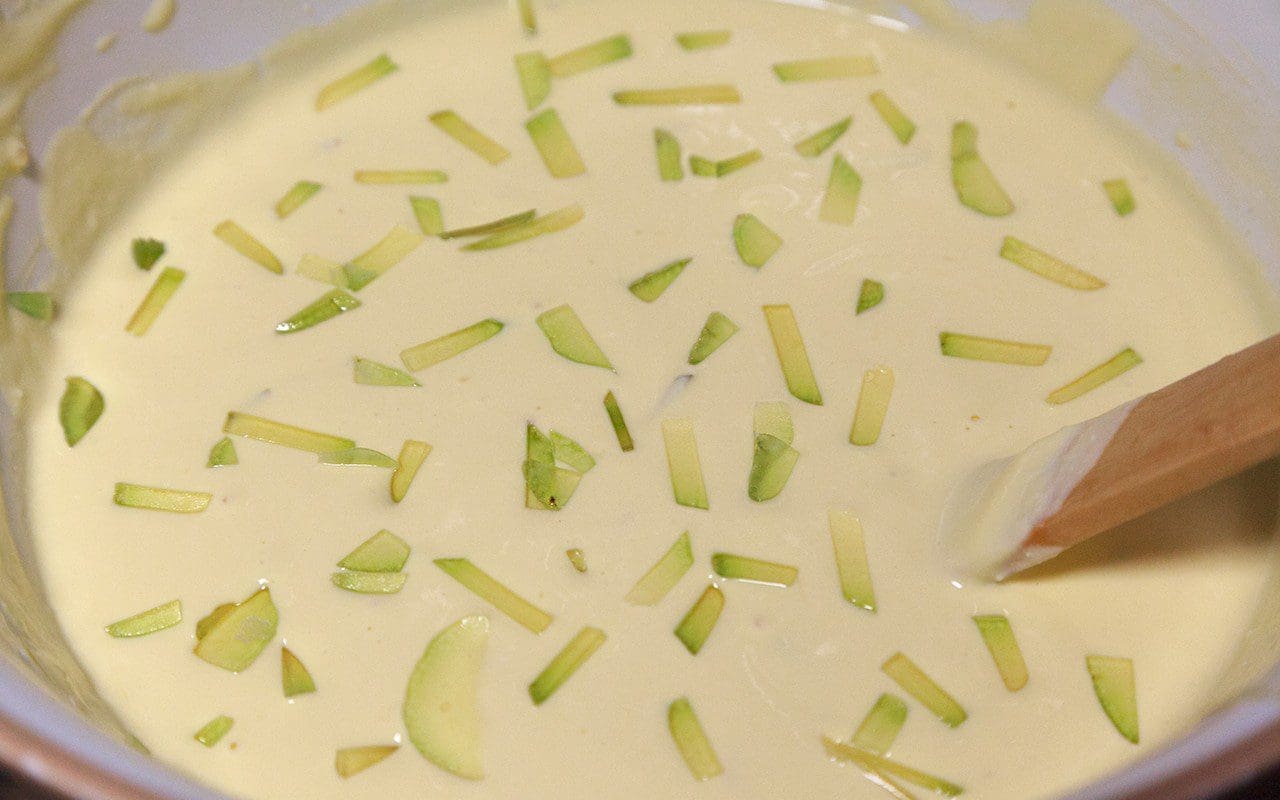
Strip the sorrel leaves from the stalks. Bundle and roll the leaves together. Using a very sharp knife, cut into the thinnest ribbons possible. Remove the leaves from the chervil and reserve.
Warm the soup bowls. Brush each side of the sourdough bread with olive oil and toast under a hot grill until lightly charred.
Break the eggs into a jug. Add the grated Parmesan, black pepper and nutmeg and whisk thoroughly.
Take the pan of stock off the heat. With the jug of beaten egg in one hand stir the stock briskly in one direction with the other so that it swirls around the pan, then slowly pour the egg into it in a trickle. The egg will cook on contact with the hot stock and form threads. Place a piece of toasted sourdough in the bottom of each soup bowls. Divide the sorrel and chervil equally between each bowl and immediately ladle over the hot soup. The sorrel will immediately turn khaki, but it will still taste delicious. Scatter some reserved sorrel and chervil on top.
Serve with additional grated Parmesan and olive oil if desired.
Recipe & photographs: Huw Morgan
Published 28 April 2018
Easter is a time for baking, when the gently spiced scent of Simnel cake, hot cross buns, saffron buns and Easter biscuits fill the kitchen. This year, however, I have forgone the buns and fruit cake, which still have a whiff of Christmas about them, in favour of something lighter and more subtle based on an Easter cake traditional in Italy. Known there by various regional names including pastiera napoletana or pizza di ricotta, this is a baked cheesecake, often flavoured with orange flower water and studded with vine fruits soaked in marsala or chopped citron peel. Sometimes bitter chocolate chips are added.
A friend brought me back half a candied citron from the market in Palermo last summer, she had been told of the local cakes it was used in and thought I would be able to find a use for it. I have been waiting all winter for the right moment. A translucent pale green, the colour of new spring foliage, I imagined it flecked through a primrose yellow custard coloured and flavoured with saffron, a spice with strong associations with Easter and spring, and a natural affinity with both cheese and honey, which I have used to sweeten the cake.
The honey was a gift from our neighbours, Josie and Rachel, who as well as keeping chickens, guinea fowl and a brace of beef cattle, have about ten hives on the their land in this valley. Every Christmas we look forward to the bag that they habitually leave by the back door containing a card, some ingots of beeswax and two jars of honey. As this local honey is so special I use it only where its floral flavour can really be appreciated and this cake is the perfect vehicle.
After the prolonged cold, grey and wet of the last few weeks, when we are pining for heat and warmth finally, a slice of this cheesecake is light and fresh and the colour of sunshine.
INGREDIENTS
Pastry
250g plain flour, preferably Tipo 100
125g unsalted butter, chilled
Pinch of salt
50g icing sugar
1 large egg yolk, retain white for filling
Iced water
Filling
500g ricotta
250g mascarpone
2 large eggs, separated
2 large eggs, whole
5 tablespoons honey
Generous pinch saffron – about 50 stamens
2 tablespoons milk
25g candied citron peel, coarsely chopped, or zest of 1 lemon
Serves 8-10
 METHOD
You will need a deep, fluted tart tin or springform cake tin 25cm in diameter.
Set the oven to 180°c.
In a very small pan scald the milk for the filling. Remove from the heat and add the saffron threads. Leave to stand until cool.
Make the pastry by sifting together the flour, salt and icing sugar. Cut the butter into small pieces and rub into the flour mixture until it resembles fine breadcrumbs. Whisk the egg yolk in a small bowl and add to the pastry mixture, stir through and then add just enough iced water to bring the dough together. Two to three tablespoons should be enough. Quickly and lightly form the dough into a ball without kneading. Wrap in clingfilm and chill in the fridge for 20 minutes.
Take the pastry from the fridge, unwrap it. On a lightly floured surface roll out until about 2 mm thick. Use the rolling pin to carefully lift the pastry over the tart tin. Gently press into the base and up the sides of the tin. Trim the overhanging pastry by tearing it away or use a knife if you prefer a tidier finish. Prick the base of the pastry with a fork. Line the pastry case with a piece of baking parchment, fill with baking beans and bake blind for 15 minutes. Remove the beans and baking parchment and return to oven for a further 5-7 minutes until it looks dry and pale gold in colour. Remove and allow to cool.
For the filling put the ricotta and mascarpone in a large bowl. Add the honey and stir well to dissolve. Add the saffron milk and stir well until the whole mixture is pale yellow.
In a bowl whisk together the two egg yolks and the two whole eggs. Add to the cheese mixture with the chopped citron peel and stir well.
In a clean metal bowl whisk the three egg whites (one retained from the egg used in the pastry) until they reach the soft peak stage. Add one tablespoon of white to the cheese mixture and gently fold in. Add the remaining egg white a tablespoon at a time. When folding in, bring the mixture up from the bottom of the bowl, until well combined.
Gently pour the filling into the pastry case. Bake in the oven for 60 to 75 minutes, until well risen and golden brown on top.
Remove from the oven and allow to cool. Do not be alarmed, the filling will sink.
Serve at room temperature.
Recipe & photographs: Huw Morgan
Published 31 March 2018
Although the excesses of Christmas and New Year may already seem far behind us, there are still a few culinary reminders lingering in the pantry. Now is the time to use up these last festive remnants, before they are consigned, with lashings of guilt, to the bin or the compost heap. A tin of macaroons will be crushed to make a crumble topping for damsons from the freezer, while the end of a jar of mincemeat mixed with some apple puree will make a filling for some quick turnovers. In the fridge are the last heels from the cheeseboard, including a fairly large piece of Stilton that defeated us, while in the fruit bowl, along with some wizened lemons and limes, are a few handfuls of shell on walnuts wondering what they did to deserve such ignominy.
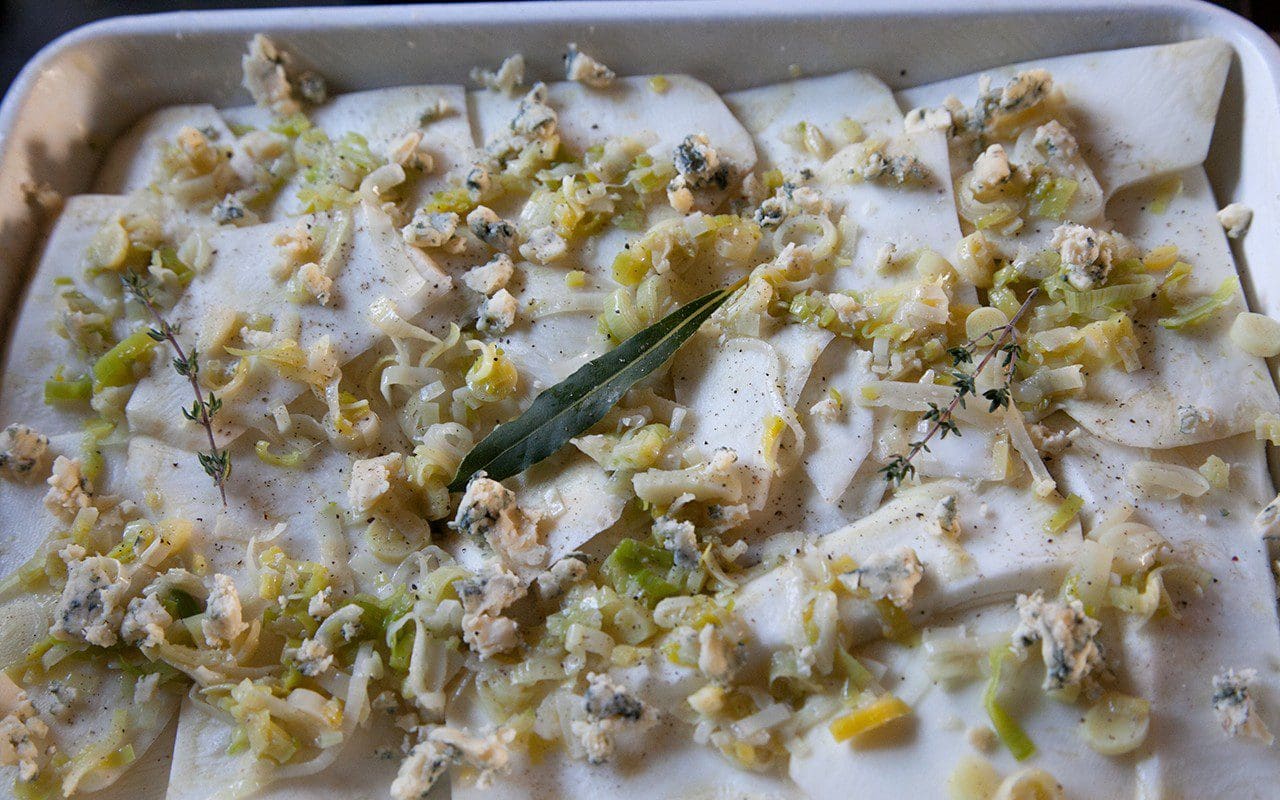
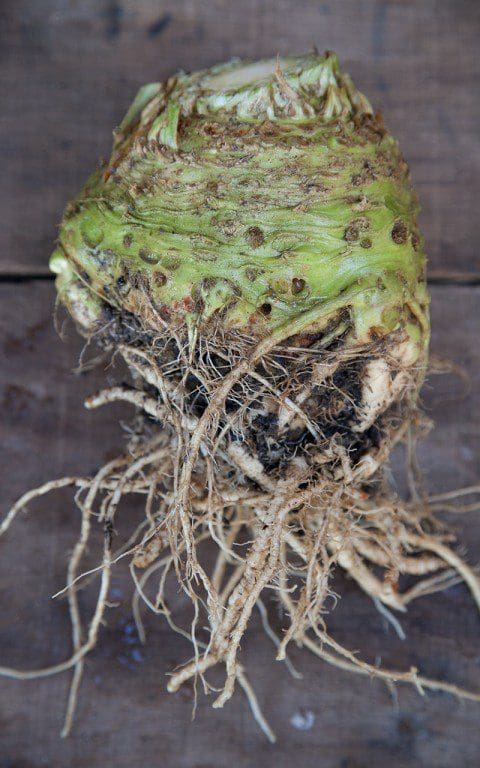
When the days are as cold as they have been recently, with the icy damp getting into your bones, a slow-cooked vegetable gratin holds the heat and is guaranteed to warm you from the inside out. This might be a simple potato boulangère, one made with spiced pumpkin and tomato, or something earthier made with roots. In the Kitchen Garden, alongside the cabbages and kales, we have a good stock of roots, but it is the celeriac to which we most often turn, preferring it to the sweetness of parsnips. While it has a mineral, earthy flavour with natural umami that pairs well with nuts and sharp cheeses, the delicacy of leeks – growing in the neighbouring bed – are a less overpowering companion than onions.
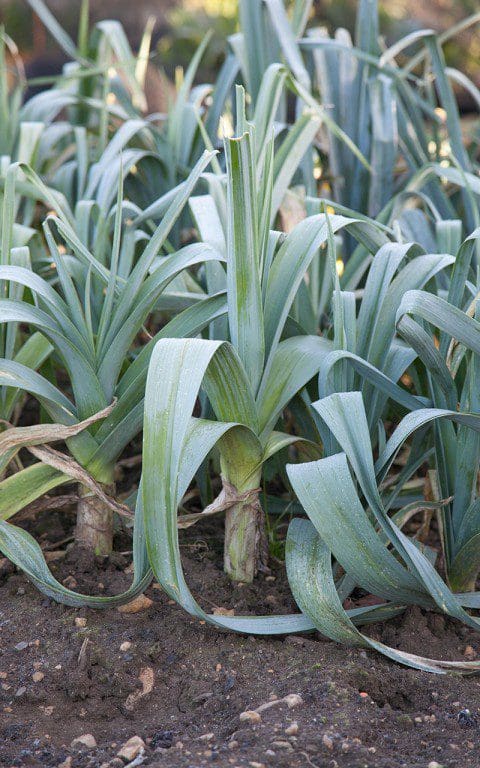 Leek ‘Carentan’
So much do we like celeriac that we give over half a bed to it. Twenty plants that see us through the winter from November to early March. Celeriac requires a long growing season, and it is only a few weeks until we sow the seeds of this coming winter’s crop, usually at the end of February. This we do under cover, as the seedlings are minuscule and prone to damping off. Germination can also be a bit erratic, so we always sow half as many again as we need to cover for losses and no-shows. Once germinated they take a couple of months to reach transplanting size. This happens in early summer, when they are planted out into soil that has been previously manured, as celeriac needs open, moisture-retentive ground with plenty of light to thrive. We have also found that the secret to good-sized roots is consistent watering throughout the summer, while a straw mulch also helps to retain moisture.
This gratin is rich enough to serve as a main course, in which case a simple green salad or boiled, buttered cabbage are accompaniment enough. However, with its strong flavours, it makes a good side dish for roast chicken or beef.
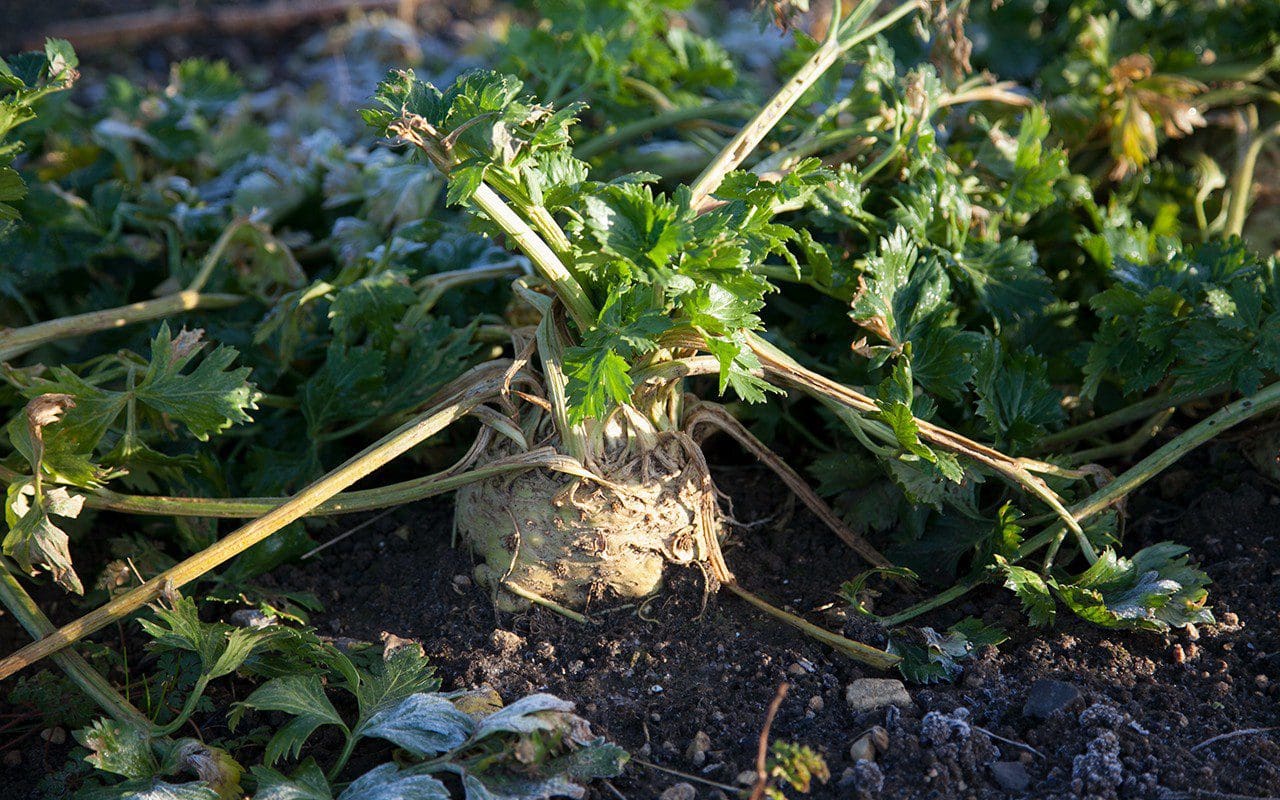 Celeriac ‘Prinz’
INGREDIENTS
1 large or 2 medium celeriac, about 1.2 kg peeled weight
3 medium leeks, about 100g trimmed and finely sliced
2 cloves garlic, minced or grated
100g butter
4 small bay leaves
8 springs fresh thyme
Fresh nutmeg, grated
175g Stilton or other blue cheese
250ml single cream
50g breadcrumbs
75g walnuts, coarsely chopped
Serves 6 as a main course or 8 as a side dish.
METHOD
Preheat the oven to 200°C.
Melt 20g of butter in a saucepan over a low heat. Add the leeks and garlic and a good grating of nutmeg. Stir to coat the leeks with butter. Put the lid on the pan and sweat the leeks until soft and translucent, stirring from time to time. Do not allow them to colour. Remove from the heat and allow to cool.
Quarter the celeriac roots and slice to the thickness of a pound coin using a sharp knife, mandolin or food processor. Put the celeriac slices into a bowl of water to prevent browning.
Melt another 20g of butter in a small pan. Using a pastry brush use it to generously coat the base and sides of a ceramic gratin dish measuring around 22 x 30cm.
Drain the celeriac, pat dry with a clean tea towel and cover the base of the gratin dish with one layer of slightly overlapping slices. Take 100g of the Stilton and scatter a quarter of this and a quarter of the leeks over the celeriac. Place one bay leaf and two sprigs of thyme on top. Season with a little salt and pepper. Arrange another layer of celeriac on top and press down with the palms of your hands to flatten. Repeat with the remaining ingredients, finishing with a fifth layer of celeriac.
Pour the cream over the top and dot with some butter. Cover the gratin dish with foil and bake in the oven for 45 minutes to an hour, until the celeriac yields to the point of a knife. Remove the foil. Press down on the top of the gratin with a fish slice to compress and flatten.
Melt the remaining butter in a small pan. Put the breadcrumbs and walnuts in a mixing bowl and stir to combine. Pour over the melted butter and stir until the breadcrumbs are well coated. Crumble the remaining 75g of Stilton into the breadcrumbs and stir to combine. Spread the breadcrumb mixture over the top of the celeriac and return to the over for 30 minutes until well browned and bubbling. Take out of the oven and allow to stand for 10 minutes before serving.
Recipe & photographs: Huw Morgan
Published 20 January 2018
Seldom has anyone said, “I really fancy a turnip for dinner.” Along with their cousin the swede, turnips suffer from a longstanding reputation as being good only for animal fodder or the poverty-stricken.
The first reference to turnips (Brassica rapa ssp. rapa) is in John Gerard’s Herball, or Generall Historie of Plantes (1597), where he writes, “It groweth in fields and diverse vineyards, or hoppe-gardens in most places in England. The bulbous or knobbed rotte, which is properly called rapum or turnip, and hath given the name to the plant, is many times eaten raw by the poor people, but most commonly boiled.” Over two hundred years later little appears to have changed when John Rogers states in The Vegetable Cultivator (1839), “That turnips are nourishing has been proved. In Wales, a few years since, they formed a considerable portion of the food of the lower classes’.
Even those doyennes of middle class Victorian cuisine, Eliza Acton and Mrs. Beeton, can suggest little more to do with turnips than boiling or mashing them. The most complicated treatment from both requires only a dressing of white cream sauce on the boiled roots. This addition of dairy produce in the form of milk, butter or cream provides the contrast to their slight bitterness – common to all brassicas – and which I imagine made them more acceptable to palates unatuned to this flavour. In oriental cooking, where bitter flavours are more highly prized, turnips are simply steamed or braised and cleanly flavoured with soy, mirin and fresh ginger. It is more common for them to be used raw as brined pickles or as a grated accompaniment, in the same manner as daikon, and they can replace these large radishes in all recipes that call for them, although their flavour is not as strong.
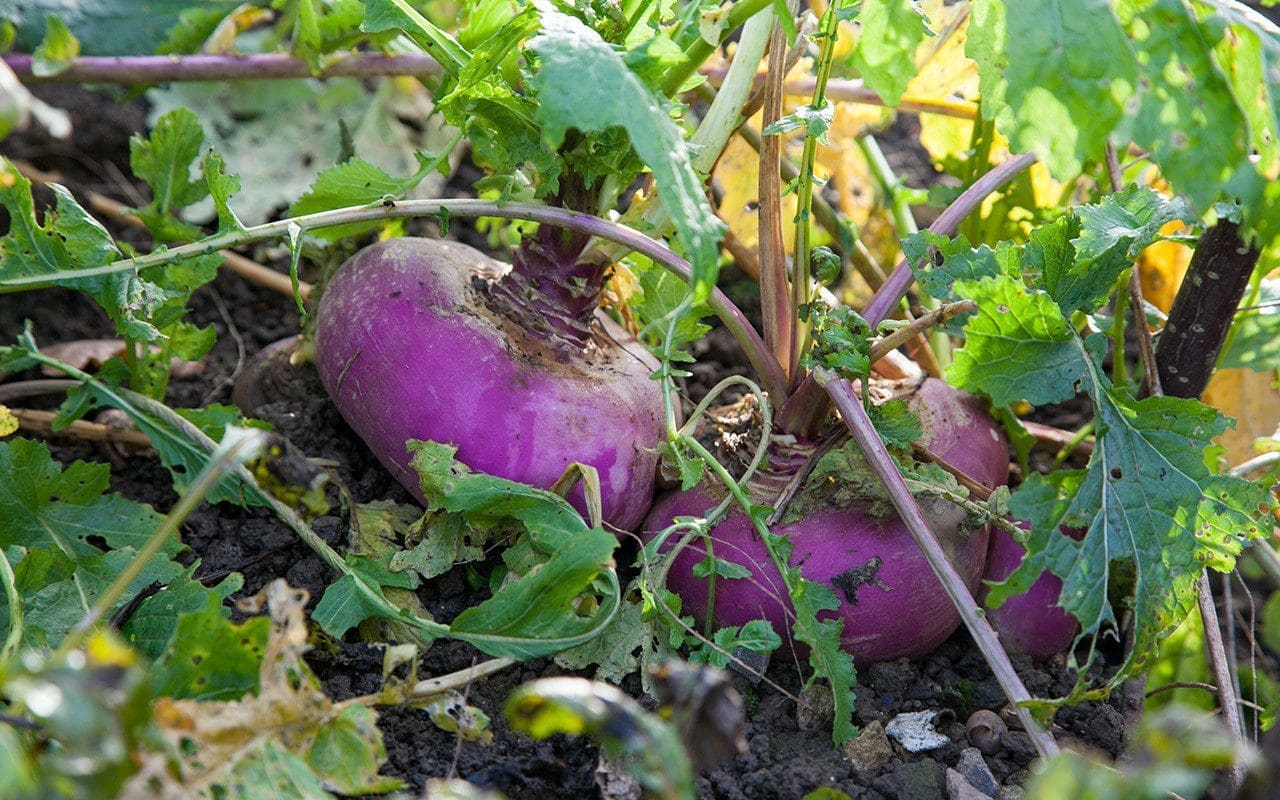 Turnip ‘Purple Top Milan’
There are now a number of varieties available to grow, from the traditional purple top types through more decorative red and orange skinned varieties to the small, sweet, snow white cultivars from Japan. We rely on the commonly available ‘Purple Top Milan’, and successional sowing throughout the year from April to August provides us with a steady supply from late spring to early winter. Being fast growing and water lovers turnips do best in moisture retentive soil which has been enriched with manure for the previous crop. Early sowings are very prone to attack from flea beetle, which can decimate the young foliage, so these we protect with a layer of fleece or Enviromesh until the seedlings are large enough to fend for themselves. With a higher water content than swedes, turnips do not respond well to frost, so they should be lifted now and stored in sand or dry compost in a cool, dark shed for winter stores.
This recipe came from a desire to do something with our turnips that would give them the lead role in a main dish that would challenge people’s opinion – ours included – of this vegetable as a nothing more than a supporting player. With the current nip in the air as winter’s grip gets hold we are also increasingly drawn to spiced food, and a fresh curry is a great way to warm up after a day in the garden. Ample use of mustard seeds keep things in the brassica family, while coconut milk provides the contrasting equivalent of dairy. Unsurprisingly this recipe works just as well with swede, or any of the more commonly available root vegetables such as beetroot, parsnip and celeriac, although you may want to adjust the seasoning to counteract the sweetness of these last three with the addition of some lemon or lime juice just before serving. The coconut chutney is by no means essential, but the extra effort involved is minimal and helps turn this humble vegetable into a memorable main meal.
INGREDIENTS
Curry
800g turnip peeled and cut into 1cm dice
1 large onion, peeled and coarsely chopped
4 garlic cloves
4cm long piece fresh ginger, peeled
3 small green chillies, or more to taste
The stems of a small bunch of coriander
3 teaspoons brown mustard seeds
8 fresh curry leaves
½ teaspoon freshly grated turmeric, or ¼ teaspoon of powdered
2 teaspoons ground cumin
½ teaspoon ground fenugreek
2 small bay leaves
300ml coconut milk
400ml tomato passata
2 tablespoons red lentils
2 tablespoons rapeseed or sunflower oil
Salt
Chutney
150g fresh coconut, peeled, or unsweetened desiccated coconut
2 tablespoons chana dal
1 small green chili
2cm long piece fresh ginger
Salt
Temper
1 teaspoon urid dal
½ teaspoon brown mustard seed
½ teaspoon cumin seed
4 curry leaves
2 dried red chillies
A pinch of asafoetida
2 tablespoons rapeseed or sunflower oil
Serves 4 as a main or 6 as part of a mixed meal
METHOD
To make the curry first put the onion, garlic, ginger, chillies and coriander stalks into a small liquidiser (a Nutribullet type is ideal for this). Process into a paste. Scrape the sides of the bowl down several times to ensure a smooth consistency.
Heat the oil in a pan large enough to take all of the ingredients. When smoking add the mustard seeds and curry leaves and cook until the seeds begin to pop and the leaves are translucent.
Add the onion puree and cook over a high heat, stirring continuously, until the mixture has given up most of its water and is starting to become golden. About 5 minutes. Add the ground dried spices and the bay leaves and cook for another minute until fragrant. Add the tomato and stir well. Cook for another 3 minutes, stirring frequently.
Add the turnip to the pan. Stir well to coat all the pieces. Bring to the boil then turn the heat to low and simmer until tender. This will take about 20-25 minutes, but will be less for young turnips and maybe more for older ones. The turnips create quite a bit of liquid, but stir from time to time to ensure that it doesn’t catch.
Add the lentils and stir to incorporate. Continue to cook on a low heat for 15 minutes until the lentils soften.
Add the coconut milk and turn the heat back up to high. Boil until the lentils have disappeared into the sauce, and then reduce until there is enough to just coat the turnips. Season with salt. Keep warm.
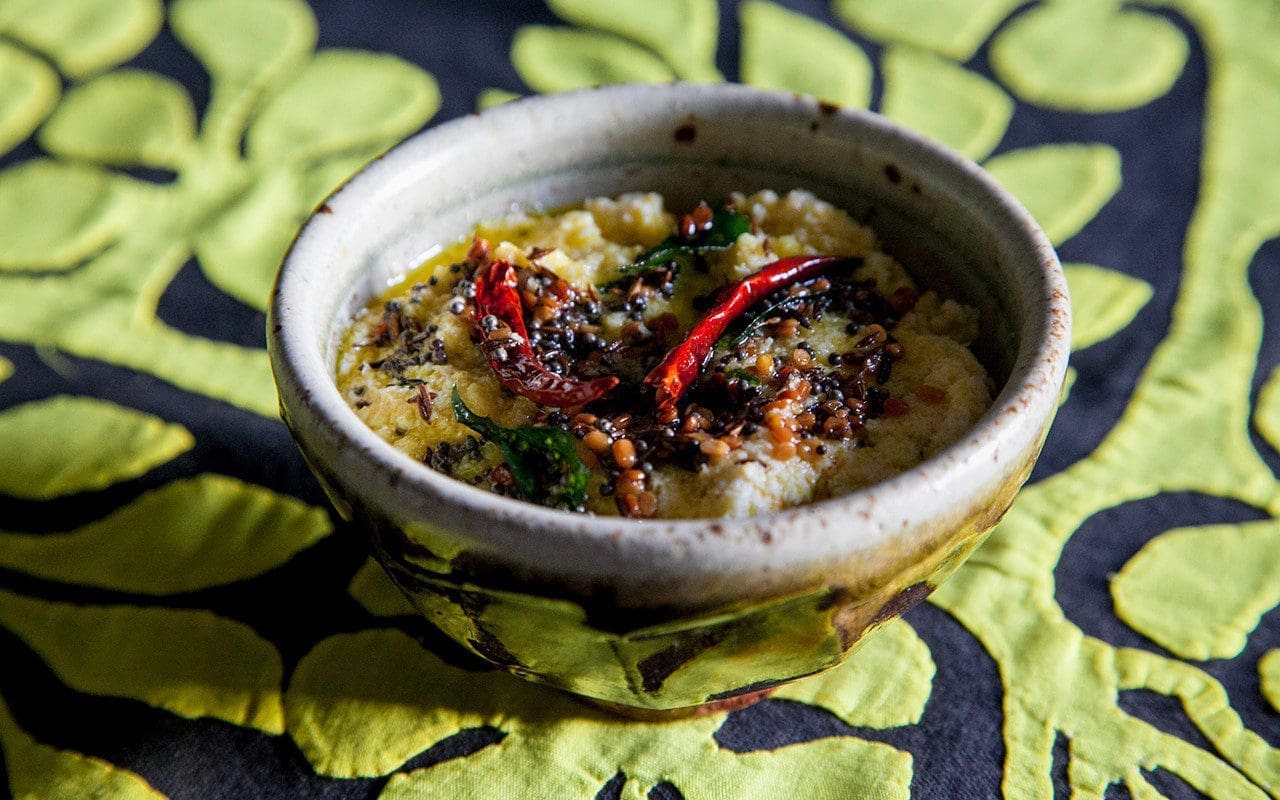 Coconut Chutney
While the curry is cooking make the coconut chutney. Heat one tablespoon of oil in a small frying pan. When smoking put in the chana dal and fry for a couple of minutes until toasted and dark orange in colour. Put the chana dal, coconut, green chilli and ginger into a small liquidiser and process until smooth. You may need to loosen the mixture with a few tablespoons of water or, if you have some coconut milk left from a 400ml can opened for the curry, some of that. Season with salt to taste.
To make the temper heat the remaining tablespoon of oil in the same small frying pan in which you cooked the chana dal. Add the urid dal and fry for a minute or two until golden, then add the remaining ingredients. Continue to cook until fragrant and the mustard seeds start to pop.
Mix half of the temper into the chutney. Transfer this to a serving bowl and then pour the remaining temper on top.
Put the hot curry into a warmed serving dish. Garnish with a few fried curry leaves, some rings of finely sliced red chilli and a scattering of torn coriander leaves. Serve with boiled rice or sponge dosa. This also makes a very good filling for a crisp masala dosa.
Recipe & photographs: Huw Morgan
Published 2 December 2017
This week we have reached the tipping point where autumn turns to face winter. There is a nip in the morning air and, as soon as the sun sets, a jacket and scarf are needed outside. So far we have avoided a frost, but it is only a matter of time, and so the pumpkins that until last weekend were ripening in October sunshine, are now safely tucked up inside.
These moments when the seasons make a noticeable shift towards the next also have an effect both on what is available to eat in the garden and what we feel like eating. The first celeriac have been pulled, and have so far been used in a sharply dressed remoulade and a creamy soup flavoured with bay and nutmeg. Pumpkins have been made into vibrant curries with lemongrass, ginger and coriander, or hearty gratins with fontina cheese and a crust of herbed breadcrumbs. We are also just starting on the brassicas, plumping for romanesco and early sprouting broccoli before we get firmly stuck into the savoys and kales. There are also the windfalls to use up before they turn to mush, and the very last of the hedgerow fruits, both of which give us a connection back to the last days of summer, when there was still some heat in the sun.
 Windfall apples and pears from our neighbours
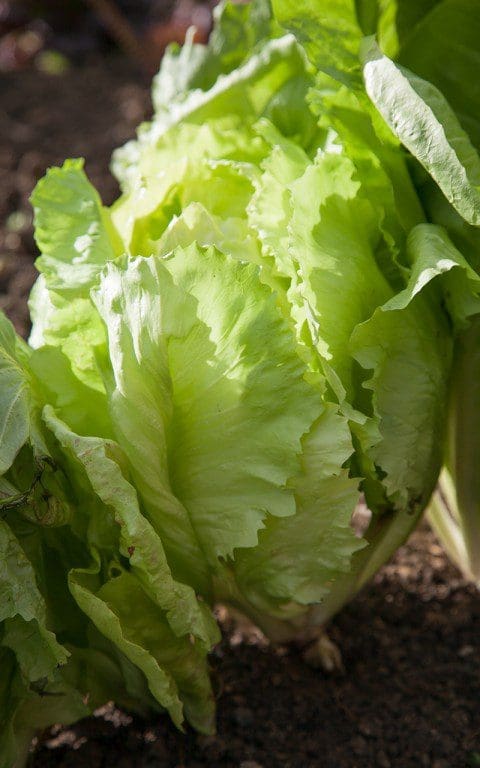
Although we still have a few summer sown lettuces hanging on in there, they quickly go to seed now, and can’t be relied on to provide salad for much longer. However, the chicories and radicchios are invaluable at this time of year, as they are incredibly hardy and come into their own as the temperatures fall. We grow those varieties that we have found to be the most reliable over the years; the elongated blood red Rossa di Treviso (both Tardivo and Svelta), the spherical, strongly veined Palla Rossa and the delicately mottled Variegata di Castelfranco. These we sow throughout the summer, starting in May for summer salad leaves, with successional sowings in June, July and August. The June and July sowings are now hearty enough to eat, while the plants from the final sowing will keep us going through the Christmas period and into the new year.
As the season progresses the bitter taste of chicory provides a welcome and fresh contrast to the roots and squashes which increasingly will be either roasted, mashed or baked in vegetable casseroles. Paired with ingredients that provide a sweet or earthy foil to their bitterness, salads of chicory make regular appearances on our winter table.
 The mottled leaves of Chicory ‘Variegata di Castelfranco’ develop as the weather gets colder
This salad bridges the autumn and winter larders by using the first of the chicory hearts, combined with the familiar autumn combination of apple and blackberry, with bite provided by crisp, roast hazelnuts. Here I have used both the hearts and outer leaves of Variegata di Castelfranco, but you can use a mixture of any of the green and red varieties available. For the dressing I use hazelnut oil and a spoonful of homemade bramble jelly to accentuate the flavour of the main ingredients. Any lightly flavoured oil such as rapeseed or sunflower and a little honey will do just as well. It is important that the apple slices hold their shape when cooked, so choose a firm eating apple. Pears work equally well as and, as the blackberries disappear until next year, the addition of a sharp blue cheese such as Gorgonzola, Roquefort or Picos de Europa adds a piquancy that goes well with the nuts.
This is good served with celeriac or parsnip soup, or a creamy pumpkin pasta or risotto.
INGREDIENTS
Salad
1 large or 3 small heads of chicory or radicchio
2 apples
100g blackberries
100g hazelnuts
A large knob of butter, about a tablespoon
1 tablespoon hazelnut or other lightly flavoured oil
Dressing
1 tablespoon cider or sherry vinegar
2 tablespoons reduced blackberry juice
1 teaspoon bramble jelly or honey
6 tablespoons hazelnut or other lightly flavoured oil
A large pinch of sea salt
Serves 4
METHOD
Remove the leaves from the chicory and tear into large pieces, discarding any coarse parts of the central rib. Wash in cold water and then dry in a salad spinner or clean tea towel. Keep to one side.
Put the blackberries in a small pan with a tablespoon of water. Put on a low heat with the lid on and gently bring to a simmer for a few minutes until the fruit gives up its juice. Do not allow to boil.
Strain the blackberries in a sieve over a bowl and reserve. Put the juice back in the pan and simmer until reduced to about two tablespoons. Reserve for the dressing.
Put the hazelnuts on a baking tray into a hot oven (200°C) for 5-8 minutes. Check them regularly to ensure they don’t burn. Remove the nuts from the oven and tip into a clean tea towel. Gather the four corners of the cloth together and rub the nuts hard to remove the dry skins. Remove the cleaned hazelnuts from the cloth and reserve.
Peel and core the apples. Cut into quarters and then cut each quarter into four slices. Put into a bowl of water acidulated with lemon juice to prevent them discolouring. In a large, heavy-bottomed frying pan, which is large enough to take all of the apple slices, heat the hazelnut oil and butter together over a moderate heat. Remove the apple slices from the bowl of water and dry on a clean cloth. When the butter starts to foam, lay the slices of apple in the pan. Turn the heat up and cook until they start to caramelise. Carefully turn the slices over and cook until browned on the other side. Remove the apple slices from the pan with a slotted spoon, being careful not to break them. Put on a piece of kitchen paper.
Make the dressing by putting the vinegar, reserved blackberry juice, bramble jelly or honey and salt into a bowl. Whisk until the salt has dissolved. Add the oil and whisk again until emulsified.
To assemble the salad arrange the chicory leaves on a large serving plate. Distribute the apple slices, blackberries and hazelnuts evenly and then spoon over the dressing. Eat immediately.
Recipe & photographs: Huw Morgan
Published 4 November 2017
One of the best things about growing your own fruit and vegetables is the opportunity it provides to eat things that are seldom, if ever, available at the greengrocers. Before we planted our orchard I had never eaten a Mirabelle plum. Although I had pored over Jane Grigson’s description of their superior flavour, and heard from my Francophile friend Sophie of the delicious tarts and pies she had eaten in Lorraine, I had always had to imagine what they tasted like.
The Mirabelle is the smallest plum, barely bigger than a large marble, but what it lacks in size it definitely makes up for in flavour. Perfumed, and with the same floral hint of muscat that you get from the best gooseberries, they are the plum par excellence. We are now getting a very decent harvest and, when something so rare and prized suddenly becomes easily available, it feels important to celebrate the moment with a dish that makes the most of this fleeting moment.
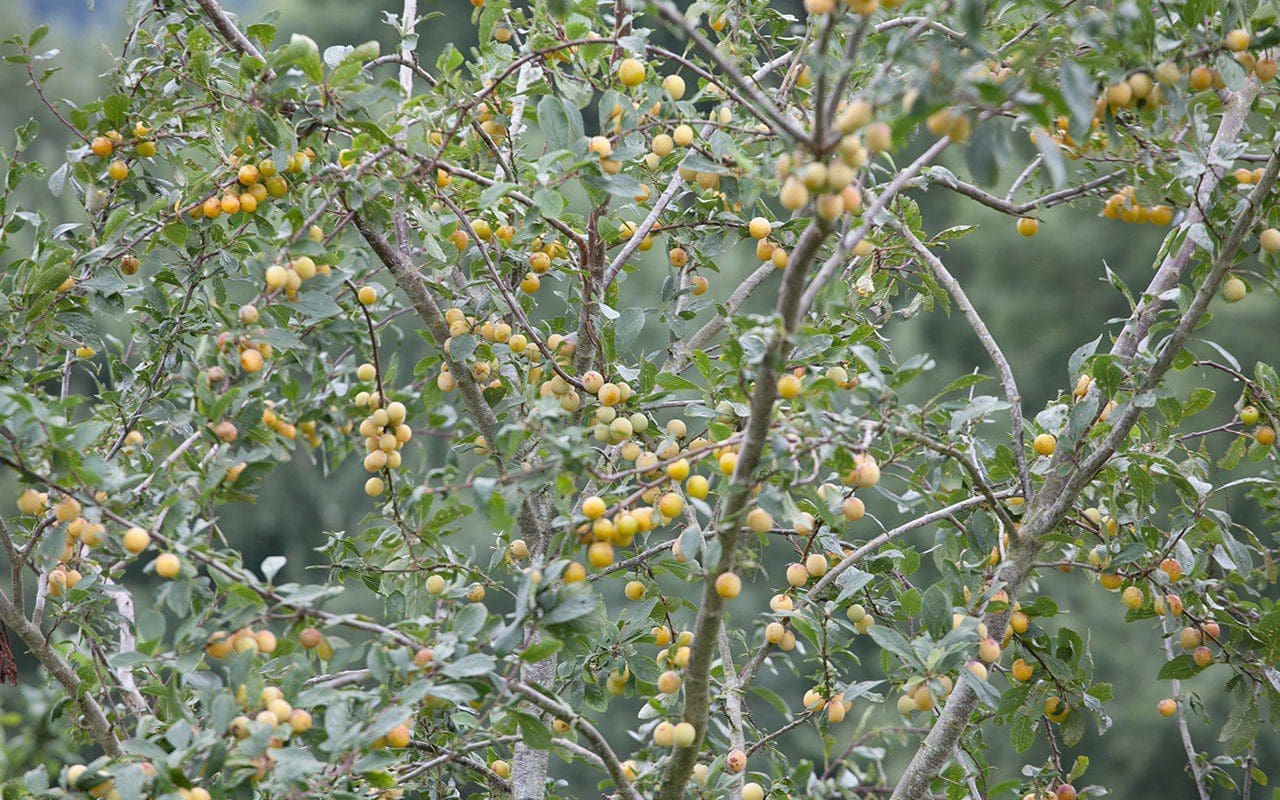
You need a fair number of Mirabelles to make a tart of this size, but they are quick to pick. De-stoning a large bowl of them also appears an intimidating prospect but, being a ‘freestone’ variety of plum, where the stone separates easily from the flesh (unlike ‘clingstone’ plums where the flesh adheres to the stone) they are also easy to prepare.
Plums and almonds are all from the Prunus family, and so make perfect companions in in desserts. The flavour of the almond frangipane is improved by the addition of a number of kernels taken from the stones, which enhances the bitter almond flavour, but a few drops of almond essence or, if you happen to have it, a teaspoon or two of plum eau de vie do a similar job.
The Mirabelle season is painfully short. The tart here was made last weekend, when the plums were at their peak of perfection. This week the tree is bare. So, if you have missed the moment or can’t get hold of them, you can use any other stone fruit in their stead. Greengages are the next best choice of plum, but other yellow cooking plums would work, as would apricots. Later in the season the frangipane can be made with ground walnuts, which makes a more autumnal partner for sharp red or purple plums. This year I plan to try a walnut version with some of our damson glut but, being mouth-puckeringly sharp, they will need to be poached in a sugar syrup first.
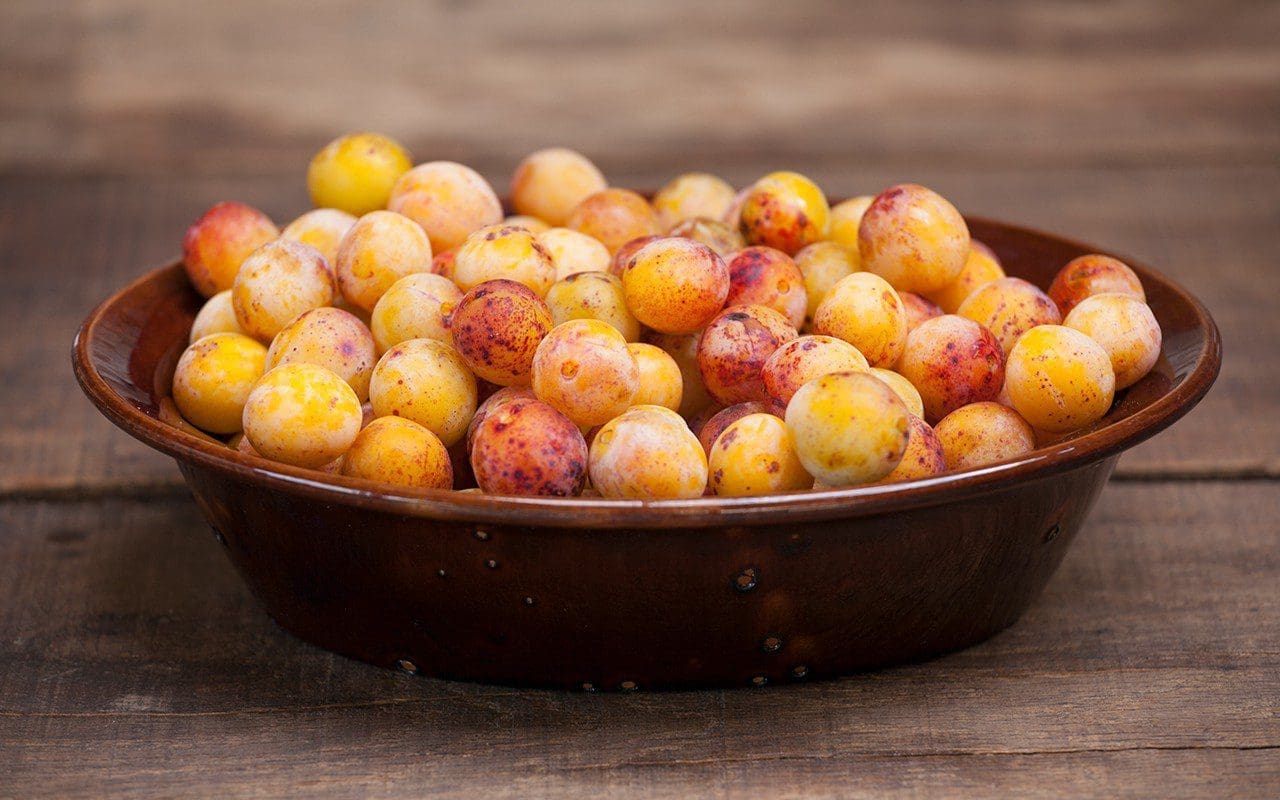 Mirabelle de Nancy
INGREDIENTS
500g Mirabelle plums, stoned and halved (weight after stoning)
Pastry
300g plain flour
150g unsalted butter, well chilled
3 tbsp icing or caster sugar
1 egg yolk, beaten
Iced water
Almond Cream
150g ground almonds
150g caster sugar
150g butter, melted
1 large egg, beaten
2 tbs double cream
Kernels from about 20 Mirabelles
Serves 12
METHOD
You will need a 30cm shallow, fluted tart tin.
Set the oven at 180°c.
Put the flour and butter into a food processor and process quickly until the mixture resembles very fine breadcrumbs. You can use your hands to do this, but a processor is better as it is important that the pastry stays as cold as possible. Add the icing sugar and pulse again quickly to combine. With the motor running add the egg yolk, and then enough chilled water, a tablespoon at a time, until the dough just starts to come together. Immediately turn off the processor and bring the dough together quickly and lightly with your hands until smooth. Do not knead it.
Immediately roll the dough out, preferably on a cold, floured slate or marble surface, with short, light movements until just large enough to line the tin. To get the pastry, which is very short, into the tin, ease your floured rolling pin underneath it and then very gently lift it over the tart tin until it is centred, before removing the rolling pin by sliding it out. Again handle the pastry very gently as you press it into the corner and fluted sides of the tin. Trim the pastry in line with the top of the tin, prick the base with a fork and then chill in the fridge for 20 minutes.
Remove the pastry case from the fridge, line it with baking parchment and then fill with baking beans. Bake blind for 20 minutes. Remove the baking beans and parchment and return to the oven for a further 10-15 minutes until the pastry looks dry but has not coloured. Remove from the oven and leave to cool.
Turn the oven up to 200°c.
Put the ground almonds and sugar in a mixing bowl, reserving a tablespoon of sugar. In a mortar and pestle crush the Mirabelle kernels with the tablespoon of sugar then add them to the ground almonds, before mixing in the butter, egg and cream.
Spread the almond cream evenly over the base of the cooled tart case. Then, starting from the outside, arrange the Mirabelles on the almond cream with their cut sides facing up and so that they are just touching. Push each one gently into the cream as you do so.
Bake for 30-40 minutes, until the pastry is well coloured and the mirabelles are bubbling.
Remove from the oven. Allow to cool for 15 to 20 minutes before carefully removing from the tart case.
Serve warm with cold pouring cream.

Recipe and photographs: Huw Morgan
Published 2 September 2017
It’s not long now before we head back to Greece for our annual summer holiday. We are creatures of habit and have been going back to the same island for several years. We enjoy the routine of familiarity; the locals who now recognise us as we wander round town, the meditative walk to the black sand beach and the welcoming, energetic atmosphere of the panagyri, the numerous village festivals focussed on food and dancing. Food at the panagyri is free, and you eat what you are given, but this is no hardship as, without fail, everything is home-cooked and delicious.
One dish that always makes an appearance on the communal tables is skordalia, the thick garlic sauce that usually accompanies simple, boiled greens. These are most often beet greens, vlita (amaranthus) or horta, a mixture of foraged wild greens which can include purslane, dandelion, nettle, chicory, shepherd’s purse and sow thistle.
However, the first time we were served skordalia, it came to the table as a dip with breadsticks, and I was immediately reminded of an identical dish we used to eat every night at a beach restaurant on the Andalucian coast just on the edge of the Cabo de Gata Natural Park, the location of our last long-term holiday crush. When I asked, I was told that this garlic dip was called ajo blanco, which confused me, since I was familiar with the chilled soup of this name, sometimes called ‘white gazpacho’. It transpired that the ingredients were exactly the same – garlic, bread, almonds, oil and vinegar – it was just the proportion of ingredients that was different, and with less water added.
When I mentioned the similarity of this Spanish dish to the island locals they were really interested, and informed me that the skordalia on this island was unusual in that it was made with bread and almonds, whereas most traditional recipes are made either solely with potato, or bread and walnuts. Indeed, if you Google skordalia there is a huge range of differing recipes and, as with all such traditional dishes, although the core ingredients remain the same, every region has its own version, which also differs from family to family.
However, both the ajo blanco and skordalia of our holidays had a similarly light and creamy texture, which I knew in Spain was achieved through the addition of cold water as well as oil. So this recipe is the result of some experimentation in an attempt to match these two versions, and so may not be one for skordalia purists.
This is a great dish to foreground our recently harvested garlic and, given that skordalia is little more than a vehicle for it, the garlic you use for this should be as fresh and sweet as possible. We grew four varieties this year; Thermidrome, Germidour, Sprint and Printanor. We did a raw taste test immediately after harvesting and, of the four, we found Sprint to be the sweetest.
The quality of the bread is equally important, so use a sourdough with a good crumb, if possible. Cheap, white bread will turn to glue. Blanched almonds produce a whiter result, but the skins of unblanched almonds add an attractive, wholesome speckle to the dish.
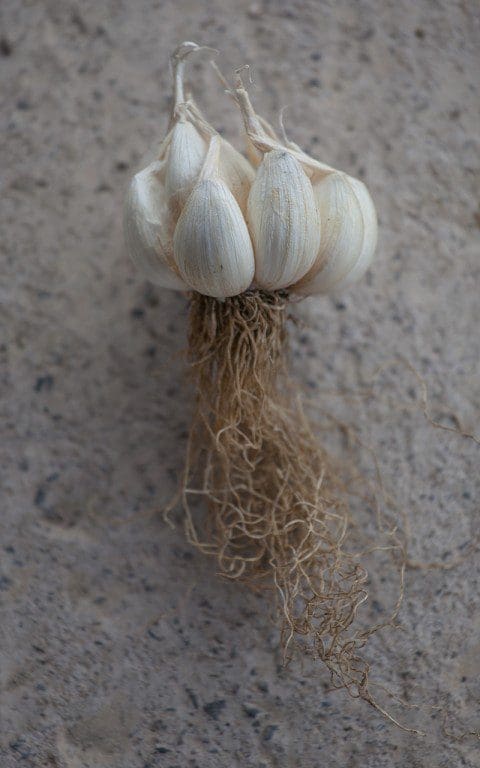 Garlic ‘Sprint’
INGREDIENTS
100g stale white bread, crusts removed
50g almonds, blanched or with skins
3 cloves garlic
1 teaspoon sea salt
1-2 tablespoons red wine vinegar
150ml olive oil, or more if required
Up to 175ml iced water
Serves 6 as an appetiser, 4 as an an accompaniment to a main course
METHOD
Soak the bread in cold water for 30 minutes then squeeze out as much water as possible.
Crush the garlic cloves with the salt in a mortar and pestle until you have a smooth paste.
Put the bread, garlic, almonds and vinegar in a food processor and blend until smooth, scraping down the bowl every now and again.
With the motor running on a high speed slowly add the oil until a smooth emulsion is formed. Then add the iced water until it reaches the consistency of fresh mayonnaise. Taste and adjust seasoning with additional salt and vinegar as required.
Transfer to a bowl. Cover with cling film and refrigerate until needed. Remove from the fridge immediately before serving and stir well. If the mixture has thickened considerably beat in a few more tablespoons of cold water.
Spoon the skordalia onto a dish and drizzle over a little more olive oil. Serve as an appetiser with breadsticks, or alongside boiled greens. Spinach, chard or young kale would be suitable replacements for the traditional beet greens or amaranthus.
Recipe & photographs: Huw Morgan
Published 5 August 2017
One of the goals we set ourselves when we started Dig Delve was for the writing to be as current as possible. A piece on crabapples the week they are in full bloom, a report of a garden visit made just a couple of weeks previously, and recipes using the best from the kitchen garden and hedgerows as they come into season. Many of the pieces are written the day before publication, so this ambition is not without its challenges, since Dan is often travelling for work, we need to have holidays, and sometimes other life events simply have to take precedence.
Dan has been up north this week. Firstly visiting the new RHS Chatsworth Flower Show and then on to Lowther Castle in Cumbria, where they are celebrating their official opening this weekend. So it was down to me to come up with this week’s piece.
However, like most of the country, I was up into the small hours of Friday morning watching the election coverage with bated breath. The consequent late morning start, with the accompanying time required to get a handle on what was happening in parliament, meant that I had to think on my feet to come up with a recipe for today’s issue.
I had originally thought to make a gooseberry and elderflower ice. Whether ice cream or sorbet I hadn’t decided, but, after half an hour Facetiming a friend in New Zealand who had called for an election update, it was clear that I wasn’t going to have the time to faff around with sugar syrups or custards or the freezing required afterwards. I needed something simple and immediate.
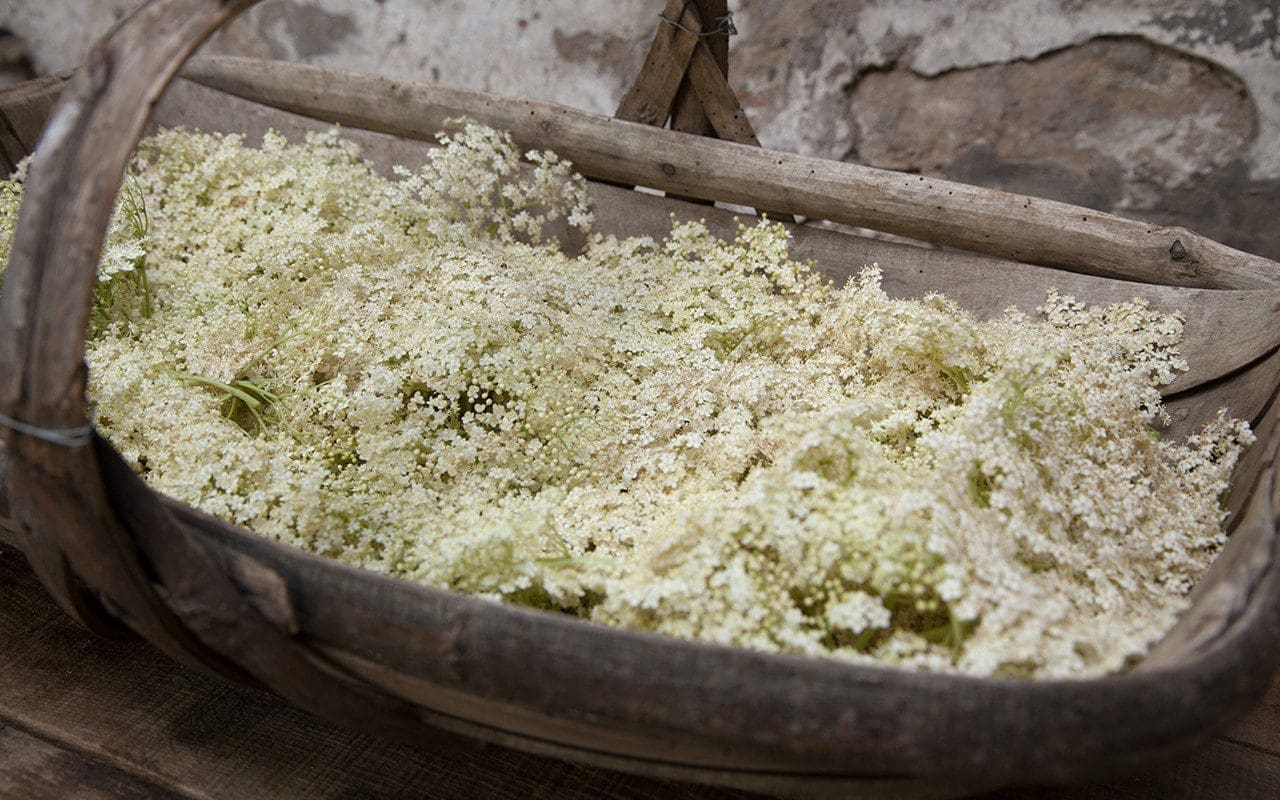
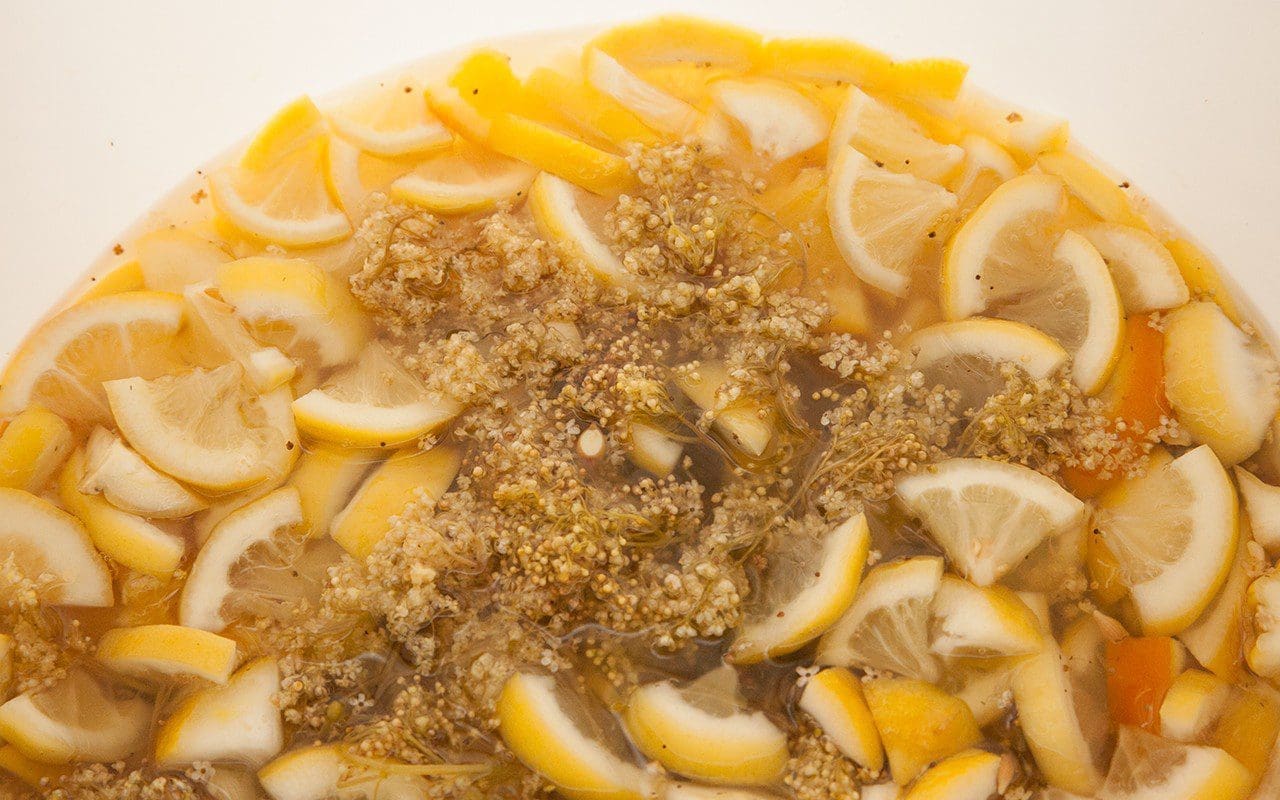
Earlier in the week I had got my first batch of elderflower cordial going and it was ready to strain and bottle. I try and make a large batch every year, but have been foiled for the past two by a combination of constant wet weather and being away in June. The recent clear, warm weather meant that, for the first time in a while I have been able to pick enough to be able to replenish our supplies.
It is essential to pick the flowers on a warm day when they are dry, and to only pick the freshest ones that have just opened and are purest in colour. If you live in a city don’t pick flowers near main roads (when we lived in Peckham I used to get my supplies from nearby Nunhead Cemetery). Don’t, whatever you do, wash the flowers, as you will wash away the pollen which gives the drink most of its flavour. For the same reason I don’t even shake the flowers before using, as many recipes suggest. Unless you are squeamish any small insects get strained out prior to bottling.
I can never get enough of the flavour of elderflower. Its floral taste announces summer. Sparkling elderflower cordial is the most refreshing way to slake your thirst during a hot afternoon’s gardening. Although I have found that a scant teaspoon of cider vinegar added to a glass is the most refreshing of all. Like orange blossom’s more demure, earthy cousin elderflower pairs well with any number of fruits, from strawberries to rhubarb, pears, raspberries, grapes and even grapefruit. It also works with gently flavoured vegetables that allow its floral notes to shine. A teaspoon or two of cordial adds fragrancy to a vinaigrette for a white chicory and goats cheese salad. A pickled salad of very finely sliced cucumber macerated in a dressing made with cordial, honey and, again, cider vinegar, and finished with poppy seeds and elderflowers, makes a sophisticated partner for poached trout or salmon.
Yesterday’s time shortage meant that I was thrown back on the reliable combination of elderflower and gooseberry, which crops up in a number of desserts I regularly make, including the unavoidable fool, a green summer pudding and a baked egg custard tart. The gooseberries aren’t quite ripe when the elder blooms, but for this drink you want the refreshing sharpness of the younger fruit.
This celebratory aperitif is a version of a Bellini where peach puree is replaced with gooseberries and a splash of elderflower cordial. I may have only had bad ones, but have always found peach Bellinis to be a little sickly. Here the combination of tart green fruit and scented flower create a drink with a distinct muscat flavour, which is dry, fragrant and deliciously quenching on a hot summer’s day. To ensure the best result, it is vital that everything, including the glasses, is ice cold before you make them.
First is the recipe I use for homemade cordial, but you could use a good quality shop-bought one.
Elderflower Cordial
Ingredients
Makes about 1.5 litres
30 elderflower heads
1kg white sugar
1 litre water
2 lemons, chopped
1 orange, chopped
2 teaspoons citric acid
¼ crushed Campden tablet (optional)
Put the sugar and water in a saucepan and bring to the boil. Stir and ensure the sugar is completely dissolved. Take off the heat and stir in the citric acid until dissolved.
Put the elderflowers and chopped citrus fruit into a sterilised plastic or glass lidded container large enough to take all of the ingredients. Pour over the hot sugar syrup. Put the lid on the container and leave in a cool dark place for 48 – 72 hours.
Strain the cordial through a fine muslin or tea towel that has first been sterilised with boiling water. Finely crush the Campden tablet and add it to the cordial. Stir until dissolved.
Using a funnel pour the cordial into sterilised bottles. Fasten the lid and store in a cool, dark place.
The Campden tablet (potassium or sodium metabisulfite) prevents the cordial from developing wild yeasts and bacteria which would cause it to ferment, and means that it keeps almost indefinitely. If you prefer not to use them the cordial will keep for 2-3 months, or longer if refrigerated.
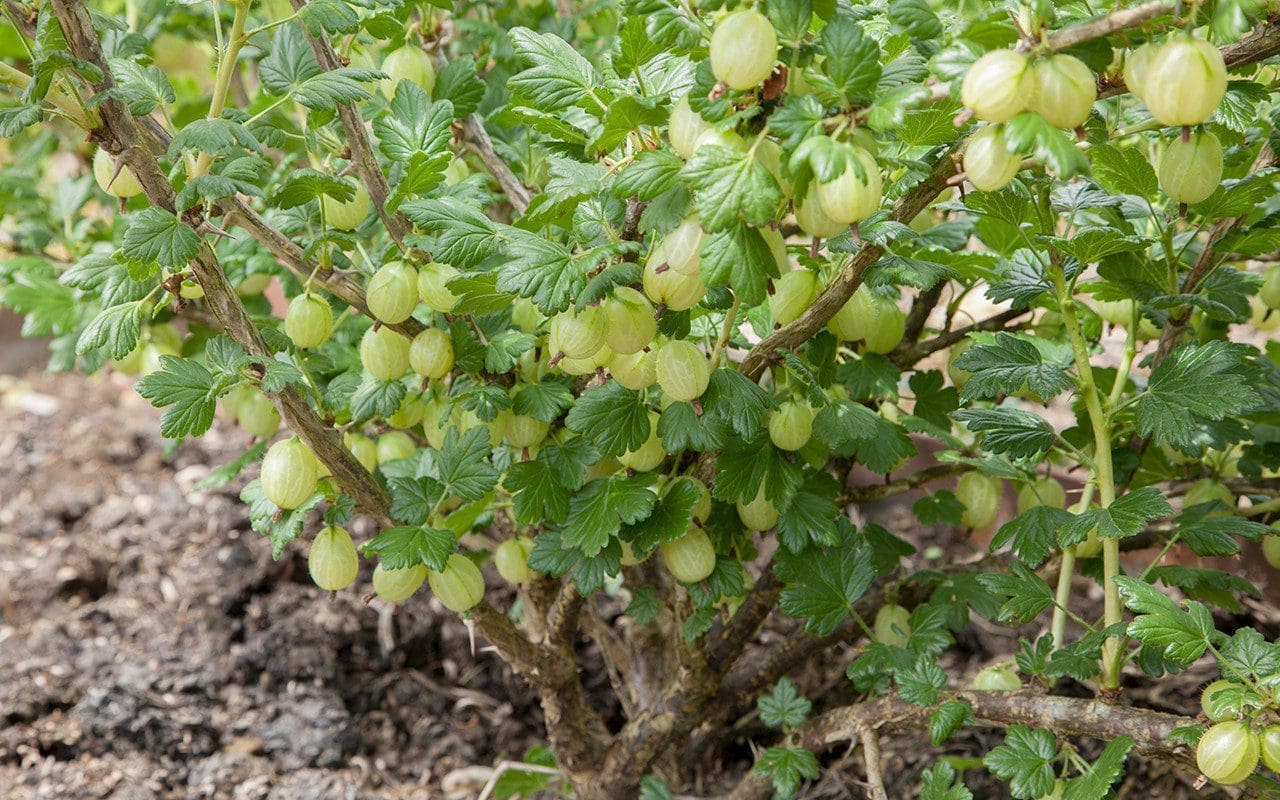 Gooseberry ‘Hinnomaki Green’
Gooseberry & Elderflower Bellini
Ingredients
Makes 6
100g green gooseberries
Elderflower cordial, chilled
1 bottle dry prosecco
Put the gooseberries in a saucepan with a splash of water. Put the lid on and cook over a low heat for about 10 minutes until the fruit has completely collapsed and given up its juice. Press the fruit through a sieve. You should have about 80ml of purée. Discard the seeds and skin. Put the purée into a covered container, then into the fridge until well chilled.
To make the drinks, take six champagne flutes or narrow tumblers that have been in the freezer for at least twenty minutes. Put two teaspoons of gooseberry purée and two teaspoons of elderflower cordial in the bottom of each glass. Slowly top up with very cold prosecco.
Decorate with a few elderflowers and raise a toast!
Recipe and photographs: Huw Morgan
Published 10 June 2017
Nearly all of the vegetable beds in the kitchen garden are now empty of last year’s crops and are gradually being refilled with this year’s. The autumn sown broad beans are 3 feet high, the peas, sown just over a month ago, are twining around their supports, and the first seedlings of lettuce, beetroot and carrot are finally getting away after the long dry spring. The very last of the old veg to come out is the chard. Sown this time last year, eight plants (four of white-stalked Swiss chard and four of the crimson-stemmed ruby chard) have stood all winter, providing some variety of greens amongst the cabbages. For the past three months, the young leaves have been the foundation of our first salads, while the older ones have found their way into a number of chard tarts.
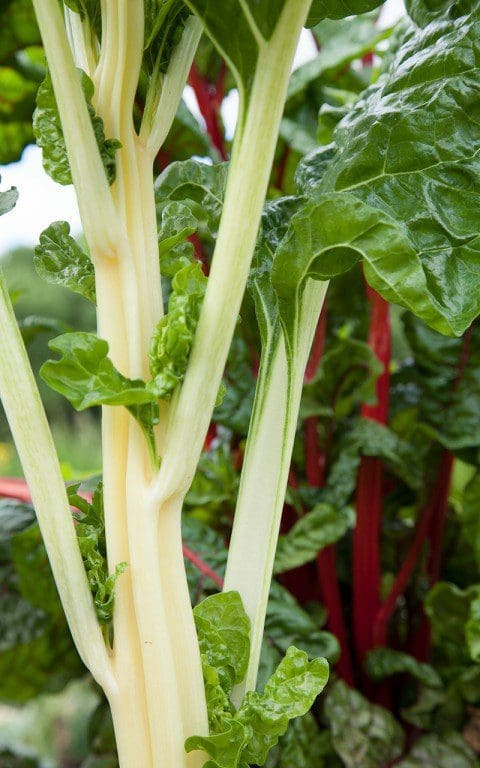 Swiss chard with ruby chard behind
You rarely see Swiss chard in farmer’s markets, and I have never encountered it on a restaurant menu. This is most likely due to the fact that the large fleshy leaves quickly wilt after cutting, giving it an unappealing appearance for sale. Freshly cut, however, they are shiny and juicy and squeak with health as you gather and prepare them. We rarely grow spinach as we have had trouble with even the bolt-resistant varieties. For the amount of time and effort expended in sowing, tending and harvesting, the resulting meagre handfuls we have been able to gather before they go to seed reduce to nothing in the pan and so are hardly worth growing. Chard is far less temperamental and has a much longer growing season.
Although they don’t have as high a concentration of oxalic acid as spinach, and which gives these leafy greens their distinctive ‘dry’ taste in the mouth, I use chard leaves to replace spinach in any recipe that calls for it, and prefer the sweeter, mellower flavour. Chard also has the added benefit of its thick edible stalks, or ribs, for which, in France, they are primarily grown and considered a great delicacy on a par with white asparagus. A completely separate vegetable from the leaf, they are most similar in texture to sea kale and can be used in any recipe that calls either for that uncommon vegetable, white asparagus, cardoons or celery. As you would with cardoons or celery, the stalks must be de-stringed before use, or you will find yourself with an unpalatable, unswallowable mouthful of fibre.
In France it is common to make a gratin of the blanched stalks covered with either a béchamel sauce or, in the south, one made of tomatoes, onion, garlic and olives. The quickest way to prepare them is to cut them into pieces, blanch them for a few minutes, drain and then transfer to a pan in which you have stewed some onion and garlic in olive oil. Leave to cook together, covered, for a few minutes more, then season and serve dressed with lemon juice and chopped parsley.
Sometimes, though, I want to elevate this seemingly mundane ingredient into a dish over which a little more care is taken, and this very slightly adapted recipe from Richard Olney’s Simple French Food, is one I often make. It is incredibly simple, but cooking the stalks in an aromatic court bouillon before combining them with a richly-flavoured, slow-cooked sauce, creates a layering of flavours that causes the vegetable to undergo an almost alchemical transformation during cooking into something that is more than the sum of its parts.
Garlic, anchovy and saffron are much-used ingredients in Provence, where Olney lived and learnt much of his art for French country cooking from Lulu Peyraud, and the taste of this dish is reminiscent of rouille, the saffron and garlic sauce that accompanies bouillabaisse. So, as a side dish, it is a natural pairing with fish.
When serving as a main course I might scatter over a handful of oiled breadcrumbs and some grated Gruyère for the last 10 minutes of cooking, and, as Richard Olney himself recommends, serve with a simple pilaf of onion and tomato.
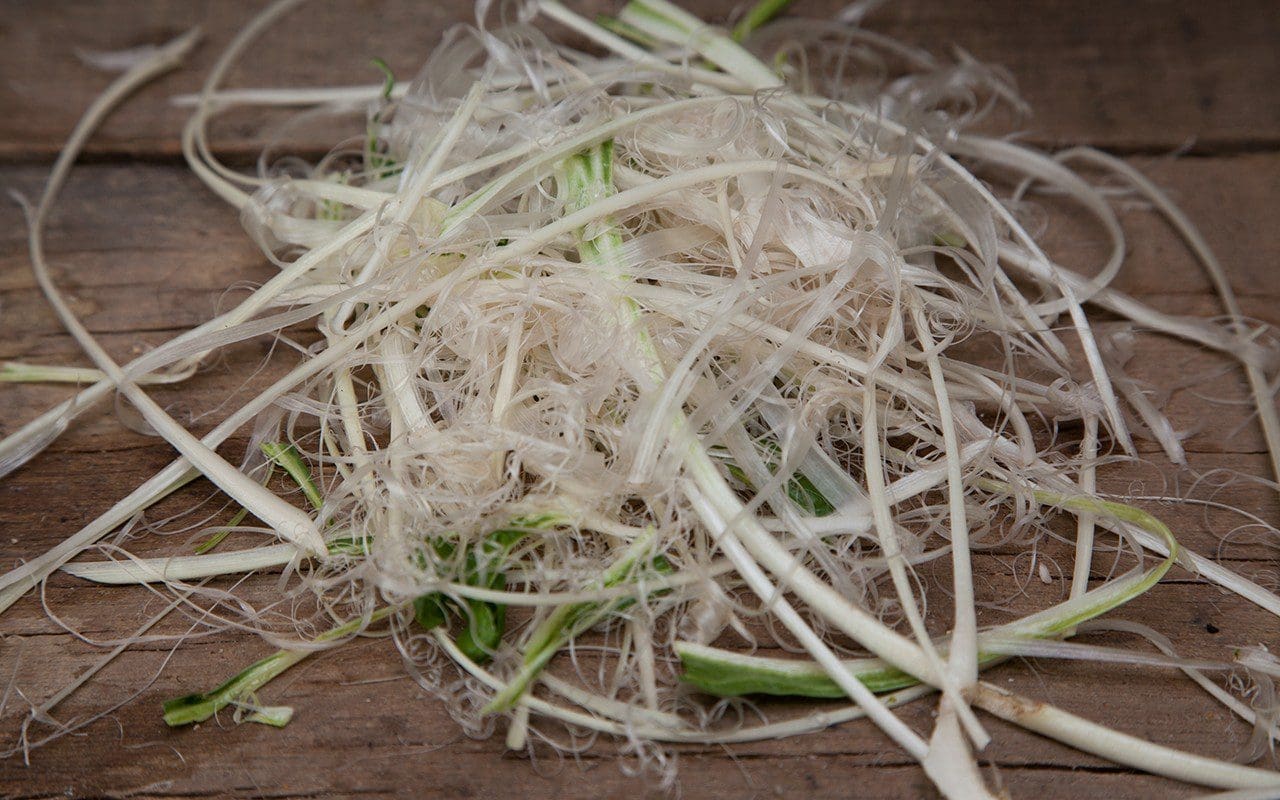 Remove the fibres from the ribs using your fingernails or the edge of a sharp knife
Ingredients
500g of chard ribs, trimmed and destringed, cut to the length of your gratin dish or into 10cm long pieces
Court Bouillon
2 litres of water
2 banana shallots or 1 large onion, finely sliced
2 bay leaves
A large bunch of thyme
1 tablespoon white wine vinegar
10 black peppercorns, lightly crushed
1 teaspoon of salt
Roux
1 tablespoon olive oil
1 tablespoon plain flour
2 anchovy fillets, ideally the large ones preserved in salt, or 4 of the small fillets in oil
2 large cloves garlic, peeled
A pinch of cayenne pepper, to taste
A pinch of saffron threads, to taste
500 ml of the court bouillon
A small bunch of flat-leaved parsley, leaves removed and chopped
Serves 4 as a side dish, 2 as a main course
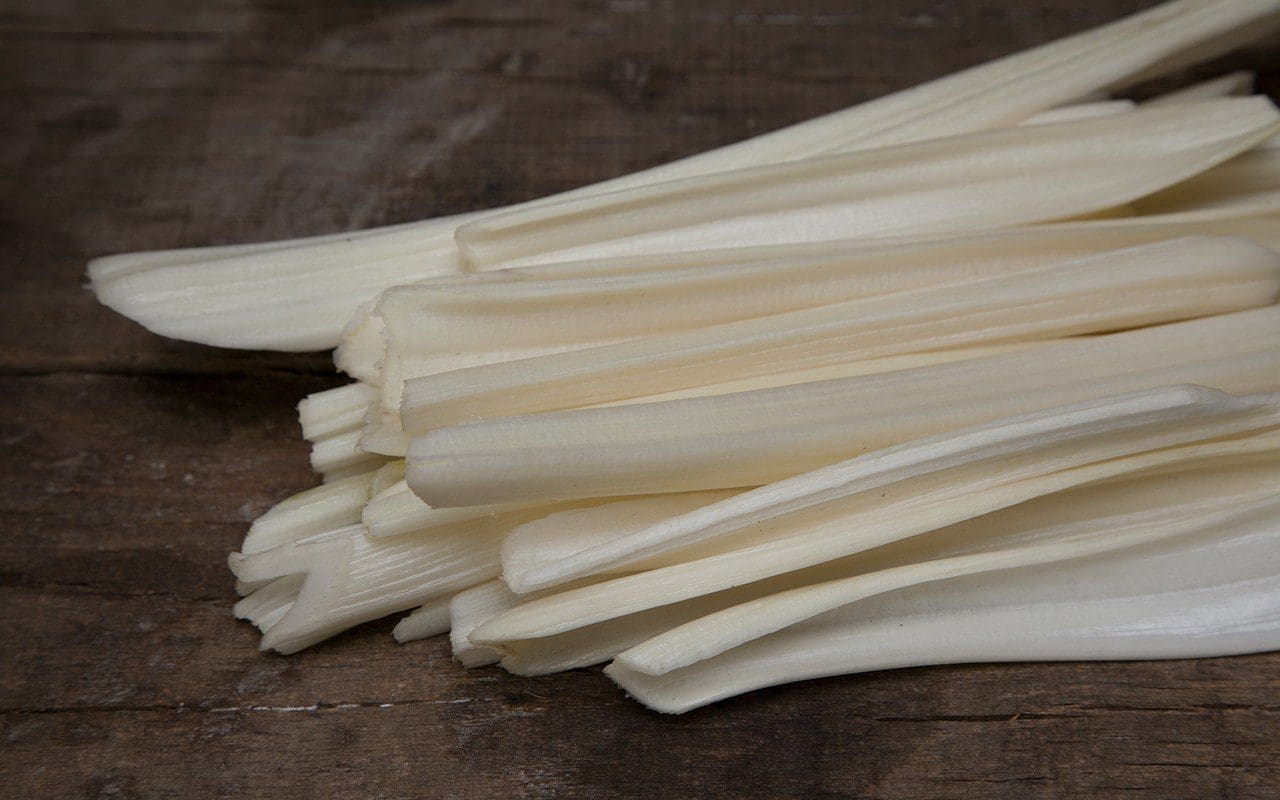 Prepared chard stalks
Method
Put all of the ingredients for the court bouillon into a saucepan and bring slowly to the boil, then simmer gently for half an hour with the lid on. Strain the liquid, discarding the solids, and return it to the cleaned pan.
Bring back to the boil, put in the chard ribs and cook until tender – 10 minutes or a little longer. Remove the ribs with a slotted spoon, allow excess liquid to drain, then transfer them to the gratin dish.
Turn the oven to 230°C.
In a mortar pound together the anchovy, garlic, cayenne and saffron threads until you have a fairly smooth, golden paste.
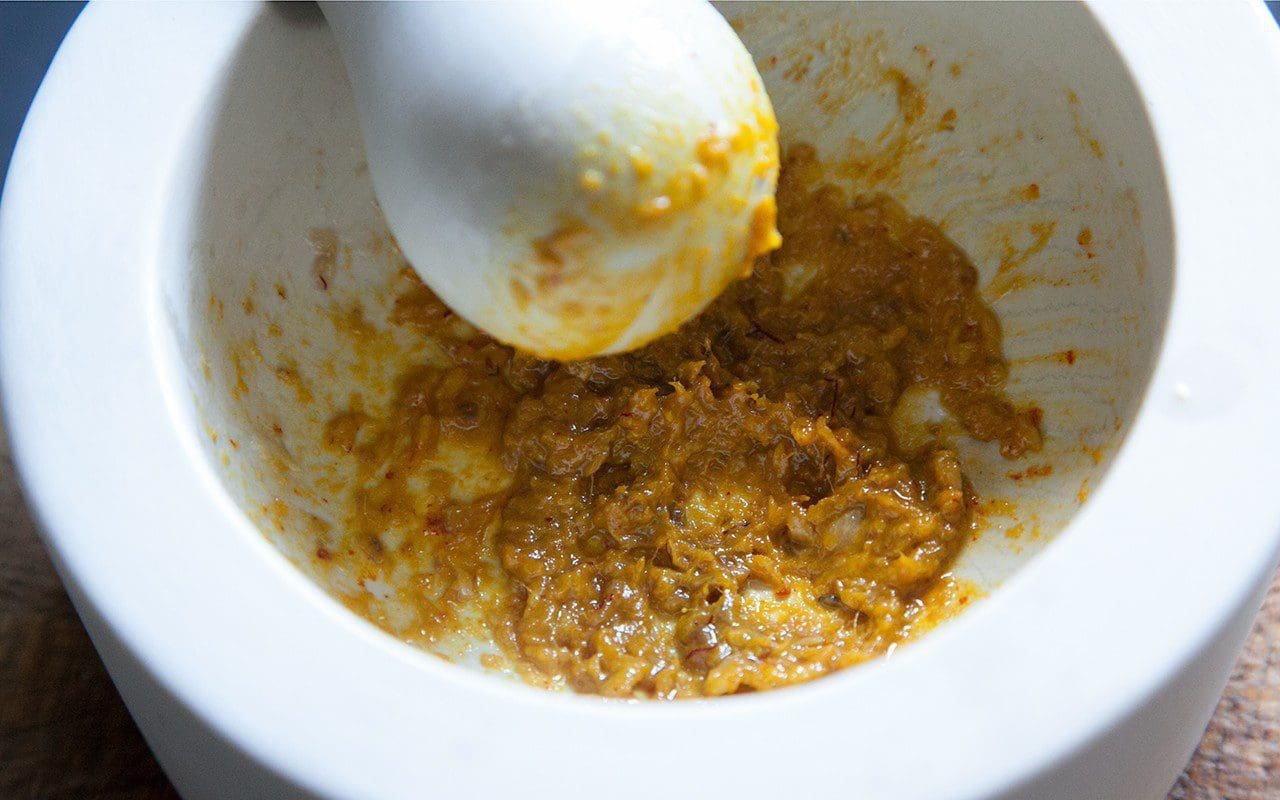 Anchovy, garlic & saffron paste
Make the roux by stirring the flour into the olive oil in a small pan, and then cook on a low heat for two minutes, stirring all the time. Add the anchovy, garlic and saffron paste and, still stirring, cook for half a minute more. Off the heat add a couple of spoonfuls of the court bouillon and stir well until smooth. Add the remainder of the court bouillon, stir and return to the heat. Stir continuously until the sauce comes to the boil and begins to thicken. The sauce should be quite thin, so don’t expect it to thicken much. Then leave to simmer on the lowest heat for about 20 minutes. Skim off the skin that forms on the surface as the sauce reduces by about a quarter. It should have the consistency of single cream. Taste and season with salt, no pepper.
Pour the sauce over the chard ribs and put into the oven for 20–30 minutes until bubbling and golden brown at the edges. Scatter the parsley over the top and serve.
Words & photographs: Huw Morgan
Published 20 May 2017
At this time of year there are two major challenges in the kitchen garden; how to use up the remaining winter vegetables in order to clear the beds for the sowing of new crops, and how to bridge the hungry gap, as we reach the end of our stores. Most of the remaining vegetables have been sitting in the ground or in storage for the best part of five months and as the days start to lengthen and warm, we crave the flavours of spring.
The trick to bridging the gap is to combine these winter vegetables with fresher, spring ingredients; roast beetroot with fresh horseradish and watercress, or a plate of sautéed carrots with blood oranges and the last cobnuts.
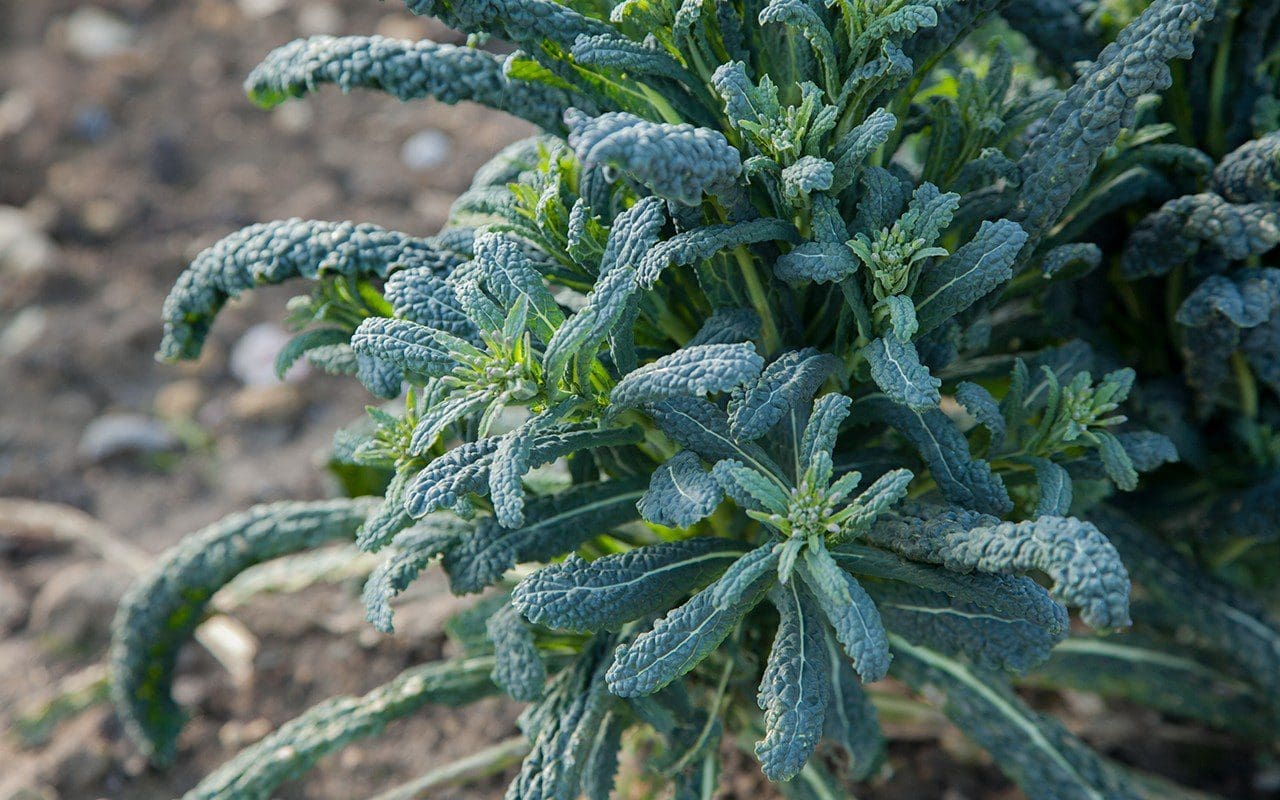
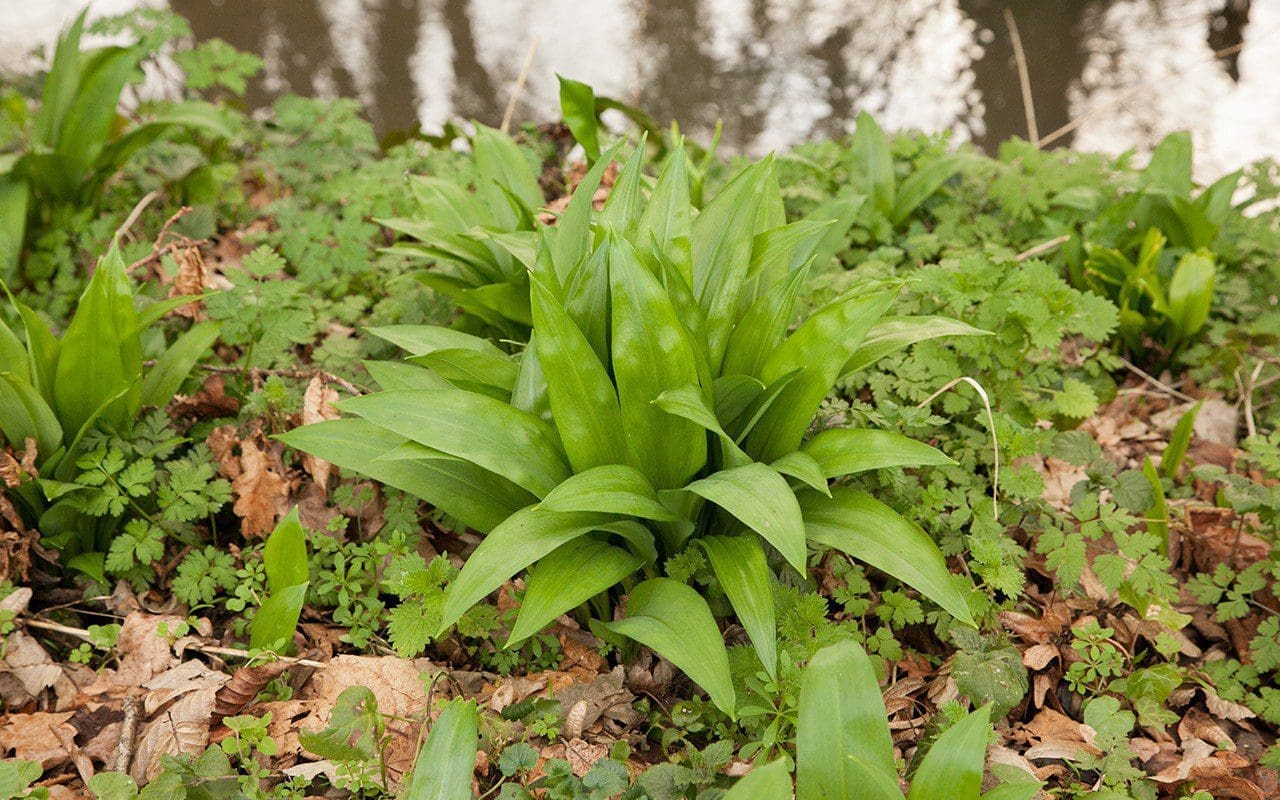
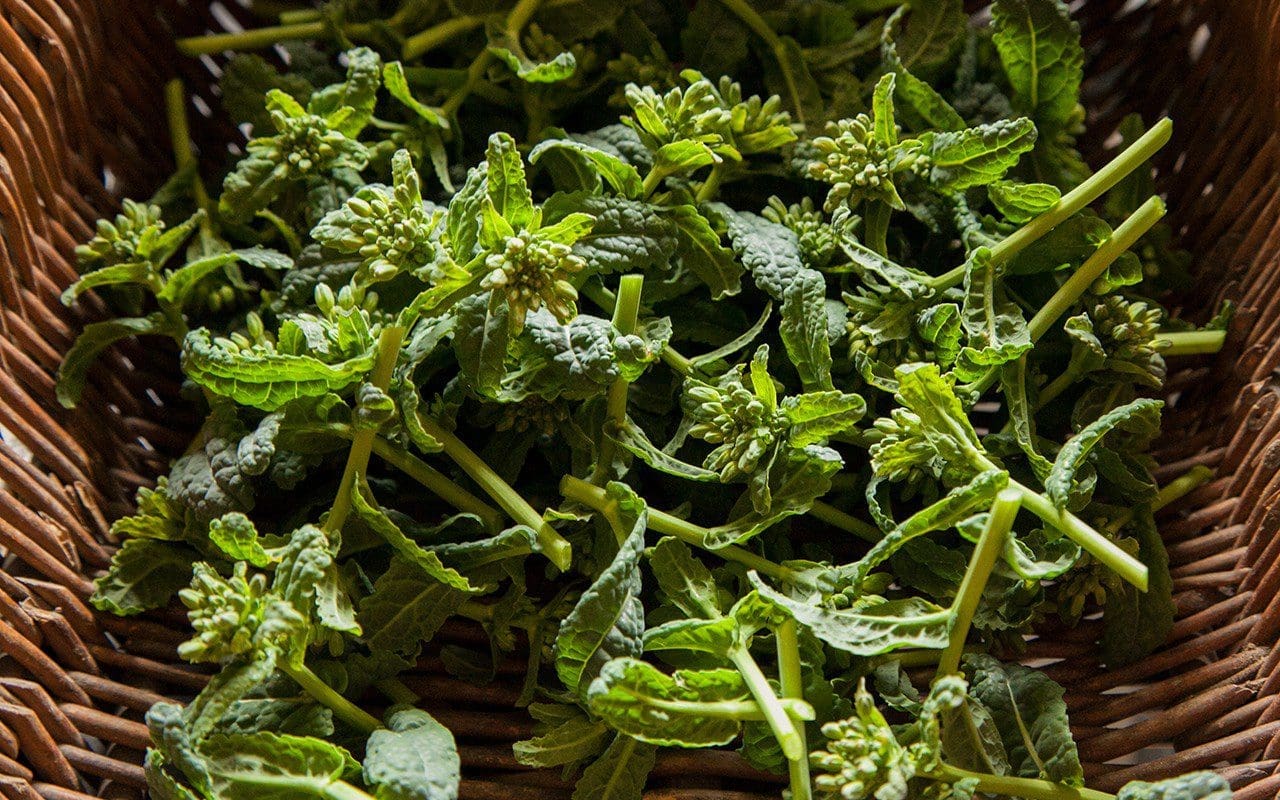
This recipe is an adaptation of one I usually make with purple sprouting broccoli. However, ours has been a disappointment this year as we sowed a couple of weeks too late and the plants failed to gain enough stature before the winter. The cavolo nero would also have done better with a fortnight more of summer. Although we’ve harvested a few good helpings of leaves we have learned not to uproot it too early, since we have found it has a second season and has been shooting furiously for the past few weeks as it readies itself to flower. The young cavolo shoots are best before all the energy goes into the flower so pick when you see the first buds to retain the velvety texture of the young growth. At the end of winter it has has a mineral richness, which is a good partner to the wild garlic that is now showing itself down by the stream.
Gnocchi are quick and easy to make yourself and a great way to use up the last of the potatoes. It is best to use a floury variety or the gnocchi will be gluey, but I made do with ‘Roseval’, the last of our stored potatoes, which is somewhat waxy. As long as you rice the potatoes while piping hot they still lose a lot of their moisture.
Served with a sharply dressed salad of bitter leaves this makes a perfect spring lunch.
INGREDIENTS
GNOCCHI
500g potatoes, preferably a floury variety like Desirée
1 large or 2 small organic egg yolks
75g Tipo 00 pasta flour
50g semolina
35g (a small handful) wild garlic leaves, finely chopped
Salt
TO SERVE
250g ricotta
100g cavolo nero shoots or purple sprouting broccoli
Olive oil
Pecorino cheese, finely grated
Serves 4 or 6 as a starter
METHOD
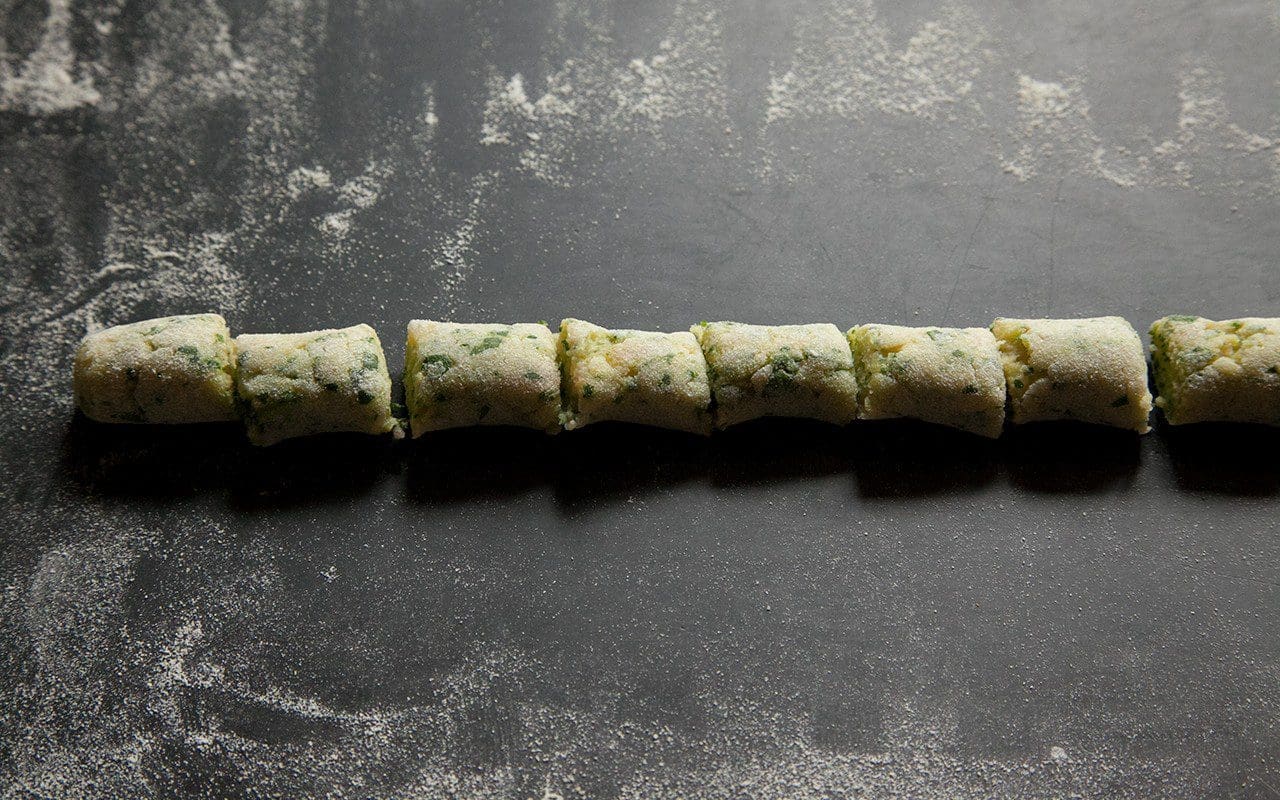
To make the gnocchi cook the potatoes in their skins in a large pan of boiling water. Drain and peel them while still hot. Protect your hand with a tea towel or oven glove. Immediately put them through a potato ricer or mouli into a large mixing bowl. Add the egg yolk, flour, semolina, wild garlic and salt and fold through with a metal spoon until well combined. Using very light movements use your hands to quickly bring the dough together into a ball. Do not knead it or the gnocchi will be heavy.

Divide the dough into four. On a floured worktop roll the first quarter into a sausage a little thicker than your index finger, then cut into 2cm pieces with a sharp knife. Take each piece and, pushing away from you, roll them on the back of a fork to create ridges which will hold some of the sauce. Place them on a floured tray. Repeat with all of the dough.
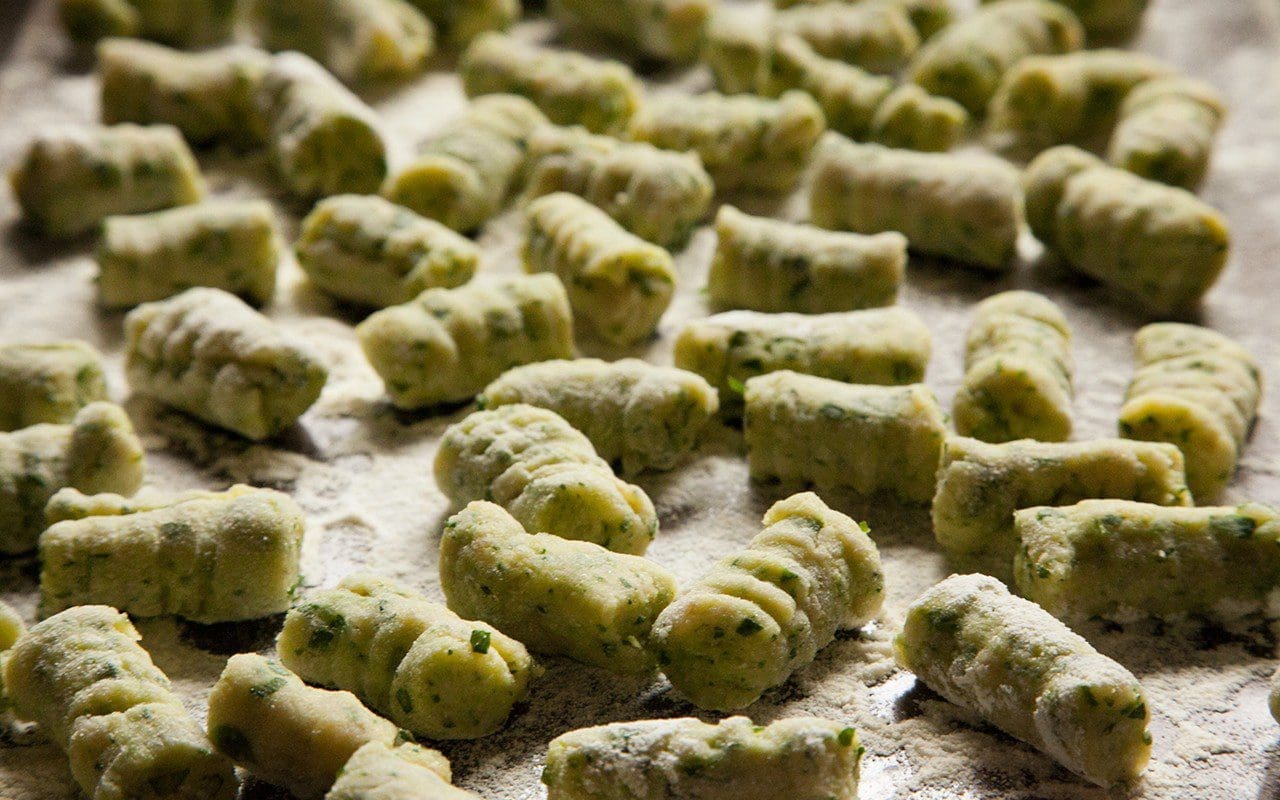
Bring two large pans of generously salted water to the boil. In the first one cook the gnocchi in batches. They are done when they float to the surface. Remove with a slotted spoon and drain them on a clean tea towel while you cook the rest.
As you cook the last batch of gnocchi put the cavolo nero shoots in the other pan of boiling water for two minutes. They should retain some bite. Drain, refresh in cold water and drain again. If using purple sprouting broccoli remove the small florets from the larger stems and cut any larger florets in half or quarters.
Put the gnocchi and cavolo nero shoots into a bowl. Add the ricotta in spoonfuls. Season with salt, ground pepper and a little olive oil. Stir gently to coat adding a little reserved cooking water to loosen if necessary.
Divide the gnocchi between hot plates. Drizzle with olive oil and finish with grated pecorino.
Recipe & Photography: Huw Morgan
We are sorry but the page you are looking for does not exist. You could return to the homepage