It has been too hot to cook. Too hot to do much at all. And yet the Kitchen Garden has been demanding attention. If we take our eye off the ball right now we will find that currants and berries will rot on the bush, in late summer there will be no more salad and, come autumn, there will no turnips, swedes or winter lettuce. Harvesting has become a twice daily occurrence and beds must be cleared to make room for the last of the summer sown crops.
A couple of weekends ago, just as we were preparing to head off to Hokkaido, we spent two mornings picking gooseberries and blackcurrants for the freezer. If you have a hat and water bottle and keep in the shade of the bushes, this can be a very pleasant way to pass a hot, sunny morning with friends; picking, chatting, eating and laughing. The resulting Tupperwares full of berries are their own reward. Whenever I am squatting on my milking stool picking blackcurrants I remember – always too late – Sarah Raven’s method, which is to cut out the oldest canes when laden with fruit and then take these to a comfortable, shady spot to pick the berries off at leisure. Needless to say this is never the way it happens.
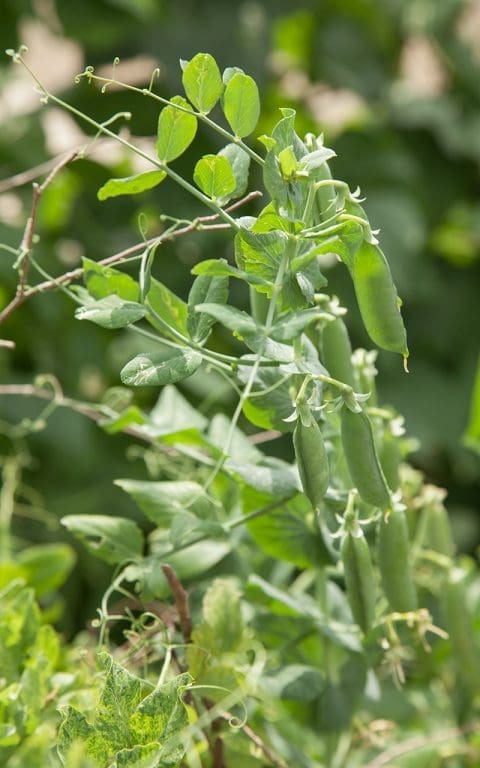
We returned from Japan to find that both sowings of peas – one late winter, another mid spring – had caught up with each other and we had a pea glut comparable with the currant glut. Here it was a much more straightforward decision to simply take out the plants – leaving their nitrogen-fixing roots in the soil – and pick off the pods in the shade of the open barn by the house. Nothing can compare to the satisfaction of podding peas into a bowl and I have a particular fondness for shelling them into a red enamel metal bowl, which reverberates like a gong as the peas hit the sides, its colour vibrating against the green of the peas.
The peas are no longer in their prime, but freshly picked and quickly cooked, they are still quite delicious. We most often eat peas cold in summer. Thrown into a pan of boiling water for a few minutes, drained and then refreshed in cold water I will throw a couple of handfuls into salads, or puree them with mint, stock and cream to make both a green hummus-like dip or a thinner, refreshing chilled soup. Peas and white cheeses of all sorts go together beautifully, both the salty – feta, halloumi, pecorino – and creamy – Vignotte, goat curd, ricotta – providing different types of contrast to peas’ natural sweetness.
Here burrata – a type of mozzarella filled with cheese ‘rags’ and cream – provides a decadent richness which, mixing with the basil oil dressing, creates a delicious sauce. It is customary to serve burrata at room temperature but, when it’s as hot as it has been, I prefer the cheese to be lightly chilled, and so take it out of the fridge around 20 minutes before it is needed. If you can’t get hold of burrata then substitute with a good quality, fresh buffalo mozzarella or a piece of ripe Vignotte.
Per person
100g shelled peas
A small handful of young leaves; lettuce, pea shoots, watercress, rocket
1 burrata or burratina, 100g weight
4 large Genovese basil leaves
3 tablespoons olive oil
½ small clove garlic
Zest and juice of ¼ lemon
¼ teaspoon salt
Small-leaved basil or torn Genovese basil to serve
Wash and dry the salad leaves.
Put a pan of water on to boil.
Put the salt, garlic and basil leaves into a mortar and crush into a coarse green paste. Add the olive oil, lemon zest and juice. Stir to combine.
Cook the peas in the boiling water for 2 to 3 minutes. Drain and quickly refresh under a cold running tap. Drain off excess water.
Arrange the salad leaves on a plate. Spoon the peas over the leaves. Place the burrata in the centre. Spoon the basil dressing over everything. Strew over some basil and serve immediately with some oiled and grilled sourdough bread.
Recipe & photographs: Huw Morgan
Published 27 July 2019
I don’t exactly remember when I first tasted elderflower cordial. Romantic though it would be to imagine, it didn’t feature in my childhood, when summer drinks ran the gamut from orange squash to lemon barley water to Coca Cola and back again. However, I have an inkling that it may have been at the country house of Stephen Keynes (a great-grandson of Darwin and nephew of John Maynard Keynes) who was my London landlord for a while when I was in my early ‘20’s. Stephen was a polymath; a banker, an intellectual, an historian, an appreciator of the arts, a raconteur, a patron, a naturalist, a naturist. Yet the thing I remember him best for was his love of good food and the ability to make it without fuss or fanfare.
Stephen cooked in a way which has become quite fashionable in recent years. Very basic, simple food – some might call it nursery food – redolent of a time of housekeepers, nannies and cooks, waste not, want not, rationing and grow your own. For breakfast he might serve an egg coddled with the top of the milk and a slice of good white, heavily buttered toast, lunch could be a poached kipper with floury boiled potatoes or a bacon and egg pie with his own greenhouse tomatoes, for dinner a pork chop with creamed spinach from the garden. Pudding would usually be a seasonal fruit tart or pie, with his own pastry and served with cream or custard. At Christmas he made the best mince pies I have ever eaten. He was also an expert preserver in the old tradition and so the pantry was always full of his home made jams, jellies, chutneys, pickles and syrups made from garden and hedgerow.
At his house near Newmarket (which at weekends was filled with the chatter and laughter of bright, young things) Stephen had a proper vegetable garden and greenhouse, as well as fruit cages and fruit trees, including the first medlar I had set eyes on. Every year he religiously made pounds of medlar jelly, and it is this memory of him standing (naked) at the Aga over a hot preserving pan which makes me think that it was probably he who was taking the time to make elderflower cordial for those long summer days we spent lounging around on the lawn by his oh-so-decadent swimming pool.

Despite the conspicuous lack of a pool here, I still enjoy a lounge on the grass on a hot summer’s day, and no summer is now complete without the ritual of making elderflower cordial. This isn’t always possible though, since elder flowers from the end of May until the end of June, a notoriously unsettled time weatherwise, so for several years I have been stymied in my desire to go elder picking by cold, heavy June drizzle. The past few weeks have been no different and so I seized the opportunity last weekend when the sun finally shone on Sunday morning.
Elder flowers should be picked early on a dry morning. Select the newest umbels that have not yet fully opened and pick the whole flowerhead, but not the coarse stalk. Gently shake them to dislodge any small insects and lay carefully in a trug. I used to cram carrier bags with the flowers, but since it is largely the pollen that flavours the cordial you lose too much of it collecting them this way. It is better to go gently, which makes the whole process more enjoyable.
As Dan wrote last week I was inspired to make this cordial after seeing a dog rose growing through one of our largest elders a couple of weeks ago. However, our wild roses aren’t highly scented enough to bring much flavour, so I used the blooms of the most highly scented of our David Austin roses in the cutting garden, ‘Gertrude Jekyll’ and the dark, velvety ‘Munstead Wood’. Any highly scented rose will do, but the darker the rose the pinker the cordial will be. Of course, they must be absolutely free of pesticides, fungicides or other sprays. Pick flowers that are just opening, again early on a dry morning.
Over the years I have tried a number of different elderflower cordial recipes, many of which use whole lemons, pith and all, but I find these too bitter, so now only use the zest and juice. In others the proportion of sugar produces a syrup that is too sweet and deadens the floral flavour. The citric acid allows the cordial to be kept for 3-4 months in the refrigerator. If you leave it out it will keep for 3-4 weeks.

25 large heads of elderflower
5 large heavily scented roses
Grated zest and juice of 4 unwaxed lemons
1.5 litres water
1 kg sugar
1 heaped teaspoon citric acid
Remove all of the petals from the roses and put into a large ceramic or glass container with the elderflowers, lemon zest and juice.
Bring the water to the boil and add the sugar. Take off the heat and stir until dissolved. Leave to cool a little then, while still hot, pour the syrup over the flowers. Cover the container well so that no insects can get in and leave in a cool dark place – an outhouse is ideal – for 2-3 days.
Strain the syrup through a fine muslin. Transfer to a large saucepan and bring to a gentle simmer. Simmer for 3 minutes, then add the citric acid to dissolve.
Pour the hot cordial into sterilised bottles, seal immediately and allow to cool before storing.
Dilute to taste – a proportion of 1 part cordial to 5 parts water gives a good flavour without excessive sweetness. Sparkling water makes the rose flavour more pronounced.
Makes approximately 2 litres.
Recipe & Photographs: Huw Morgan
Published 23 June 2019
There is so much to learn and remember about vegetable gardening – sowing times and distances, transplant times, successional sowing, water requirements, crop rotation, pests and diseases, optimum harvesting times, storage, seed saving, the list goes on. Each year with experience under the belt, I do feel more confident, but there are always new obstacles that throw themselves down as a challenge.
This spring the kitchen garden got off to a wobbly start. When we lifted the horticultural fleece we had put over the autumn sown broad beans we found they had been decimated by ground slugs, which had thrived in the shelter. An autumn sowing is usually perfectly hardy, but we had left it late last year and thought the fleece might encourage growth. However, it showed us that the blackbirds must help in keeping the slugs at bay, so we won’t be doing it again. The defeat continued with a second sowing made in early March falling prey to the vandalism of pheasants and collared doves. The third sowing has now been in flower for a week, but there are several more weeks before we harvest our first crop. It has been a similar story with the peas.
Sowings of landcress and mustard greens have been severely set back by flea beetle, as have our brassica seedlings. Fortunately we thought to protect the latter with enviromesh just in time and so, as long as we net from pigeons, we should be back on track. Happily, with a couple of weeks of warm weather, we are now self-sufficient in several different types of lettuce and salad leaf, but without a polytunnel or greenhouse to give us a head start, the ‘hungry gap’ is lasting longer than usual.
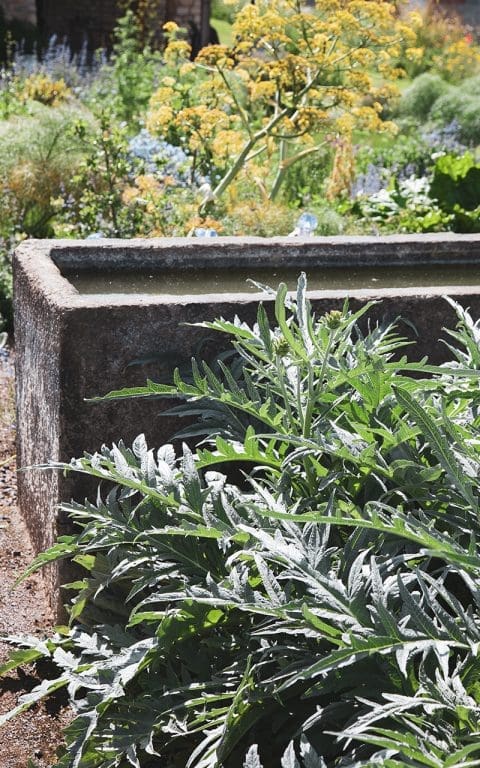
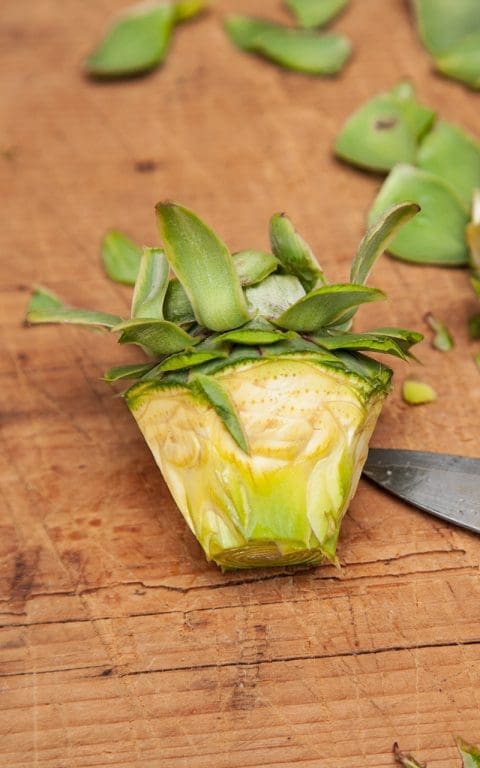
The gap between winter vegetables and the season’s first beetroot, chard, carrots and new potatoes is handsomely bridged by asparagus and the perennial artichokes. Before growing artichokes at Hillside my mental image and usual experience of them was plainly boiled with vinaigrette. Since having a dependable annual crop now that the garden is established, I have been surprised and happy to discover their unsuspected versatility. You can braise or stew them, roast or chargrill them, boil or deep fry them and their subtly resinous, nutty-grassy flavour works with everything from the simplest lemon and garlic to the richest onion, tomato, fennel and chilli slow braise.
Used raw here their greener flavour goes well with the sharp freshness of citrus and herbs, while the capers and parmesan accentuate their nuttiness. This salad can be varied in any number of ways depending on what’s available. Use mint in place of parsley, add wafer thin slices of chestnut mushroom, or small pieces of anchovy and green olive, or a handful of the tiniest raw, new garden peas and slivers of Parma ham. To take things up a level you can add shavings of white truffle and crushed, toasted hazelnuts. Quite plain it is delicious alongside some whipped ricotta, goat’s curd or burrata.
This salad must be made immediately before it is to be eaten, since the artichokes will discolour if left for too long. In fact they start to discolour as soon as the cut surface meets the air, so organise all of the other ingredients in advance of preparing the artichokes. These should be done as quickly as possible, before assembling and dressing the salad and taking it straight to the table.
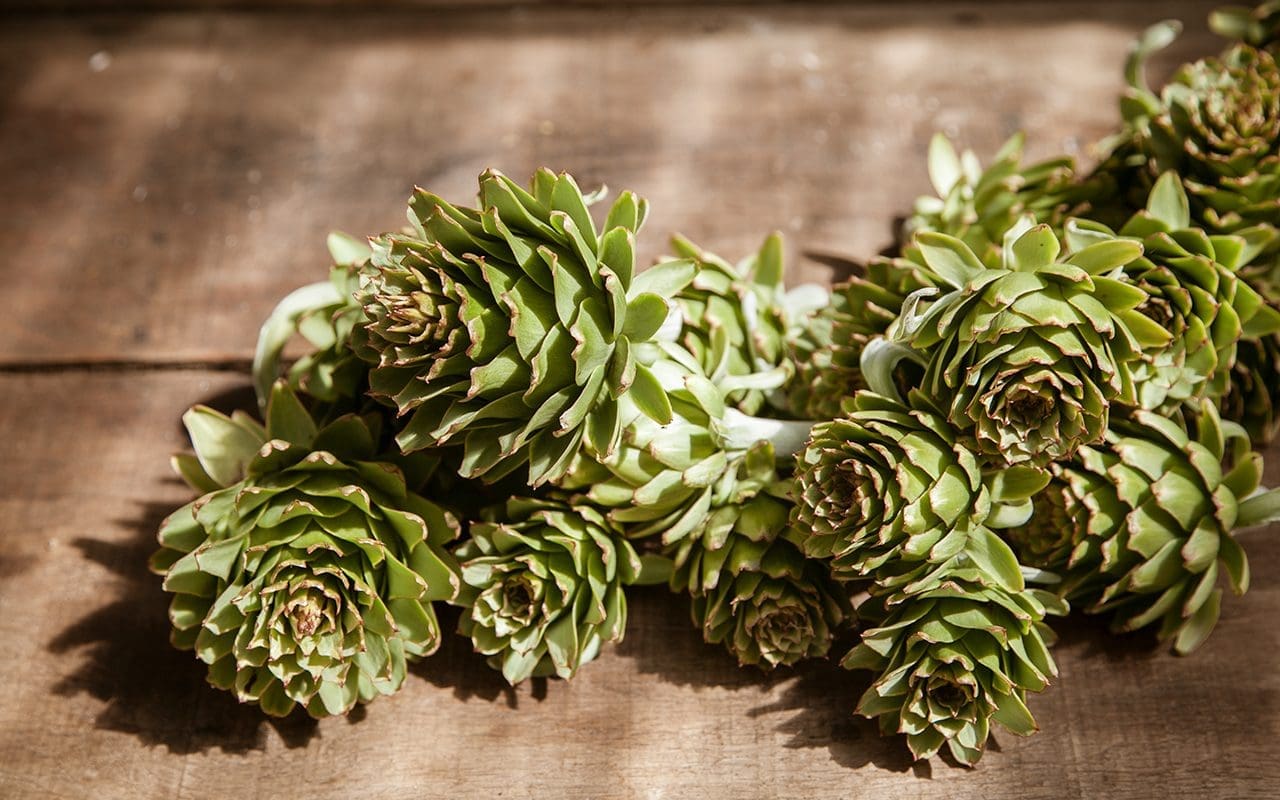
12-16 very small artichokes, or 8 larger ones, no wider than 6cm
2 lemons, juiced
½ a preserved lemon
1 tablespoon small capers, rinsed and drained
4 tablespoons olive oil
A small handful of flat leaf parsley, the stalks removed
A small handful of small rocket leaves, about 30 leaves
20g Parmesan cheese, shaved
Salt
Serves 4 as a starter
Wash and dry the rocket. Remove the leaves from the parsley. Squeeze the lemons. Rinse and drain the capers. Remove the pulp from the preserved lemon. Cut the lemon half into quarters vertically, then slice finely. Shave the parmesan.
Put the juice of one lemon in a medium mixing bowl with a litre of cold water.
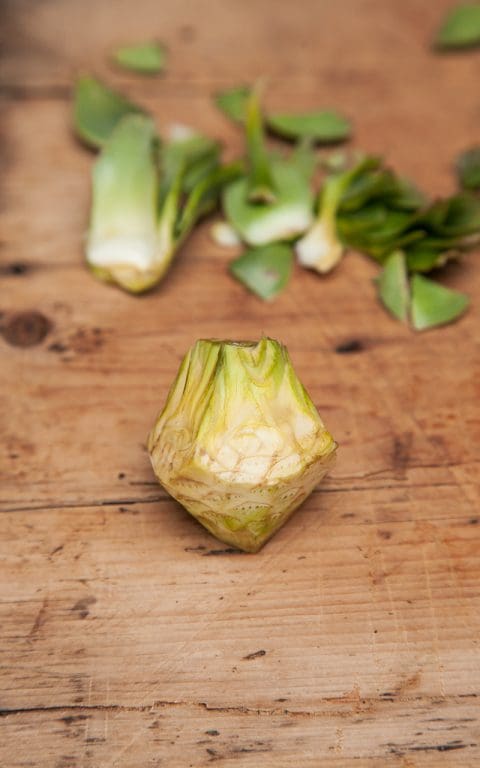
Prepare the artichokes using a very sharp, small knife. Trim the stalk leaving about a centimetre. Hold the artichoke on the chopping board with the stalk end pointing away from you. Visualise the interior structure of the artichoke and where the heart is. Holding the knife at an angle remove the tougher outer, dark green leaves and reveal the pale leaves and creamy heart beneath. To start with you may need to use trial and error to remove as little as possible of the paler leaves. If you are concerned that you may be leaving some tough leaves, chew one of the trimmings
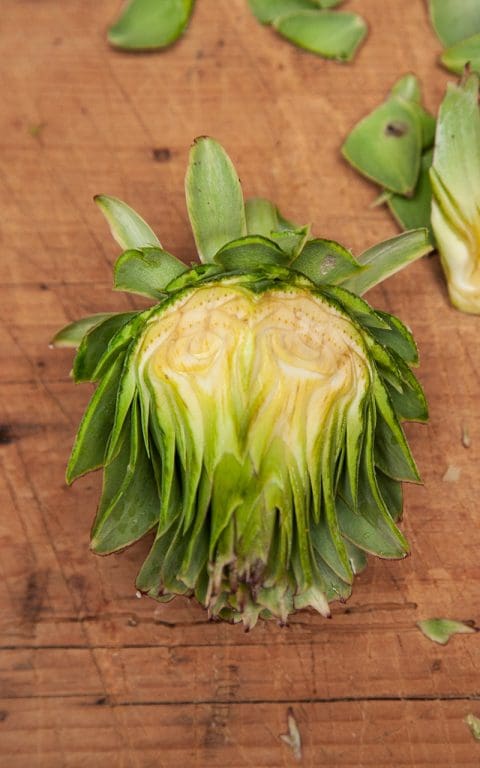
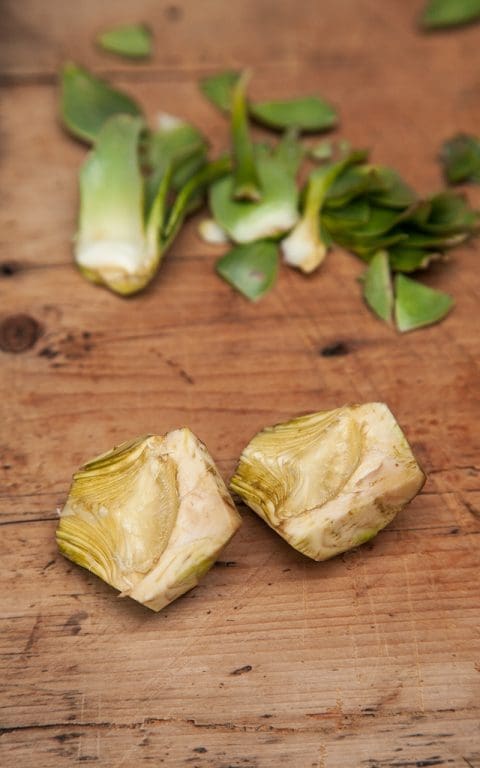
Slice the artichokes lengthways as finely as possible and immediately put into the bowl of acidulated water. If your artichokes are larger you will firstly need to cut them in half lengthways to check if the choke is too developed to eat. If so remove it with a sharp spoon.
As soon as all of the artichokes have been prepared quickly drain them. Pat the artichoke slices dry on a clean tea towel. Put them into a mixing bowl and pour over the remaining lemon juice. Quickly toss the artichoke in the lemon juice so that all is coated. Add the olive oil and salt and toss again. Then add the capers, preserved lemon peel, parsley and rocket and mix together quickly with your hands. Arrange the salad on a serving plate. Scatter over the shaved Parmesan. Serve immediately.
Recipe and photographs: Huw Morgan
Published 1 June 2019
Raymond Lewis, the farmer who lived here before us, was born in this house shortly after his parents moved here in the early 1930’s. Although he raised cattle, his parents had been market gardeners and it is our nearest neighbour, Glad, who has been the fount of all knowledge regarding how the land here was used before we arrived. She too was born here, in the house just above ours on the other side of the lane, and went to school with Raymond. She has a prime view over our slopes.
It was she who told us that we were planting our new orchard on the site of the Lewis’ old orchard, that the hollies by the Milking Barn were harvested each year for wreaths destined for the Christmas Market in Bath and that the extra-scented, large violets we found growing everywhere were wrapped in leaves and tied with cotton for spring posies. When we expressed amazement at finding ‘wild’ gooseberries and redcurrants in our farthest hedgerow, Glad said that it bordered the field where the soft fruit had been grown and so we realised that they had arrived through the actions of thieving birds.
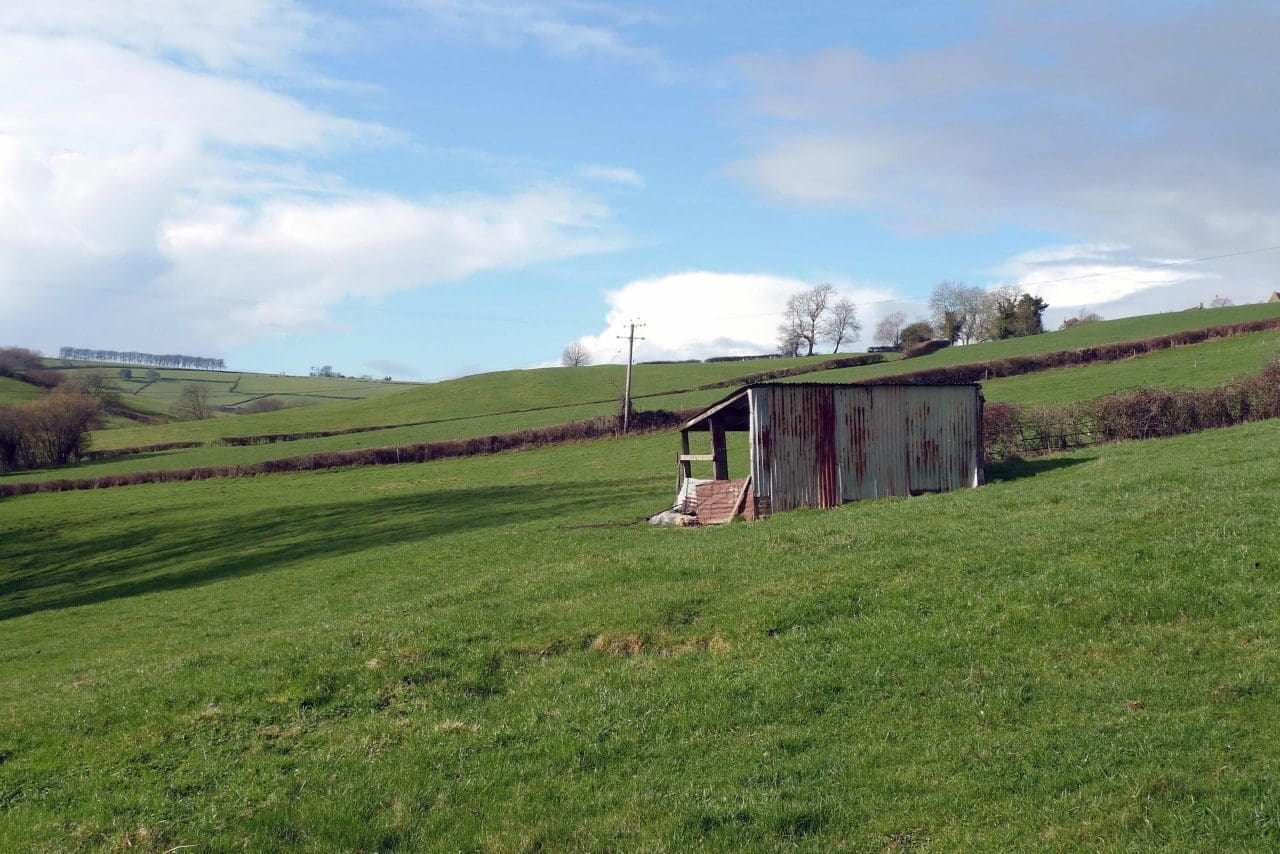
Another piece of growing history she imparted was to do with the ramshackle shed half way down the field in front of the house. We had been charmed by this little structure from the first time we saw it, but couldn’t work out what it had been used for. Made from a motley collection of wood and reclaimed corrugated tin sheeting and open on two sides it is barely high enough to stand up in. It evidently hadn’t been used by Raymond’s cattle, and it was too far from the house to have had any obvious purpose such as a vegetable or wood store. The clue to its use was revealed the winter after we arrived, when clearing the mess of bramble from the hedge that runs up behind it.
There in the undergrowth were a dozen or so terracotta rhubarb forcers. Unfortunately all but a couple were broken beyond use, but it was suddenly clear what the little shed had been used for. We asked Glad at the first opportunity and she confirmed that it had been ‘the rhubarb forcing hut’, which is how we have referred to it ever since. We have often imagined Mr. and Mrs. Lewis in there in deepest winter, inspecting the covered crowns by candlelight (as they still do in the Yorkshire rhubarb triangle to prevent the stalks colouring) and then carefully harvesting armfuls of the pale pink stems to take to market. Now it provides shelter for the sheep that graze our pastures and has sometimes protected us from sudden summer downpours when the water runs off the roof in sheets.

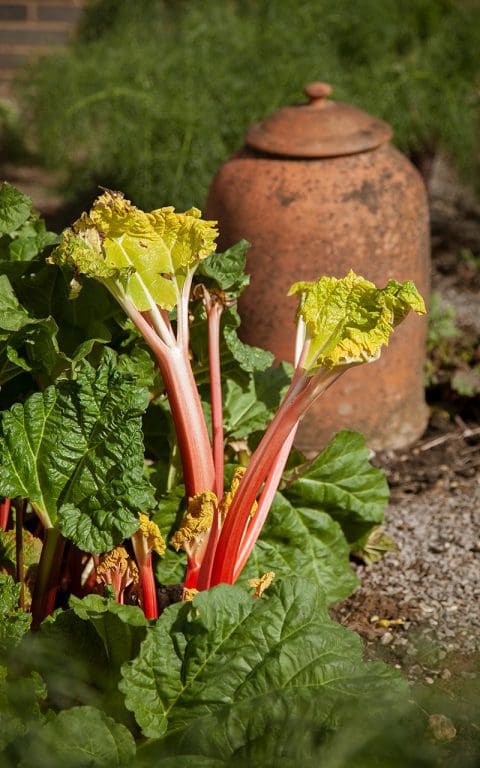
We have three varieties of rhubarb in the Kitchen Garden here which take us through spring and early summer; Timperley Early, Champagne and Victoria. The first is, not surprisingly, said to be the earliest, and has always been so for us. We have found it possible to force it for stems in February. The other two are later and tend to come together if left uncovered, but by forcing one of them and leaving the other – on a yearly rotation – we can have rhubarb until June. Beyond that and it can become a little long in the tooth and green to eat fresh, but is still perfectly serviceable for jam. When forcing rhubarb it is important to only cover part of the crown and, when ready to harvest, to take the slenderest stems and leave the strongest to feed that part of the plant for the future. To allow it to rebuild its reserves you should then choose a different part of the crown to force the following year.
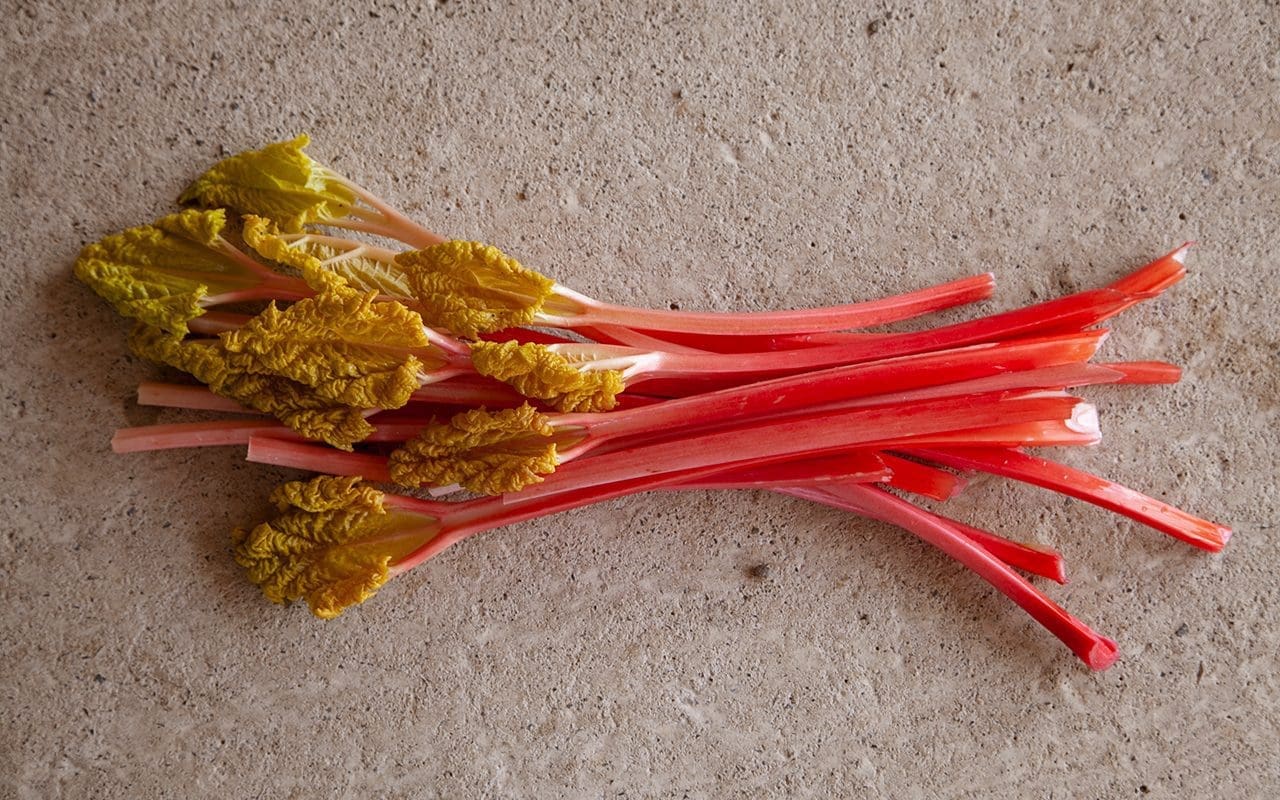
The flavour of forced rhubarb is so subtle that it needs the simplest of treatments to show it off to its best advantage. Most often I just roast it and serve with a creamy accompaniment of buttermilk pudding, pannacotta or, simplest, a mixture of whipped double cream and creme fraiche. I find orange, the customary partner of rhubarb, overwhelms this early season delicacy. However, judicious use of thyme or rosemary adds an unexpected counterpoint that suits this fruit that is actually a vegetable. It also has an affinity with the aniseed used here, but it’s not essential, so leave it out if you prefer.
The pastry is based on a recipe by Alice Waters of Chez Panisse, and is a fast and easy way to achieve a deliciously flaky result. Its success relies on using the best quality butter and flour and the very lightest of touches to ensure the pastry stays as cold as possible. If you are using open grown rather than forced rhubarb you will need to increase the quantity of sugar in the filling by at least 25g, depending on how tart you like your rhubarb.
200g plain flour, Tipo 00 preferably
150g unsalted butter
1 teaspoon icing sugar
A large pinch of fine sea salt
8 tablespoons iced water plus a couple more
500g forced rhubarb, trimmed weight
75g caster sugar
1/2 teaspoon vanilla essence
3 tablespoons ground almonds
1 teaspoon aniseed
2 teaspoons icing sugar
1 teaspoon water
2 tablespoons melted butter
Stalk trimmings from the rhubarb
5 tablespoons water
3 tablespoons caster sugar
Take the butter, still in its wrapping paper, and put it in the freezer for 20 minutes to harden.
Sift the flour into a bowl with the icing sugar. Add the salt. Remove the butter from the freezer. Unwrap about 2/3 of the block and, holding the end of the block in the paper, coarsely grate it onto the flour. To avoid grating your fingertips you may need to cut the very last of it into small pieces.
Using a sharp knife and rapid slicing and lifting movements cut the flour and butter together until the mixture resembles coarse gravel. The butter should be visible in a variety of different sizes, but few should be bigger than a pea.
Continuing to work as quickly as possible, sprinkle the iced water over the mixture 2 tablespoons at a time. Each time use the knife to mix the water into the flour and butter. When you have added all of the water the mixture should just start coming together, but there will still be dry flour visible. Use your fingertips to see it it feels like it will come together. If it seems too dry add another tablespoon or two of water – but no more – and mix through again. Then very quickly, using your fingers and not the palms of your hands, bring the dough together into a ball. Do not knead it or overhandle it. The dough should feel cold.
Lightly dust a piece of greaseproof paper about 40cm square with flour and place the dough onto it. Gently and quickly flatten the dough with the palm of your hand into a rough circle. Take a floured rolling pin and, using light, rapid movements, roll the dough out into a circle about 35cm in diameter, rotating the greaseproof paper in quarter turns after each pass. Reflour the rolling pin if it starts to stick. The pastry will be very short, so don’t worry about the edges cracking. Lift the greaseproof paper and dough onto a heavy baking sheet and put in the fridge for 20 minutes to chill.
Set the oven to 200°C (400°F, gas mark 6).
Cut the rhubarb into pieces about 8cm long. Put into a non-reactive (glass or ceramic) bowl. Sprinkle over the caster sugar and vanilla essence and toss together briefly. Leave to stand while the dough is chilling.
Remove the baking sheet from the fridge. Working quickly again, sprinkle the ground almond evenly over the pastry leaving a 5cm border. Arrange the rhubarb on top of the almond. You should have enough rhubarb for two layers. The first can be arranged somewhat haphazardly, and should use up any larger pieces. You may need to cut these in half lengthways to ensure they cook evenly. Retain the smaller stems for the top layer and arrange them more pleasingly.
Then, working around the circle, gently lift the edge of the pastry up over the rhubarb, folding, pleating and gathering as you go. Pinch it together quickly if any tears appear, since you want to keep the juices in as far as possible. Don’t worry too much about appearances though. You want to ensure that the pastry holds the rhubarb in place, but it is more important to get the chilled pastry into the oven quickly than for it to look primped and perfect.
In a small bowl put the aniseed or caraway seed, icing sugar and water. Stir until the sugar has dissolved. Add the melted butter and stir to combine. Brush this mixture generously over the pastry.
Put the tart straight into the oven and cook for about 40 minutes until the pastry is golden brown and the rhubarb bubbling.
While the tart is cooking put the rhubarb trimmings, water and sugar into a small pan. Bring to the boil, then simmer until the rhubarb has disintegrated and the liquid is syrupy. Strain the liquid off and, when the tart is cooked, gently brush this syrup over the rhubarb.
Serve warm with single cream.
Serves 8
Recipe and photographs: Huw Morgan
Published 23 March 2019
The snowdrops are just starting to hit their stride. Their new leaves and delicate white flowers pushing through bare soil have a freshness that is a welcome contrast to the prevailing mud and low light. It is also a time when, with straining post-festive season trousers, we tend to want to eat more freshly, craving simple greens and cleaner food as a balance to the richness common to many winter dishes.
The colours of the winter vegetable garden are as vital as the snowdrops, primarily green and white; leeks and Swiss chard, celeriac, turnips and parsnips. We have a bed of salsify which, after you have scrubbed and peeled the gnarly, whiskery roots, reveal flesh of an unexpected pristine, pearly whiteness. In the barn are the last of the stored potatoes. Then there are the brassicas; cabbages Savoy and Hispi, three types of British kale, one of Russian, Cavolo Nero and purple sprouting broccolis just beginning to form. However, the cabbages have suffered this year from the long, hot summer, with many not hearting up, and so we have been eking them out or using them raw in salads so that they go a bit further. This recipe uses just one large leaf per person.
Soups are the most regular feature of our winter eating – there is always one on the go – but they are most often made simply with one predominant vegetable. They are usually pretty fast affairs too, made on the hoof with quickly cooked onions, a limited number of flavourings and water straight from the tap. It can sometimes take half an hour or less to go from plot to soup bowl with a smooth, liquidised soup of carrot, pumpkin or parsnip.
This week, however, I felt like taking some time to make something with a little more care, which preserved the delicacy of the vegetables and featured a well-flavoured vegetable broth made with the trimmings. The addition of wholegrain hulled barley (rather than pasta or rice) and creamy cannellini beans makes for a particularly nutritious and filling soup. Barley has the added benefits of being rich in trace minerals and fibre, and has long been used medicinally to aid liver function and weight loss. Pearl barley can be used in its place, but is not a wholegrain, so lacking the benefits that they bring.
Although you could add any winter veg to this soup, the limited colour palette of green and white is refreshing and clean. Just looking at it makes you feel as though it is going to be good for you. If you have fennel, cauliflower, white beetroot or parsnip available, these could all be added to or replace any of the ingredients listed in the appropriate proportions. Although it is still a little early in the season, this soup is the perfect vehicle for a mix of foraged herbs and greens. So, if you are making this in a few weeks time, you could add wild chervil, wild sorrel, wild garlic, dandelion leaves, Alexanders or nettle tops to increase its somewhat virtuous, health-giving (and waistline-reducing) properties.
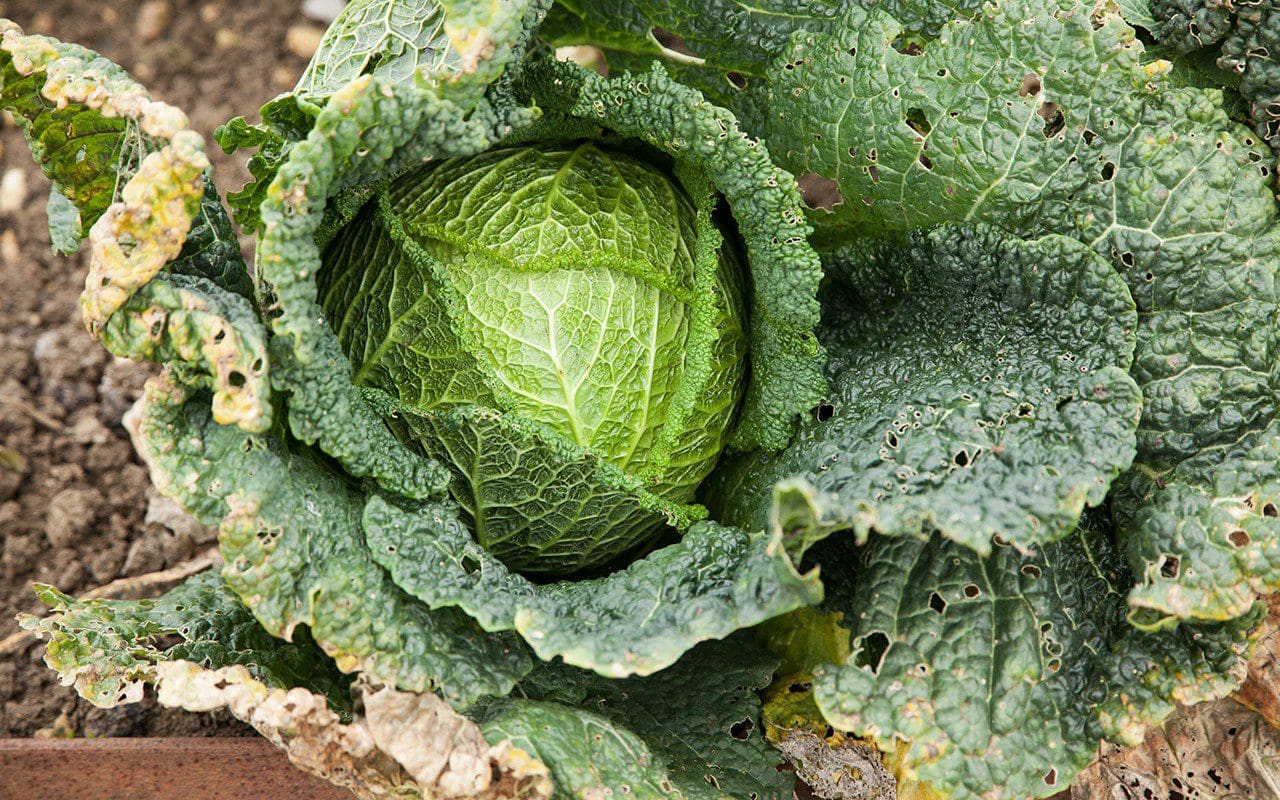 Savoy cabbage ‘Marner Grufewi’
INGREDIENTS
1 small celeriac, to yield 250g cleaned and peeled
1 medium turnip, to yield 250g cleaned and peeled
3 large leeks, to yield 250g cleaned and trimmed
1½ litres water
1 large bay leaf
A small branch of thyme
A sprig of rosemary
A piece of Parmesan rind (optional)
1 teaspoon green peppercorns
1 unwaxed lemon, juiced
3 large of cloves garlic
100g hulled barley
4 leaves of Savoy cabbage
200g cooked cannellini beans
A good bunch of flat leaf parsley
Sea salt
Olive oil
Serves 6
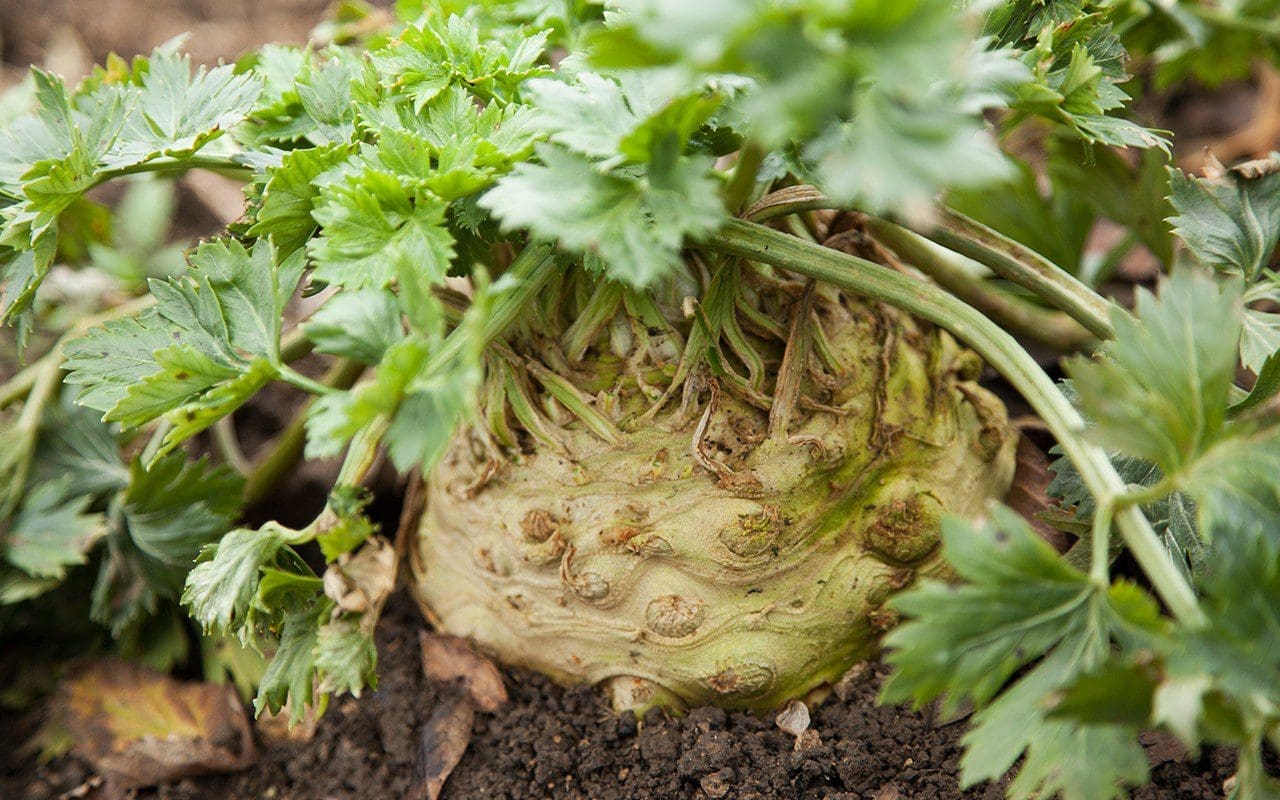 Celeriac ‘Prinz
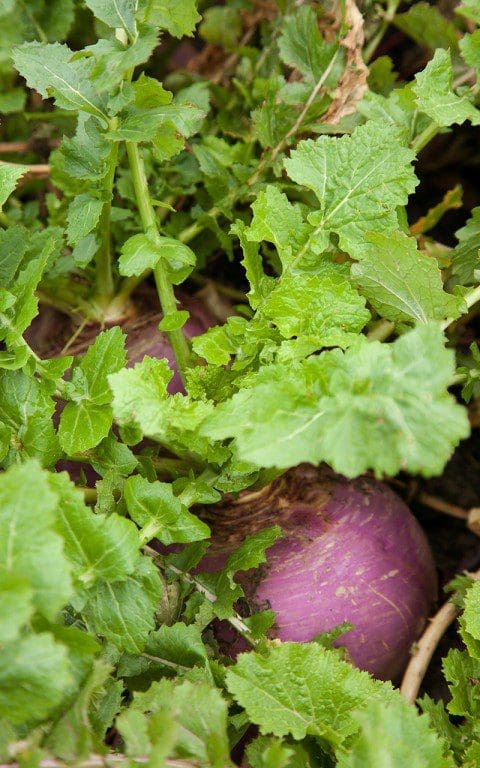 Turnip ‘Navet De Nancy A Feuille Entiere’
METHOD
Start by making the stock. Scrub the turnip and celeriac well to remove all soil. Remove the leaves, then peel. Rub the celeriac all over with one half of the juiced lemon to prevent browning. Reserve the best, young turnip leaves and the tender young central leaves of the celeriac, if it still has them. Put the peelings and the older leaves into a pan with the water.
Remove any browning leaves from the leeks, then cut off the dark green tops and wash off any soil under a cold running tap before adding them to the stock pan. Wash the cabbage leaves thoroughly. Remove the thick midribs with a sharp knife and put them into the pan. Tear the cabbage leaves into pieces about 4cm square and reserve.
Remove the leaves from the parsley and reserve. Add the stalks to the stock pan. Add the bayleaf, thyme, rosemary, Parmesan rind (if used) and half a teaspoon of the whole green peppercorns, coarsely crushed. Use a sharp knife or vegetable peeler to pare a 6cm long piece of lemon zest, being careful not to include any pith, and add this to the pan.
Put the pan on a high heat with a lid on and bring to the boil. Reduce the heat to a gentle simmer and cook for about 30 minutes. Strain the stock through a sieve, discard the vegetables, herbs and Parmesan rind and return the stock to the pan with the barley. Bring back to a gentle simmer, removing any scum that forms with a slotted spoon. Cook on a low heat with the lid on for 40 to 50 minutes until the barley is soft, but still has some bite.
While the stock and barley are cooking prepare the vegetables. Put the juice of half the lemon into a bowl with 500ml cold water. Cut the celeriac into 1cm square dice and put immediately into the acidulated water, to prevent browning. Cut the turnip into similar sized dice. Cut the white parts of the leeks on the diagonal into slices about 1cm thick. Reserve the pale green leek tops. Peel and finely chop the garlic.
Warm 2 tablespoons of olive oil in a large pan over a low heat. Add the garlic and white parts of the leeks. Stir to coat in the oil, then put the lid on the pan and allow to sweat for about 10 minutes until soft and translucent. Stir from time to time. They should not take on any colour. Drain the celeriac and add to the leeks together with the turnip. Stir. Replace the lid and continue to sweat over a very low heat for about 20 minutes until almost cooked, stirring from time to time.
Add the barley and cooking stock to the pan of vegetables together with the cannellini beans and return to a low heat. Season the soup with plenty of salt and the remaining green peppercorns, finely ground.
Slice the pale green tops of the leeks very finely. Coarsely chop the reserved celeriac leaves and parsley. When the soup has returned to a simmer add the cabbage. Cook for 2 to 3 minutes with the pan covered. Remove from the heat while the cabbage leaves are still bright green. Throw in the finely sliced leek tops, turnip and celeriac leaves and parsley and stir well. Check the seasoning and add lemon juice to brighten the flavours.
Ladle into warmed bowls and finish with a good amount of your best olive oil.

Recipe & photographs: Huw Morgan
Published 26 January 2019
I love pumpkin, I really do, but given the success we have with them here, the number in the toolshed hardly seems to decrease through the winter, no matter how often we eat them. 42 (this year’s total down on last year’s 86, when we had a much larger pumpkin patch) is a lot of pumpkin to get through and the winter squash mountain creates a kind of recipe-blindness that renders me incapable of thinking up anything more exciting than soup, roast or mash.
Of course, we do make risotto, with thyme, saffron and bay, and pastas sauced with pumpkin and ricotta, served with crisp sage leaves fried in butter. I have made pumpkin gnocchi and pumpkin lasagne. Japan offers contrasting ways of experiencing squash, from the crisp succulence of paper thin slices of tempura to earthy, peasant stews of pumpkin and aduki beans, the comfort food of panko-crumbed pumpkin croquettes or hunks poached in shiitake mushroom stock with ginger and spring onions. But I am always on the lookout for new ways to diminish the pumpkin pile.
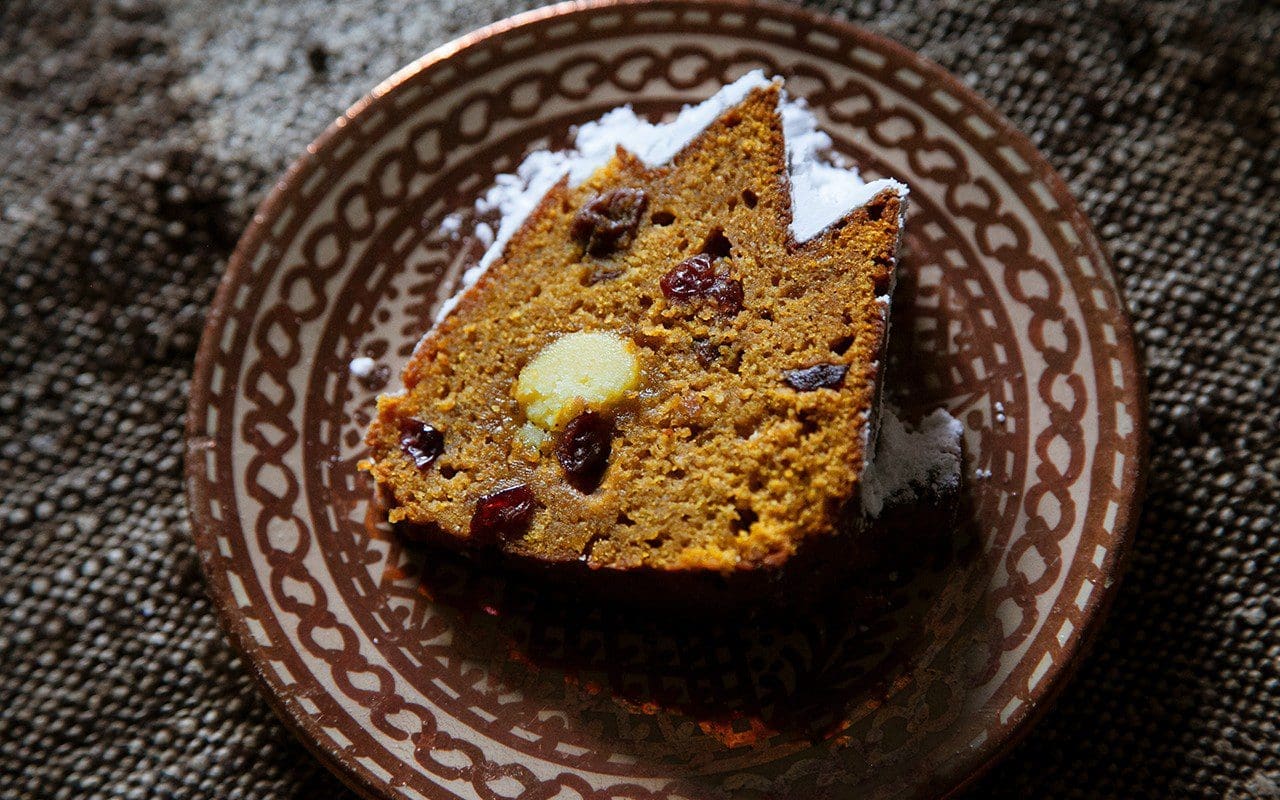
The natural sweetness of pumpkin lends itself to use in dessert dishes and, like carrot, parsnip and beetroot, can be useful if you are trying to reduce the amount of processed and refined sugar in your diet. However, the best-known sweet squash dish, pumpkin pie, has never really appealed, due in large part to those unappetising tins of pre-cooked pumpkin puree that appear in the shops before Halloween. I have also been a little wary of the Americanisation of our seasonal diet with the recent proliferation of pumpkin spice cupcakes and lattes. However, warm spices are a natural partner for pumpkin in both savoury and sweet dishes and I devised this spiced cake as a lighter option than the traditional heavy fruit cake, which can be too rich at this time of year. A hybrid of carrot cake, gingerbread and lebkuchen, it is also quick to make and to decorate at a time when every minute counts.
It is crucial to choose a dry variety of pumpkin, otherwise the water content can result in a wet, gluey cake. Having trialled many varieties over the years we now grow only kabocha (‘Cha-cha’) and onion squash (‘Uchiki Kuri’) as they have the best flavour and for us they are the best keepers. With its fudgy, chestnut-flavoured flesh the kabocha squash is the best choice here, but if you can’t get it butternut squash is an acceptable replacement. The pumpkin can be cooked ahead of time whenever you are using the oven. Combined with dates and maple syrup it creates a cake that is naturally sweet and moist, making it a very good keeper, so it’s useful to have one around at this time of year when unexpected visitors come calling. The balance of spices can be adjusted to personal taste or depending on what’s in the pantry, but for the very best flavour they should all be as fresh as possible and ground in either a mortar or a spice mill.
If you have a Bundt tin this cake looks effortlessly festive with just a heavy coat of icing sugar. If making in a simple square or round tin I would be inclined to finish it with a dressier coat of cream cheese icing sweetened with unrefined icing sugar and maple syrup, and worked into snowy peaks.
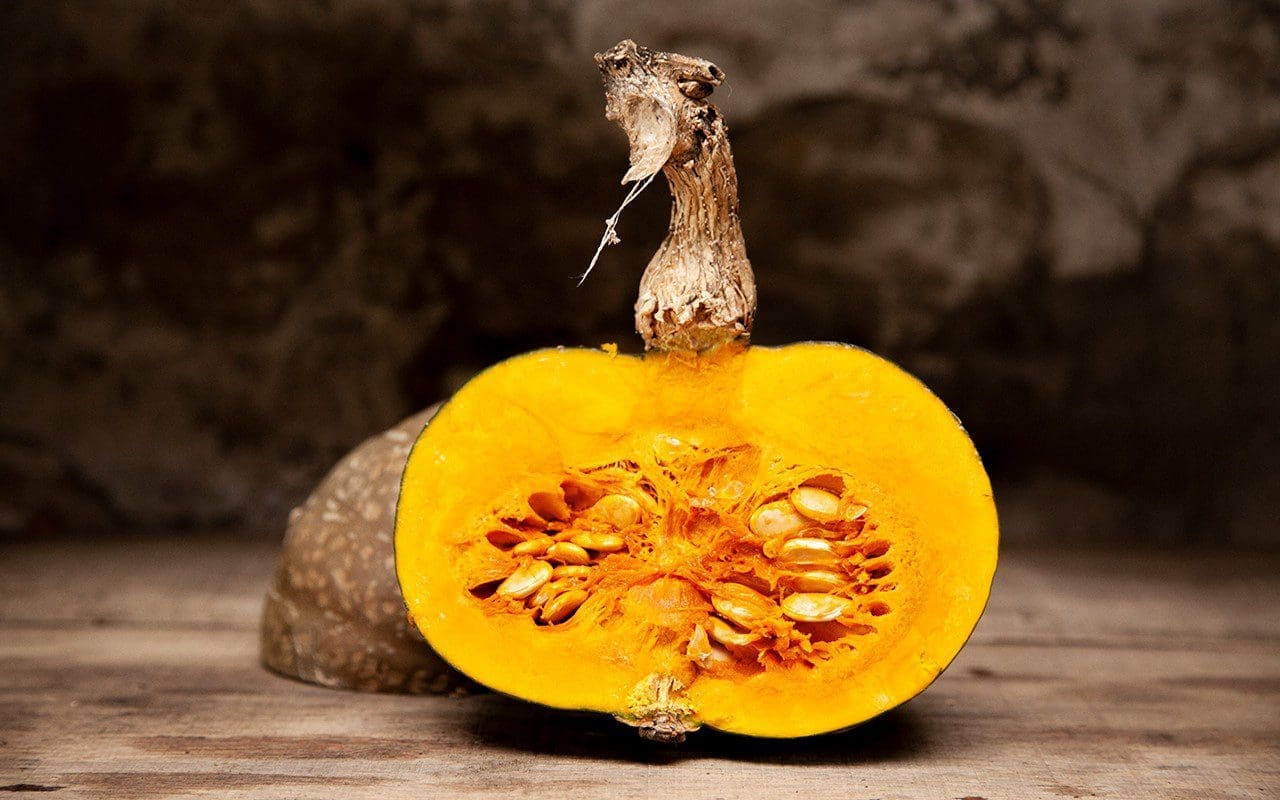 Pumpkin ‘Cha-cha’
INGREDIENTS
Cake
300g cooked pumpkin
200g soft dates (weight with stones removed)
100ml maple syrup (or honey)
250ml rapeseed, sunflower or other light oil
50ml juice and zest of one orange
3 large eggs
200g plain flour
200g ground almonds
2½ teaspoons baking powder
1 teaspoon cinnamon, freshly ground
1 teaspoon nutmeg, freshly grated
1 teaspoon ground ginger
½ teaspoon ground allspice, finely ground
½ teaspoon black pepper, finely ground
7 cloves, finely ground
A blade of mace, powdered
The seeds from five cardamom pods, finely ground
150g marzipan
25g sultanas
25g dried cranberries
3 tablespoons brandy (or strong, freshly brewed tea)
Icing
4 tbsp maple syrup
2 tablespoons brandy (or orange juice)
Icing sugar
1 10 cup/2.3 litre Bundt tin (or a 20cm square or a 22cm round cake tin each about 6cm deep)
METHOD
Set the oven to 180˚C.
If you do not have a non-stick cake tin, lightly brush the inside with oil, then sprinkle with two teaspoons of plain flour. Shake and rotate the tin to ensure all surfaces are coated and then turn upside down over the sink to dispense with any excess flour.
Chop the dates and put in a bowl with the orange juice and maple syrup. Put the 3 tablespoons of brandy (or hot tea) in another smaller bowl with the sultanas and cranberries. Leave both to stand while you cook the pumpkin.
For 300g of cooked pumpkin you will need a piece of pumpkin of approximately 400g with the skin on and seeds in. Scrape out the seeds with a tablespoon and wrap the pumpkin tightly in kitchen foil. Place on a baking sheet and cook for 45-60 minutes until soft. Remove the foil and allow to cool, then scrape the flesh from the skin with a metal spoon. Dispose of the skin or use for stock.
Put the dates and their soaking liquid into a blender and process until smooth. Add the oil and process again. Then add the eggs, orange zest and vanilla essence and process again until well mixed. Finally add the pumpkin and process again until completely smooth. Transfer to a large mixing bowl.
Sift the flour, baking powder and spices into a bowl. Stir through the ground almonds. Carefully fold the dry mixture into the wet mixture, being careful not to overmix. Remove the soaked dried fruit from the brandy (or tea), squeeze to remove excess liquid and quickly fold in. Retain the brandy, if used, for the icing.
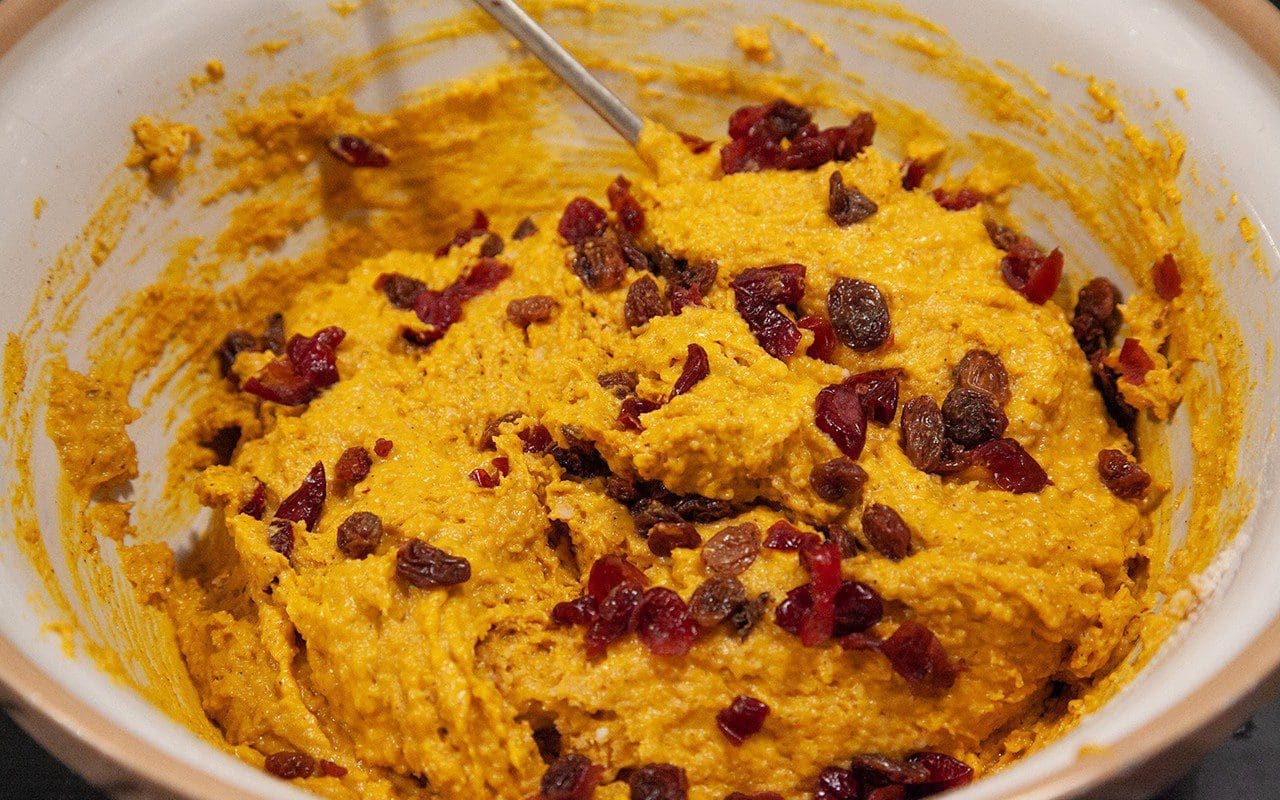
Spoon about half of the mixture into the tin. Divide the marzipan into three and roll each piece into a thick sausage about 1.5cm in diameter. Shape them to fit around the centre of the circular pan in the middle of the mixture. Spoon over the final half of the cake mix and carefully smooth the top. If baking in a square or round tin you can break the marzipan into thumbnail-sized pieces and fold gently into the mixture with the dried fruit.
Put the Bundt tin onto a baking sheet and bake for 45-55 minutes until a skewer comes out clean. Allow to cool in the tin for 15 minutes and then carefully turn out onto a cooling rack set over a piece of greaseproof paper.
To make the icing, mix together the maple syrup and brandy in a small bowl. While the cake is still warm coat the whole cake with one coat of the syrup using a pastry brush. Allow to cool completely, then paint once again with the remaining syrup and brandy mixture. Then dredge the cake heavily with well-sieved icing sugar. You may need to do this several times to achieve a suitably snowy coating.
Transfer to a large plate, decorate with seasonal berries or leaves.
Provides 16 slices.
Recipe & photographs: Huw Morgan
Published 15 December 2018
I have just returned from the South Tyrol where we are helping to heal the scars of construction and seat a new house back into a precipitous mountainside. This north-eastern province of Italy feels more Austrian than Italian and the two-hour drive from Verona plunges you deep into a valley as the Dolomites rise up around you. The spa town of Merano sits at the end of the valley and the slopes that come down to meet the town are farmed proudly and intensively by the locals. Though there was already snow on the peaks, every ledge and terrace up to the treeline was striped with fruit trees. Figs to the lower slopes and then apples, pears, apricots and cherries in immaculate cordons criss-crossing the contours. Beautifully constructed chestnut pergolas sailed over the terraces to make the fleets of vines easily pickable and, in the gulleys that became too steep, the yellowing of the chestnut trees marked their presence at the base of the oak woods above them. Our client helped to make our stay that much more memorable with a meal at a typical Tyrolean eatery on the last night. A winding, single-track road into the orchards threw us off course more than once, but we eventually found the farmhouse, sitting square and noble with the view of the town below. We were welcomed warmly by the family who have occupied this farm for more than seven hundred years and invited into a beautifully simple wood-panelled room. Shared farmhouse tables with chequered tablecloths and lace-covered pendant lights concentrated the experience and a tiled floor-to-ceiling stove sat in the corner of the room to enhance the autumnal feeling. Our host came to the table, offering speck and drawing up a chair beside us to cut and portion it carefully, as he explained the nature of the meal to come. The speck was his own and he told us how it was smoked daily over the course of three months with the prunings from his vines and apple trees. A perfectly portioned apple, rosy as in a fable, sat on the chopping board as a complement, together with schüttelbrot, a South Tyrolean crispbread flavoured with caraway seed. A jug of this year’s new wine, the first of several, helped to lubricate the feast that was to follow. Next came the knödel. Two portions, one red and made of beetroot, the other yellow which, on tasting, we discovered were made with swede, both drenched in a sauce of melted butter and grated parmesan. A meaty plate of home made blood sausage and belly pork on a bed of sauerkraut came next, with more knödel, this time flecked with chopped speck. Finally, a round of hot, charcoal-roasted chestnuts made it to the table. A large cube of butter and schnapps infused with grape skin served to counteract their mealiness and, as we peeled them together, our fingers blackened, I couldn’t help but feel that this same autumn meal must have been eaten in this room for generations.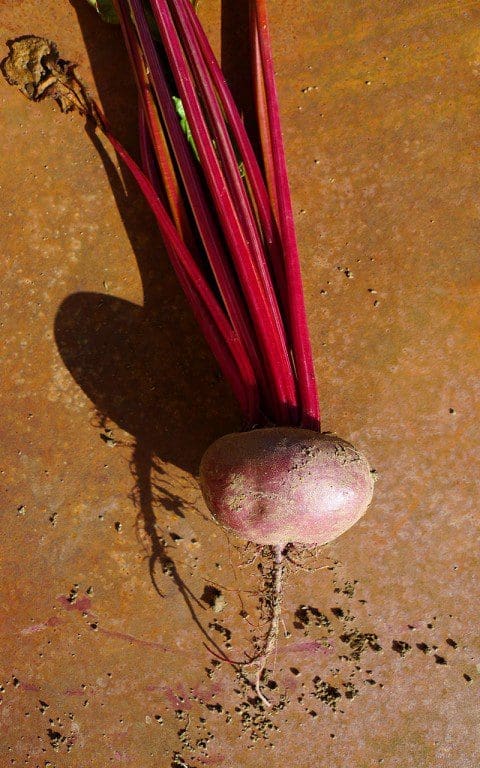 Beetroot ‘Egitto Migliorata’
INGREDIENTS
Knödel
250g beetroot
1 small onion, finely chopped, about 50g
1 clove garlic, finely chopped
1 tablespoon butter
70g coarse breadcrumbs
30g hard goat cheese or pecorino, finely grated
1 small egg
30-50g plain flour
Small bunch flat leaf parsley, about 1 tablespoon finely chopped
Small bunch dill fronds, about 1 tablespoon finely chopped
Salt and pepper
Sauce
8 tablespoons buttermilk
1 tablespoon soured cream
1 tablespoon freshly grated or creamed horseradish
1 tablespoon olive oil
1 tablespoon lemon juice
Salt
Finely grated hard goat cheese, finely chopped parsley and dill fronds to serve.Serves 2
METHOD It is worth saying that to get the best result you must use breadcrumbs made from the best bread you can get, preferably sourdough, and that the breadcrumbs should be quite coarse. It is also said that the staler the breadcrumbs, the better the knödel. If you can’t get hold of buttermilk use just soured cream or crème fraiche. Heat the oven to 180°C. Wrap the beetroot tightly in foil and bake for 30 minutes to an hour depending on size, until they are soft. Unwrap and leave to cool. Rub the skins off under cold running water. Grate coarsely and put into a mixing bowl. Melt the butter in a small lidded saucepan over a moderate heat. Put in the onion and garlic, stir to coat, then put the lid on the pan and reduce the heat to low. Sweat the onion for about five minutes until it is soft and translucent, but not coloured, stirring from time to time. Remove from the heat, allow to cool, and add to the beetroot. Add all of the remaining dumpling ingredients, apart from the flour, to the beetroot and onion. Stir until all is well combined. Season with salt and pepper. Add the flour, starting with 30g. The dough should remain soft, but start to come together in the bowl. If the mixture seems too wet add flour a little at a time until the right consistency is reached. Do not be tempted to add more flour or the dumplings will be gluey. Leave the mixture to sit for 15 to 20 minutes while you bring a deep pan of water to the boil and make the sauce, by putting all of the sauce ingredients into a bowl and whisking together until emulsified. When the water comes to the boil, turn down to a gentle simmer. Using a knife or spoon divide the dumpling mixture into quarters. Wet your hands with cold water and then take a quarter of the mixture and quickly shape it into a ball. Repeat with the remaining dumpling mixture. Gently lower the dumplings into the hot water, being careful not to burn your fingers. The dumplings will sink. Using a slotted or perforated spoon stir them very gently from time to time to stop them sticking to the bottom of the pan. Cook for 8 to 10 minutes until they float, when they are ready. Carefully remove the dumplings from the pan with a slotted spoon and allow as much water as possible to drain away. Spoon the sauce onto two plates and place two of the dumplings on each plate. Scatter the herbs and cheese over and serve immediately while still hot. Words: Dan Pearson / Recipe and photographs: Huw Morgan Published 3 November 2018I’ve been clearing out the freezer and pantry over the past few weekends to make room for the end of season fruit harvest. Over the course of the winter we get through nearly all of the fruit we freeze – rhubarb, gooseberries, blackcurrants, raspberries, plums, blackberries and apples – but I can guarantee that, each autumn, in the bottom drawer of the freezer there will be a container full of redcurrants, untouched since they were picked.
I really like redcurrants, when in season. Freshly picked off the bush and used to garnish anything from morning granola to a festive summer pavlova, their carmine colouring and jewel-like clarity draw you to them like a magpie. However, I have always found that they produce far too much fruit for their usefulness when fresh, and that their uses when preserved are limited. But, we have a very healthy redcurrant bush and every year it produces as much fruit as before. So, in the past couple of years, I have been trying to find other ways to use the glut.
Redcurrants are very high in pectin but, when cooked, are not strongly flavoured and retain their vibrant colour. So, as well as their ubiquitous use in redcurrant jelly they are very useful in making preserves with fruits that are low in pectin, particularly red ones, such as raspberries, strawberries and rhubarb, as they brighten the colour of the preserve. Since they are high in acid, they also provide a good balance to fruits that can otherwise be too sweet on their own in a jam. Last year I made the most of a good (but still small) harvest of wild strawberries by cooking them briefly in a heavy redcurrant syrup into a jammy compote. The recalcitrant redcurrant acted as a carrier for the delicate, floral flavour of the strawberry, enabling you to fully experience a taste that is usually quite ephemeral. This year I have used the leftover redcurrants with the last of this year’s autumn fruiting raspberries which, after producing for weeks now, are finally running out of steam, and so need stretching out.
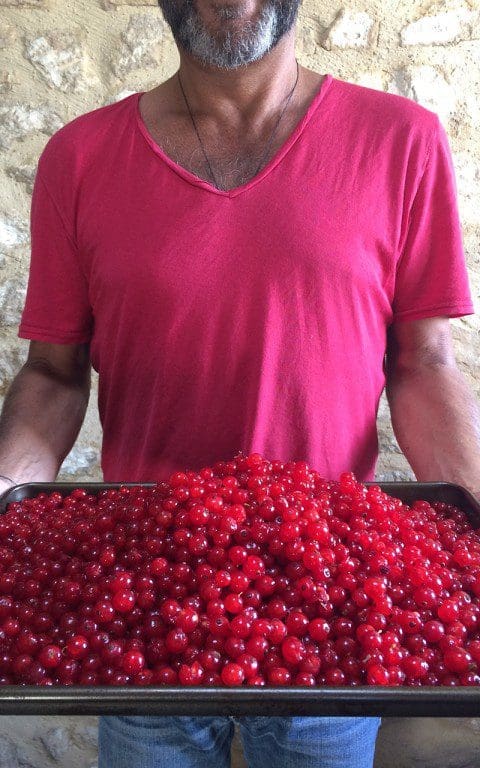 Just a small proportion of our annual redcurrant harvest
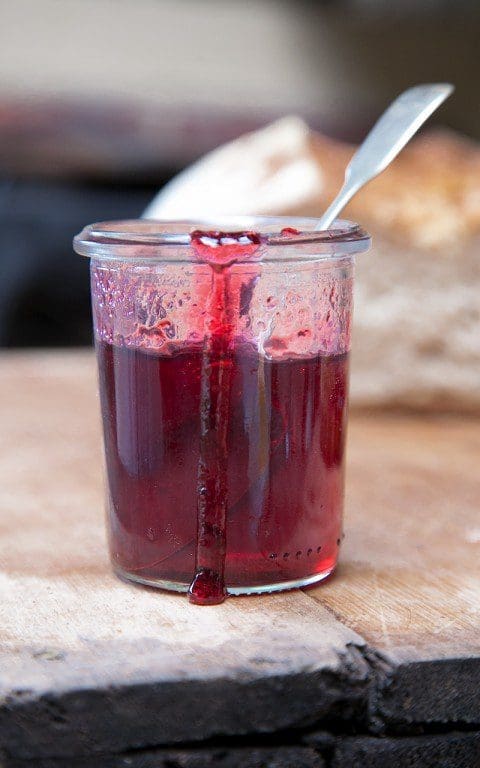
I have always loved raspberry jam. As a child I much preferred it to strawberry, which I found sickly and artificial tasting. However, I have always found the seeds a bit irksome. If it’s possible, redcurrants are even seedier than raspberries, and so a jam made of the two would have proven particularly dentally challenging. And there is something about a pure, clear fruit jelly that I find almost primally enchanting. The distillation of fruit into the essence of that fruit. I generally use less sugar than is used in traditional recipes, where the ratio of fruit to sugar is usually 1 to 1. This is because I prefer a runnier preserve, and also find the reduced sweetness more palatable, and less overwhelming to the flavour of the fruit.
Raspberries and roses are good bedfellows, so when making this batch of jam, I stewed some rose geranium leaves (Pelargonium ‘Attar of Roses’ has the best flavour) in it just before potting up. The rose flavour is taken up by the fruit, but the sharpness of the redcurrants prevents it from being cloying and elevates this preserve into something which is as good on vanilla ice-cream, stirred through a fool or used as the base of a vodka cocktail as it is smeared on a piece of toast or a freshly baked scone. It feels good to eke out these last moments of summer.
Makes 3-4 225g jars
INGREDIENTS
500g raspberries
500g redcurrants
Granulated sugar
4 large rose geranium leaves or 1 teaspoon rose essence
400ml water
METHOD
Put the fruit and water into a preserving pan. Simmer gently for 30 to 40 minutes, until the fruit has completely collapsed and given up all of its juice. Break it up more with a wooden spoon, then pour into a jelly bag or colander lined with muslin and allow the juice to strain into a large bowl for at least 6 hours, preferably overnight. Do not squeeze or press the pulp or the bag or the jelly will be cloudy.
Measure the juice, return it to the cleaned pan and bring slowly to the boil. Measure 450g of sugar for every 600ml of juice and add this to the juice once it is boiling. Stir well to dissolve the sugar, and carefully scrape in any sugar crystals from the side of the pan. Bring back to the boil and then boil hard for 8 to 10 minutes without stirring until the desired setting point is reached.
Remove from the heat, stir to disperse any scum on the surface and then drop the rose geranium leaves – or stir the rose essence – into the hot jam. Allow to settle for 5 minutes, then remove the geranium leaves, stir well and then pot into warm, sterilised jars. Seal immediately and allow to cool before labelling and storing in a cool, dark place. This will keep unopened for up to a year. Once opened keep in the fridge.
Recipe & Photography: Huw Morgan
Published 22 September 2018
Whether it’s fish and chips after a day on the beach, calamares fritos at a Spanish bar or Indian pakora with an ice-cold Tiger beer at a festival, deep fried food is something that always tastes better outdoors and when the weather is hot.
In Greece recently I was staying with friends who, in late June, were already struggling to keep up with their courgette glut, so for lunch one day we decided to make kolokithokeftedes, the traditional Greek courgette fritters. Courgettes are coarsely grated, salted and then squeezed to remove as much water as possible, before being mixed with onion, garlic, feta, egg, breadcrumbs, dill and mint. Traditionally shaped into patties and shallow fried, they can be a little heavy, so my host decided to put loose spoonfuls of the mixture into deep boiling oil so that the shards of onion and courgette that made their way free of the mass became crispy and a deep, caramelised brown. They came out looking like tiny deep-fried, soft-shelled crabs. Served with a bowl of cold, garlicky tzatziki, six of us devoured about forty of them in quick succession.
In Japan, of course, it is tempura that fulfils this role. It is no surprise to learn that the technique of deep frying batter-coated fish and vegetables was brought to Nagasaki by the Portugese in the 16th century. Peixinhos da horta is believed to be the original dish that inspired a way of cooking that we now primarily associate with Japanese cuisine. These ‘little garden fishes’ are green string beans, coated in batter and deep fried, and were eaten in Portugal during Lent, when meat was off the menu. The Japanese took this idea and ran with it, and now tempura describes the method of cooking any fish, meat or vegetable in this way.
One of our favourite places to eat when in London is Koya Bar, a tiny Japanese restaurant in Soho, where fast-cooked food is prepared in front of you behind a long seating counter. While the queue to get a table can sometimes seem intimidating, the turnaround is so fast that waiting in line for 30 minutes is a small price to pay for food this delicious. It is the most authentic Japanese eating experience we have had outside of Japan. Although they specialise in udon noodles, there is always a blackboard of seasonal specials on offer and, of these, it is the kakiage tempura that we order without fail whenever we go. Kakiage tempura differs from regular tempura in that it is a mixture of sliced vegetables (sometimes combined with fish) in batter rather than the individual pieces of fish, crustacean and vegetables that we are more familiar with. Seasonality is key and, at Koya, they can be made of anything from wild carrot with carrot tops to broad beans and peas or squid and chrysanthemum.
We are now in the midst of our courgette glut and looking for new ways to use them as often as possible, while our sweetcorn is challenging us to eat it quicker than it becomes starchy. I have grown ‘Double Red’ this year, a new variety with seed from The Real Seed Catalogue, who sell some of the most interesting vegetable varieties in the country. The plants are highly decorative with stems and husks stained a deep purple-red and cobs of dark burgundy, almost black, kernels, which are almost too beautiful to eat. They have made a good partner to our ornamental red and tan amaranth this year. We have also just lifted all of our onions and so the combination of vegetables here reflects what is best to eat at this very moment. I could also have used green beans, carrots and beetroot or, later in the season, pumpkin, sweet potato, mushrooms, celeriac, kale or salsify. You can also add any herbs that you like to the mix. Here I have used the traditional purple shiso (Perilla frutescens var. crispa), which is used to impart the pink colour to umeboshi plums. It has a flavour somewhere between aniseed and basil. Dipped into batter and fried at the end of cooking the leaves also make a beautiful garnish.
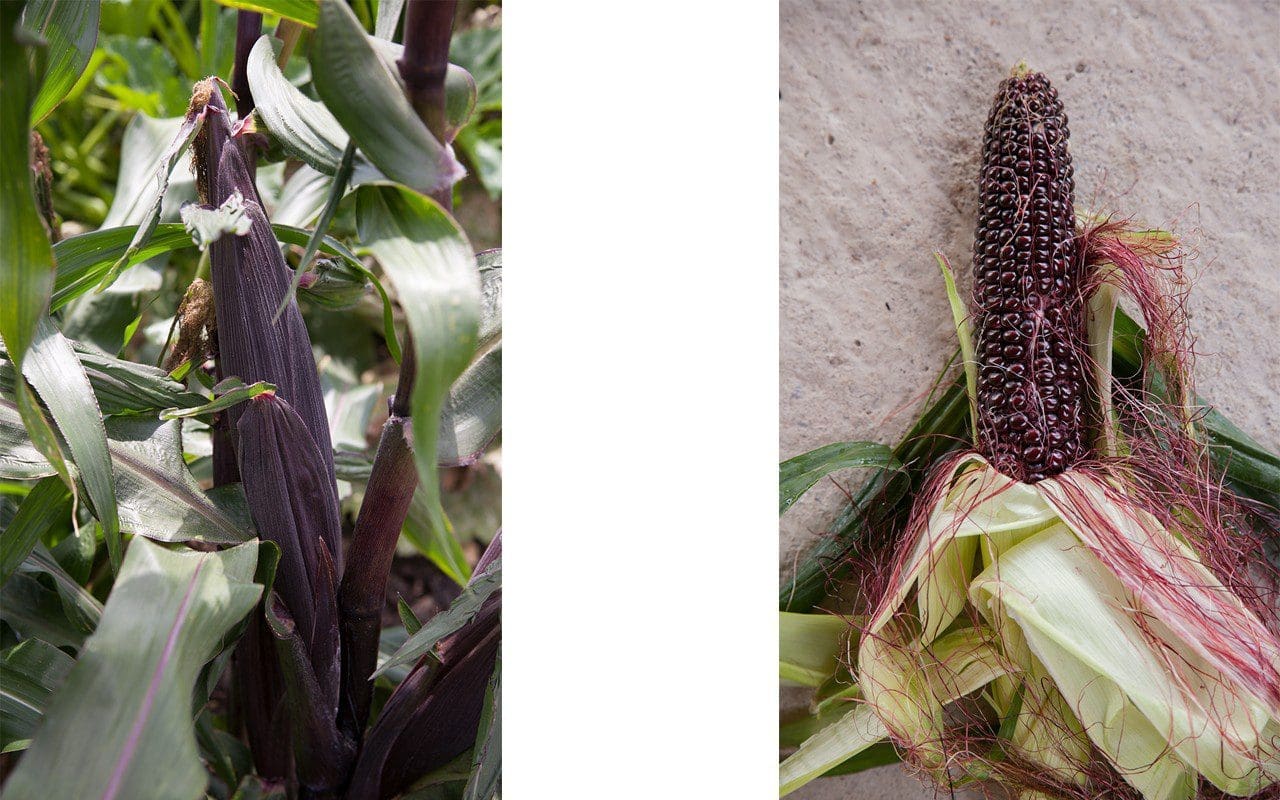
Sweetcorn ‘Double Red’
Although there is a plethora of recipes for tempura batter using either whole eggs or whisked egg whites, I have found that the simplest batter of just flour and water makes the crispest coating. However, there are a few golden rules to ensure that your tempura turns out as well as possible. Firstly, all of the vegetables must be cut to a size where they will cook in the same time. It is traditional for the vegetables to be coarsely julienned or grated. Secondly, get your oil hot enough to cook before you make the batter. It should be between 170°and 180°C. Thirdly, the batter should be as cold as possible, and must not be over-mixed or whisked which stretches the gluten and makes it tough and chewy. Chopsticks are used traditionally and it should have lumps of flour in it. Fourthly, before placing the batter-coated vegetables in the oil, allow as much batter to drain from them as possible. This ensures the lightest coating and avoids a doughy centre. Fifthly, only cook a couple of spoonfuls at a time, so as not to crowd the pan and lower the temperature of the oil. Sixthly, use a small wire strainer or slotted spoon to remove any overcooked bits of batter from the oil between batches to avoid them flavouring the oil and attaching to the next lot of fritters. And finally, do not be tempted to ‘worry’ the fritters in the oil, be patient and leave them be until they are ready to turn, or the batter will not have cooked and they will fall apart.
It is customary to serve tempura with a simple dipping sauce of dashi, soy sauce and mirin, but the lemon and miso sauce here, adapted from a recipe by Elizabeth Andoh from her excellent book of Japanese home cooking, Kansha, complements the richness of the fried fritters perfectly.
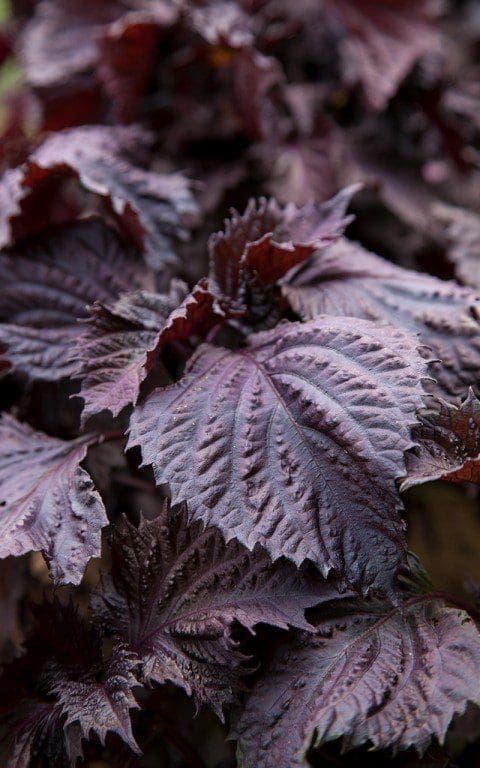 Purple shiso
INGREDIENTS
350g courgette, coarsely julienned or grated
2 large sweetcorn cobs, shucked
1 medium red onion, about 175g
8 large and 6 small shiso leaves
Sea salt
Sunflower or rapeseed oil
Batter
175ml iced sparkling water
65g self raising flour
65g cornflour, plus 1 tablespoon more
A few ice cubes, 4 to 6
Dipping Sauce
3 tablespoons white miso
3 tablespoons lemon juice
Finely grated zest of half a lemon
1 tablespoon maple syrup or lightly flavoured honey
1 tablespoon mirin or sake
Makes about 12, enough for 6 people
METHOD
Put the courgette into a sieve and sprinkle lightly with sea salt. Use your hands to mix the salt in well and then leave to drain over a bowl for 20 to 30 minutes.
To make the dipping sauce, put the miso and lemon juice in a small bowl and stir well. Add the maple syrup or honey and mirin and stir well again. Add the lemon zest and stir again. Transfer to a serving bowl.
Using a very sharp knife shave the corn kernels from the cobs over a bowl. Slice the onion in half down the centre and then cut each half across the grain into crescents the thickness of a coin. Separate the onion crescents and add to the bowl of corn.
Take small handfuls of the salted courgette and squeeze hard to remove as much water as possible. Add to the bowl of corn and onion. Cut the eight large perilla leaves into fine ribbons and add to the bowl. Using your hands, mix all of the vegetables and herbs together until the courgette strands are separated and all is well combined. Sprinkle over the one tablespoon of cornflour and toss with your hands again until everything is lightly coated. This helps the vegetables to stick together when fried.
Pour the oil into a medium-sized (25cm), deep-sided frying pan to a depth of about 2cm. Put over a medium heat until the surface begins to shimmer. Turn the heat down a little and make the batter. Put most of the iced water and some ice cubes into a bowl. Sift the two flours onto the water and then quickly mix together. The batter should be the consistency of single cream and just coat your finger. If it is too thick add more iced water. Turn the heat up under the oil and, when just smoking, test the temperature with a few drops of batter. It should sink and then immediately rise to the surface and puff up.
Pour two thirds of the batter over the vegetables and mix quickly until everything is lightly coated. Add a little more if you think it needs it. However, you may not need to use it all. The vegetables should not be swimming in batter. Using a tablespoon and a fork, take a scant tablespoonful of the vegetable mixture and hold it above the bowl, allowing most of the batter to run off. Then slowly place the vegetables into the hot oil, using the fork to quickly spread them out so that you have a thin fritter about 8cm in diameter. Now wait 30 seconds for the underside of the fritter to cook, before using two forks – or chopsticks – to carefully turn the fritter over. Cook for another 30 seconds until the other side is cooked and lightly coloured. In a medium-sized pan you should aim to cook no more than two fritters at a time, always allowing the oil to return to temperature before frying the next batch.
Remove the fritters from the oil with chopsticks or a slotted spoon, and hold them above the pan to allow as much oil to drain from them as possible, before transferring to a hot plate lined with absorbent paper. You can now either choose to serve them as they come from the pan or put the plate into an oven heated to 100°C to keep warm, while you cook the rest of the mixture.
When all of the mixture is cooked transfer the fritters to a clean plate. Quickly dip the remaining shiso leaves in the batter and fry until crisp. A matter of seconds. Remove and drain quickly on absorbent paper, then use to decorate the plate of fritters. Serve immediately with the dipping sauce.
Recipe & photographs: Huw Morgan
Published 11 August 2018
When I was a child we spent every summer holiday in Wales, staying with my maternal grandparents who lived near Gowerton, the gateway to the Gower peninsula. When the weather was good we would head straight to Horton beach after breakfast, with crab paste and ham sandwiches wrapped in foil, hard-boiled eggs, bags of crisps and a tin of Nana’s homemade Welsh Cakes and pre-buttered slices of Bara Brith to see us through the day.
My grandfather was a Baptist minister, so on Sundays the day started differently. Nana was up even earlier than usual, housecoat on and getting lunch (or dinner as we called it in those days) prepared before we all headed off to chapel. All of the vegetables came from the back garden, which was given over entirely to food; potatoes, runner beans, peas, broad beans, lettuces, onions, beetroot, carrots, parsnips, swedes, cabbages and, of course, leeks. A tiny greenhouse was full to bursting with tomatoes and cucumbers. At the front of the house, the long bed running down one side of the path was filled with Dadcu’s dahlias, tied to bamboo canes in regimented rows, a cacophony of colour in every shape available, like sweeties. On the other side of the path an assortment of exotics planted into the lawn, including a phormium, a bamboo and a pampas grass, provided me and my brother with a playtime jungle.
The chapel was just on the other side of the street so, as soon as the service was over, Nana would head back to the manse to get dinner on the table for Dadcu’s return. Although a full roast dinner was not unusual on these sweltering summer Sundays, the meal I remember most clearly, and which was my favourite, was cold boiled ham with minted new potatoes and broad beans in parsley sauce. I loved the combination of the cold, salty meat, buttery potatoes and creamy beans and would ensure I got a little of each on every forkful.
Thinking back to this garden now I realise that, although Dad also grew veg in our North London garden, it was Dadcu’s kitchen garden where I first really understood the connection between plant and plate. My brother and I would be sent out to help dig potatoes, getting a rush of excitement as the first pearly tubers were heaved from the rich, dark soil, scrabbling to grab them and put them in the bucket. Pulling carrots straight from the ground I would think of Peter Rabbit, although I was sure that, unlike Mr. McGregor, the Revd. Jones did not have a gun. And often I would sit on the back step with Nana and Mum easing broad beans from their pods, marvelling at their cushioned, fleecy protection and enjoying the plonking noise they made as they fell into a plastic bowl at our feet. I never questioned that what we ate at mealtimes had been grown just yards from the dining table, nor that there was work required to get it there. I think that even then those vegetables tasted better to me because they were so fresh and I had helped get them to table.
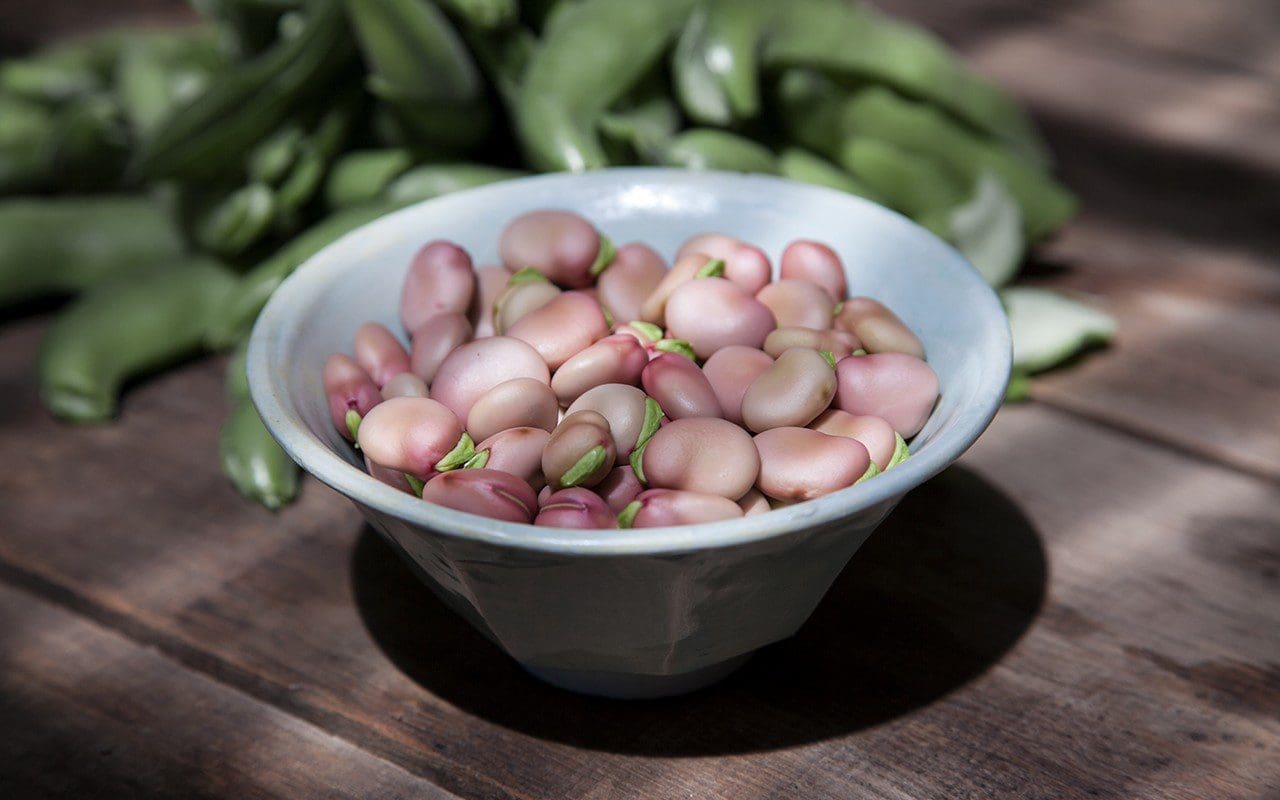 Broad Bean ‘Karmazyn’
Although I can’t profess to be as good a vegetable gardener as my grandfather, now that we have a kitchen garden of our own, I find it hard to buy anything other than lemons, melons or peaches from the local greengrocer in the summer. The feeling of being able to assemble a meal entirely from vegetables you have grown, harvested and prepared yourself has no equal. People say that vegetable gardening is hard work, and I agree, but I don’t understand why this is seen as a negative. The time, care and nurturing that goes into producing your own food gives you a connection to it that is as nourishing as the food itself. When you understand the hard work involved in growing, tending and harvesting you stop taking food for granted and get some perspective on how much food should really cost.
So, to get back to the broad beans. We have grown two varieties this year. An unnamed heritage variety with very decorative, dark pink flowers and green beans from a late autumn sowing, and a variety named ‘Karmazyn’, with white flowers and beautiful rose pink beans, which were sown in March. Surprisingly, the later sown ‘Karmazyn’ have been the quicker to mature. Earlier in the season, as it became apparent that the plants were starting to overtake their autumn-sown neighbours, I was concerned that we were going to have a major glut when both varieties came together, but it now appears we will have a good succession from pink to the green. Close by the artichokes are producing almost faster than we can eat them. ‘Bere’, the variety we grow, is spiny with little meat at the base of the leaves, but the hearts are a good size, sweet and strongly flavoured.
Due to their synchronised production in the garden it is no surprise that broad beans and artichokes are commonly cooked together, with a variety of recipes to be found in French, Italian, Greek, Turkish and other Middle Eastern cuisines. What is common to many of them is the generous use of lemon and fresh herbs. This recipe is very loosely based on an Elizabeth David recipe for Broad Beans with Egg & Lemon from Summer Cooking, which would appear to be of Greek origin. Here the boiled vegetables are dressed with a light, creamy, herb-flecked sauce. A more refined and delicate version of my dear Nana’s beans, although just as good with a couple of slices of cold, boiled ham.
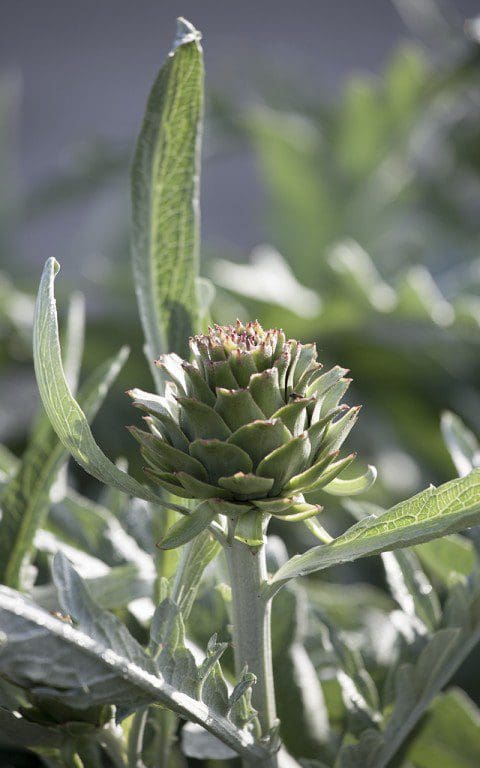 Artichoke ‘Bere’
INGREDIENTS
Artichokes, 4 small per person
Broad beans, I kg in their pods to yield about 250g
Zest and juice of 1 lemon (reserve 1 tablespoon of juice for the sauce)
Sauce
Butter, 25g
Garlic, a small clove, minced
Cornflour, 1 teaspoon
The yolk of a small egg, beaten
Single cream, 4 tablespoons
Tarragon or white wine vinegar, 1 teaspoon
Lemon juice, 1 tablespoon
Cooking water from the beans, about 200 ml
Fennel, 1 tablespoon finely chopped
Dill, 1 tablespoon finely chopped
Tarragon, 1 tablespoon finely chopped
Salt
Serves 4
METHOD
Bring a large pan of water to the boil. Cook the artichokes for 15-20 minutes until the point of a sharp knife can be easily inserted into the base. Drain the artichokes, run under a cold tap for a moment and then allow to drain and cool completely.
Put the lemon juice in a small bowl. Cut the stalks from the artichokes and gently remove and discard all of the leaves until you reach the choke. Carefully scrape out the choke with the edge of a teaspoon. Tidy the hearts with a sharp knife removing any tough green bits. Rinse in a bowl of water to remove any clinging choke hairs. Dip each heart into the lemon juice as you go and put to one side in a bowl.
Bring a fresh pan of water to the boil. Throw in the beans and cook until just done. Freshly picked ones take only 2 or 3 minutes, older beans will take a little longer and may need to be slipped from their tough outer skins after cooling. When cooked remove 200ml of the cooking water and keep to one side. Then drain the beans and immediately refresh in cold water. Drain and reserve.
To make the sauce, in a pan large enough to take the artichokes and beans, melt the knob of butter until foaming. Take off the heat, put in the garlic and swirl the pan around to cook it lightly and flavour the butter. Still off the heat put in the cornflour and stir well. Add the cream and stir again. Add the egg yolk and stir once more. Then add about 150ml of the reserved cooking water, the vinegar and lemon juice. Season with salt. Put the pan back on a low heat and stir continuously until the sauce starts to thicken. Taste to ensure the cornflour is well cooked and adjust the seasoning. The sauce should be glossy and the consistency of single cream. If it is too thick loosen with some of the reserved cooking water. Put in the chopped herbs and lemon zest and stir through. Put the artichokes and broad beans into the pan and stir gently but thoroughly to ensure that all of the vegetables are well coated with the sauce.
Transfer to a serving dish, and strew some more herbs and lemon zest over the top. Serve warm or at room temperature.
Good enough to eat simply on its own or on toast, this is also a perfect side dish for poached salmon or trout, and cold roast chicken.
You can use any combination of soft green herbs that you have available. Chervil is particularly good, as are parsley and mint. For a more substantial side dish a couple of handfuls of the tiniest, boiled new potatoes make a fine addition.
Recipe & photographs: Huw Morgan
Published 23 June 2018
